
Bria Mobile User Guide
iOS - Version 6.2.1

About this document
Bria Mobile User Guide - iOS - Version 6.2.1
Publication date: 2020-04-23
Copyright ©2020 CounterPath Corporation. All rights reserved.
This document contains information proprietary to CounterPath Corporation, and shall not be used for engineering, design,
procurement, or manufacture, in whole or in part, without the consent of CounterPath Corporation. The content of this publication is
intended to demonstrate typical uses and capabilities of Bria Mobile: VoIP Softphone from CounterPath Corporation. Users of this
material must determine for themselves whether the information contained herein applies to a particular IP-based networking
system. CounterPath Corporation makes no warranty regarding the content of this document, including—but not limited to—implied
warranties of fitness for any particular purpose. In no case will CounterPath Corporation, its employees, officers or directors be
liable for any incidental, indirect or otherwise consequential damage or loss that may result after the use of this publication.
CounterPath
®
, Bria
®
, X-Lite
®
, and the
®
logo are registered trademarks of CounterPath Corporation.
Stretto
™
and the Stretto Platform
™
are trademarks of CounterPath Corporation.
Android and Google Play are trademarks of Google Inc. Eclipse is a trademark of Eclipse Foundation, Inc.
CentOS is a trademark of Red Hat, Inc.
Intel, the Intel logo, Intel Core and Core Inside are trademarks of Intel Corporation in the U.S. and/or other countries.
iOS is a trademark or registered trademark of Cisco in the U.S. and other countries and is used under license.
iPhone, iPad, iPod, Mac, mac OS, App Store, Objective–C, and Xcode are trademarks of Apple Inc., registered in the U.S. and other
countries.
Linux
®
is the registered trademark of Linus Torvalds in the U.S. and other countries.
Microsoft, Active Directory, Office, Excel, Outlook, and Windows are either registered trademarks or trademarks of Microsoft
Corporation in the United States and/or other countries.
Oracle and Java are registered trademarks of Oracle and/or its affiliates.
All other products and services are the registered trademarks of their respective holders.
CounterPath Corporation
Suite 300, One BentallCentre
505 Burrard Street, Box 95
Vancouver, BC V7X 1M3
Canada


Contents
Introduction to Bria Mobile: VoIP Softphone 1
Bria Mobile Features 1
Requirements 3
Getting started 5
Launching Bria Mobile 5
Purchasing a subscription 5
Exiting Bria Mobile 6
Setting up accounts 6
SIP account requirements 8
To set up a SIP account 8
To delete an account 13
Configuring mobile dial plans 14
Using Bria Mobile's interface 17
Account status and network quality 20
Push notifications 23
Calls 31
Placing a voice or video call 31
Placing a second call 48
Dealing with an auto attendant (Pause dialing) 60
Handling an incoming call 67
Handling a video call 77
Transferring a call 82
Encrypting a call 100
Recording a call 101
Call audio 112
Creating a conference call 115
Merging calls 115
Splitting calls 116
Accessing voice mail 118
Messaging 121
Instant messages 121
Chat rooms 144
Working with messages 188

Presence 208
Changing your status 208
File sharing 214
Sending files 214
Receiving files 224
Canceling a file transfer 226
Contacts 228
Managing contacts 228
Buddies 240
Contact Favorites 253
Fields that must be updated in iOS 258
History 259
Viewing call information 259
Deleting calls from History 261
Settings 265
Accounts 265
Preferences 283
Advanced settings 289
Subscription 295
Share 297
Troubleshooting 299
Using Bria Mobile diagnostics 299
More information and technical support 300
Bria Push Service 301
Requirements for push notifications 306
Troubleshooting the Bria Push Service 308
Native integration 313
Native Integration is on 313
Native integration is off 314
Handling calls with Native Integration off 315
On the lockscreen 319
CarPlay and Bluetooth 323
Using CarPlay 323

Introduction to Bria Mobile: VoIP
Softphone
This user guide describes how to use and configure Bria Mobile: VoIP Softphone. Bria
Mobile is a softphone for the Apple iPhone, iPad, and iPod touch. With Bria Mobile, you
can use a Wi-Fi Internet connection on an iPhone, iPad, or an iPod touch to make and
receive calls without using a mobile data plan. You can also use a mobile connection for
calls when you are not in a Wi-Fi zone with an iPhone or iPad but not with an iPod
touch.
Bria Mobile is a subscription based app that you can purchase on a monthly basis.
Bria Mobile does not come with a SIP or XMPP service. You must have a subscription to
a SIP/VoIP service provider in order to make calls. Your SIP service provider must
support SIP SIMPLE or you must have an XMPP account to use presence and
messaging.
This guide describes how to use and configure Bria Mobile.
Bria Mobile Features
Standard telephone features
Bria Mobile softphones have all standard enterprise telephone features, including:
l Multiple account support for accounts on any SIP-compliant server
l Contact List
l Favorites List
l Call display and voice mail indicator
l Speakerphone, mute, and hold
l Call history integrated with the native iOS call history
CounterPath Corporation 1
Bria Mobile User Guide Introduction to Bria Mobile: VoIP Softphone
l Audio call record and ability to share recordings
l Ring tones and contact avatars
l Dial plan support
l Multiple call support
l Swap between active calls
l Three-way audio conference: Merge and split calls
l Transfer calls
l Redial
l Do not disturb
l Audio codecs: G.711ALaw, G.711uLaw, G.722, G.729, GSM, Opus, SILK™-NB,
SILK-WB, SILK-SWB, Speex-NB, and Speex-WB
l DTMF support: The ability to enter numbers to use an auto attendant
Advanced features
Bria Mobile also supports the following features and functions:
l Video calls with 720p video support
l Video codecs: H.264 and VP8
l Presence and messaging using the XMPP protocol or the SIP SIMPLE protocol
l NAT traversal: STUN, TURN, ICE, and rPort
l Secure call signaling: TLS
l Audio encryption: SRTP
l Quality of Service: QoS
l DNS SRV record lookups
l Call quality statistics
l Application diagnostic: Logging and log files uploading
l Siri support for calls
l Siri support for messages
l Support for the following languages in addition to English: Chinese (simplified),
French, German, Japanese, Korean, Portuguese (Brazil), Russian, and Spanish
CounterPath Corporation 2
Bria Mobile User Guide Introduction to Bria Mobile: VoIP Softphone
Requirements
Service requirements
l A VoIP service subscription with a local service provider or ISP in order to make
audio or video calls with Bria Mobile. Please contact your local service provider to
subscribe.
l An XMPP service subscription for presence and messaging.
System requirements
Component Requirement
Operating system iOS 12 or higher
Supported Devices iPhone: 5s, 6, 6 Plus, 6s, SE, 7, 7 Plus, 8, 8 Plus, X, XS, XS Max, XR
iPod: Touch (6
th
generation or higher)
iPad: Air, Air 2, mini 2, mini 3, mini 4, Pro 9.7, Pro 10.5, Pro 12.9
Supported accessories
Bria Mobile supports the following accessories:
l Headset with microphone (including Bluetooth™): Bria Mobile uses the earpiece
and microphone on the headset.
l Headphones (no microphone): Bria Mobile uses the earpiece on the headphone
and the built-in microphone on the device.
Note: Important VoIP over Mobile and Cellular data notice: Some mobile network operators
may prohibit or restrict the use of VoIP functionality over their network and may also impose
additional fees or other charges in connection with VoIP use. CounterPath will not be held liable
for any charges, fees or liability imposed by your carrier for use of VoIP over mobile and cellular
data.
Warning: Emergency calls: CounterPath's Bria Mobile products provide handling designed to
redirect emergency calls to the Native Cellular Dialer when possible on a best reasonable
commercial efforts basis, however this functionality is also dependent on the operating system
of the mobile phone which is outside of our control and subject to change at any time. As a
CounterPath Corporation 3
Bria Mobile User Guide Introduction to Bria Mobile: VoIP Softphone

result, the official position of CounterPath is that CounterPath’s Bria Mobile product is not
intended, designed, or fit for placing, carrying or supporting Emergency Calls. CounterPath will
not be liable for any costs or damages arising either directly or indirectly from the use of the
software for Emergency Calls. Using Bria Mobile as a default dialer may interfere with dialing
emergency services.
CounterPath Corporation 4
Bria Mobile User Guide Introduction to Bria Mobile: VoIP Softphone

Getting started
Launching Bria Mobile
Tap Bria Mobile to launch Bria Mobile or press and hold the Home button on your
iPhone or iPad and ask Siri to "Launch Bria Mobile". The Bria Mobile screen appears
after a few seconds.
Purchasing a subscription
Bria Mobile is a subscription product that can be subscribed to on a Monthly Plan. Your
subscription starts with a 14-day free trial. If you cancel your subscription within the 14-
day trial period, you will not be charged.
To begin using Bria Mobile, choose the Monthly Plan. For more information on
managing your subscription, see Subscription.
To complete the initial setup
1. Set up a Wi-Fi connection on your device. Go to iOS Settings > Wi-Fi and make
sure the Wi-Fi is turned on. If Wi-Fi is turned off, turn Wi-Fi on and select the
network you want to connect to. If required, enter the password for the network.
2. Set up mobile data (optional) on your device. Go to iOS Settings > Cellular and
turn on Cellular Data.
3.
Tap Bria Mobile on your device.
4. Read information about Bria Mobile by swiping through the introductory screens.
At any time, tap Get Started.
5. Choose the Monthly Plan subscription.
6. Tap Continue in Confirm Purchase. If required, enter your Apple ID password.
CounterPath Corporation 5
Bria Mobile User Guide Getting started

Bria Mobile displays a confirmation message.
7. Review the What’s New features or tap Skip or Go to Bria Mobile.
8. When prompted, give Bria Mobile the following permissions:
l Allow Bria Mobile to access your microphone
l Allow Bria Mobile to access your contacts
l Allow Bria Mobile to use Siri
l Allow Bria Mobile to send notifications on the iPhone or iPad.
Without the permissions, Bria Mobile's Contacts tab will be empty and Bria Mobile
calls will have no audio. To modify permissions, go to iOS Settings > Bria Mobile
> Allow Bria Mobile To Access.
9. If there is no Wi-Fi network available, you need to let Bria Mobile use mobile data.
Go to Settings > Preferences and turn on Use When Available and Allow VoIP
calls.
You can now set up Bria Mobile for voice and video calls.
Note: We strongly recommend that you perform your initial setup from within a known network,
such as in your enterprise or university campus Wi-Fi zone or within range of your home
network and not in a network such as an Internet Cafe.
Exiting Bria Mobile
To exit Bria Mobile
1. Tap the iPhone or iPad’s Home button twice and swipe up on Bria Mobile in the
preview screen.
Setting up accounts
Bria Mobile supports SIP and XMPP accounts.
A SIP account is used to make voice and video calls in Bria Mobile. The SIP account
can also be used for presence and messaging if your VoIP service provider supports SIP
CounterPath Corporation 6
Bria Mobile User Guide Getting started

SIMPLE.
An XMPP account is used for presence and messaging. An XMPP account is not
required.
Prerequisites for setting up accounts
The following information is required to set up your SIP accounts and XMPP accounts.
SIP account
You need the following information from your VoIP provider to set up your SIP account
l User ID
l Domain
l Password
l Authorization name, if used by your service provider
l Voicemail number, if used by your service provider
You may also require your:
l Firewall traversal method
l Server address
l Server user name
l Server password (optional)
l Port ranges (optional)
Note: See Account Advanced (SIP) - Transport and Security for more information.
XMPP account
You need the following information from your XMPP provider to set up your XMPP
account.
l User ID
l Domain
CounterPath Corporation 7
Bria Mobile User Guide Getting started

l Password
Setting up Bria Mobile for voice
To use Bria Mobile for voice and video calls, a SIP account is required. Get your
username, password, and domain from your VoIP service provider. If you have voice
mail with your service provider, your VoIP service provider uses an authorization name,
or your VoIP service provider uses an outbound proxy, get your voice mail number, the
authorization name, and the outbound proxy from your VoIP service provider as well.
If you plan to use your SIP account for presence and messaging, make sure your VoIP
service provider supports SIP SIMPLE for presence and messaging first.
You will need the following information from your VoIP service provider.
SIP account requirements
To place calls on Bria Mobile, you need to have a SIP account. You will need to obtain
the following information from your VoIP service provider.
l Username
l Password
l Domain
l Authorization name, if used by your service provider
l Voice mail number, if your service provider offers this feature
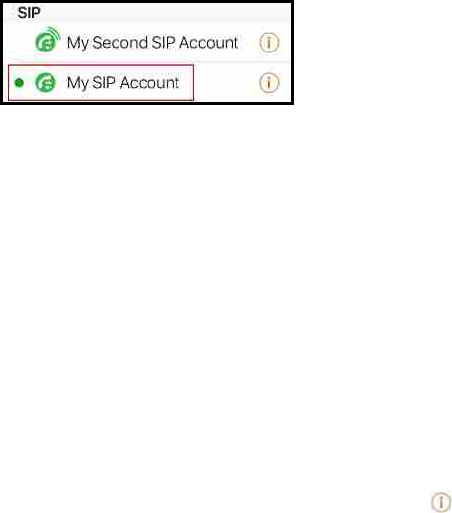
To set up a SIP account
1.
If you are not on the Select Provider screen, go to Settings > Accounts and tap
Add.
2. Select your VoIP service provider from VoIP Providers - Calling. If your VoIP
service provider is not listed, tap VoIP (SIP) – Calling from User-Defined Generic
CounterPath Corporation 8
Bria Mobile User Guide Getting started

Accounts.
3. Complete Account Name, Display as, Username, Password, Domain and VM
Number (if you have voice mail) with the information provided by your VoIP service
provider.
4. If you have an authorization name, tap Account Advanced and complete Auth
Name. Tap < New SIP Account to return to the New SIP Account screen.
5. Tap Enable.
6. Tap Save.
Your SIP account is set up. Bria Mobile displays the SIP account in Settings > Accounts.
Setting up multiple SIP accounts
You can have more than one SIP account if you have more than one VoIP service
provider. To add another account, follow the steps above in To set up a SIP account.
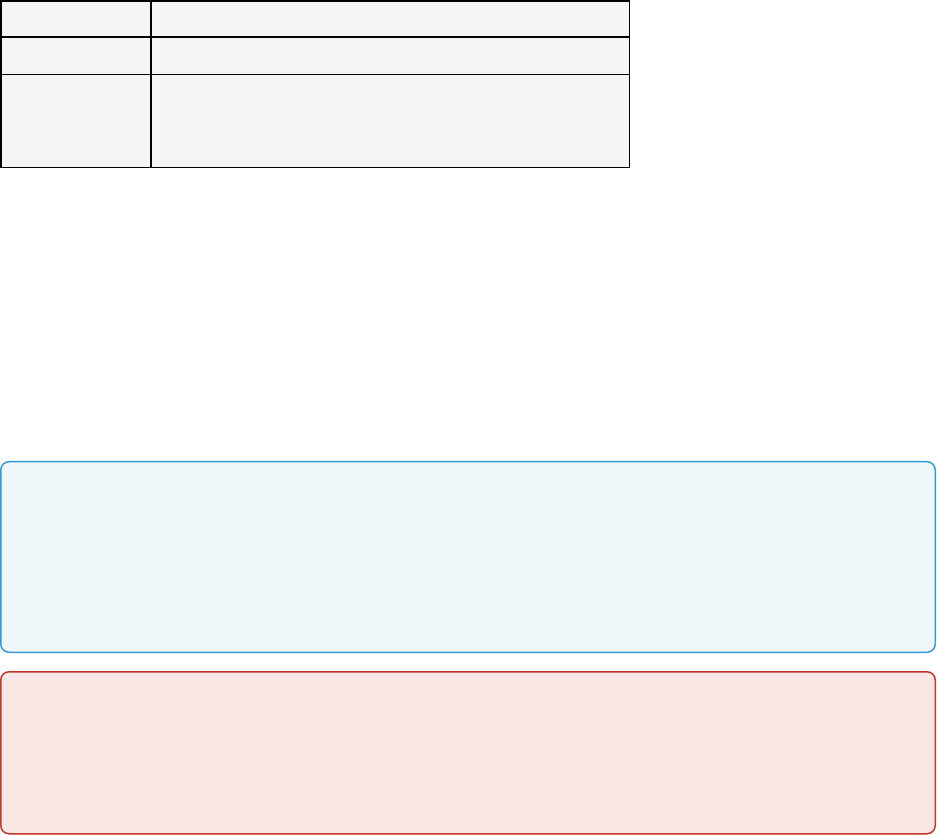
Setting your primary SIP account
One SIP account is always set up as your primary account. Bria Mobile uses your
primary account to make voice and video calls unless you choose a different SIP
account at the time you place a call. To change the SIP account used during a call, see
Changing SIP Accounts.
CounterPath Corporation 9
Bria Mobile User Guide Getting started
To set your primary SIP account
1. Go to Settings > Accounts.
2. Tap the account you want to set as your primary account.
Your primary account has a green dot beside it in Settings > Accounts.
Settings up your SIPaccount for presence and messaging
If you plan on using your SIP account for presence and messaging, you need to
complete these additional steps.
To set up a SIP account for presence and messaging
1. Go to Settings > Preferences.
2. Turn on Enable IM & Presence and Enable SMS (if applicable).
3. Tap Yes on Changes Not Applied.
4.
Go to Settings > Accounts and tap More Info beside your SIP account.
5. Turn off Enabled.
6. Tap Account Specific Features.
7. Turn on Enable IM & Presence and Enable SMS (if applicable).
8. Tap Back to return to Account Details.
9. Turn on Enabled.
The Messaging tab appears on the resource panel. The account is ready for presence
and messaging.
When a SIP SIMPLE account is used for presence and messaging, you must add
Buddies manually. See Buddies.
CounterPath Corporation 10
Bria Mobile User Guide Getting started

Setting up Bria Mobile for presence and messaging
With presence and messaging, you can share your online status (presence) with your
Buddies and exchange instant messages (IMs) with them.
Bria Mobile supports the XMPP and SIP SIMPLE presence and instant messaging
protocols. To use a SIP account for presence and messaging, make sure your VoIP
service provider supports this service for SIP SIMPLE. Texting (sending SMS) to PSTN
mobile phone numbers is also available with your SIP account if your VoIP service
provider supports this service.
Setting up a SIP account for presence and messaging
Make sure your VoIP service provider supports SIP SIMPLE for presence and
messaging first. If you have not created your SIP account, see SIP account
requirements.
To set up a SIP account for presence and messaging
1. Go to Settings > Preferences.
2. Turn on Enable IM & Presence and Enable SMS (if applicable).
3. Tap Yes on Changes Not Applied.
4.
Go to Settings > Accounts and tap More Info beside your SIP account.
5. Turn off Enabled.
6. Tap Account Specific Features.
7. Turn on Enable IM & Presence and Enable SMS (if applicable).
8. Tap Back to return to Account Details.
9. Turn on Enabled.
The Messaging tab appears on the resource panel. The account is ready for presence
and messaging.
When a SIP SIMPLE account is used for presence and messaging, you must add
Buddies manually. See Buddies.
CounterPath Corporation 11
Bria Mobile User Guide Getting started
Setting up an XMPP account
You can add an XMPP account to Bria Mobile to use for presence and messaging. An
XMPP account is required to use chat rooms.
XMPP account requirements
To send messages using an XMPP account, you need to obtain the following
information from your service provider.
l Username
l Password
l Domain
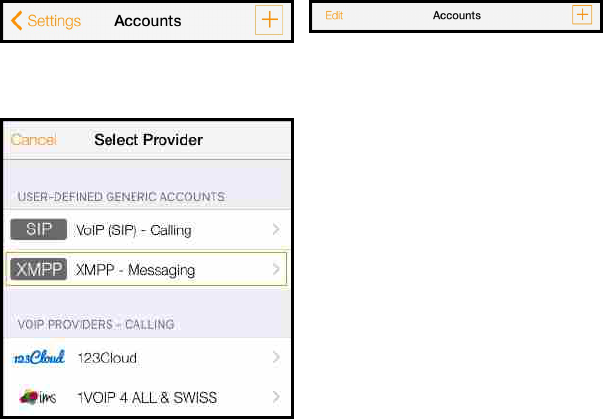
To set up an XMPP account
1. Go to Settings > Preferences.
2. Turn on Enable IM & Presence.
3. Go to Settings > Accounts and tap Add.
4. Tap XMPP - Messaging.
5. Complete Account Name, Username, Password, and Domain with the information
provided by your XMPP Provider.
6. Turn on Enable.
CounterPath Corporation 12
Bria Mobile User Guide Getting started
7. Tap Save.
The Messaging tab appears on the resource panel and Bria Mobile displays the XMPP
account in Settings > Accounts. The account is ready to be used for presence and
messaging. As soon as your account is connected to an XMPP server, your XMPP roster
appears in your Buddies list.
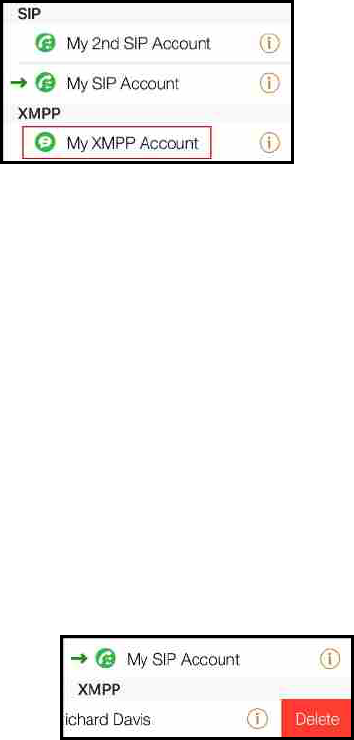
Deleting a SIP or XMPP account
If you are no longer using a SIP or an XMPP account you can delete it from Bria Mobile.
SIP and XMPP accounts are deleted using the standard Apple action for revealing the
Delete button.
To delete an account
1. Go to Settings > Accounts.
2. Swipe the account to be deleted to the left.
3. Tap Delete.
The account is deleted and Bria Mobile no longer displays the SIP or XMPP account in
Settings > Accounts. When you delete your XMPP account, your XMPP Buddies no
longer appear in your Contacts.
CounterPath Corporation 13
Bria Mobile User Guide Getting started

Configuring mobile dial plans
In Bria Mobile, a dial plan can be used to modify how your calls are placed. For
example, a dial plan can be created to change any number that starts with “+1613” to
“613”. A dial plan is used for any combination of the following reasons:
l To modify (transform) the input (the number to be dialed), such as to add the “9”
required to obtain an outside line from a PBX.
l To select the account to use to place a call, if users have more than one account.
l To prevent unresolvable calls from being placed. For example, to prevent using
network bandwidth on a call that will certainly fail. You define patterns that you
know will work, and only place a call if it matches one of these patterns.
A dial plan belongs to a SIP account. You can create as many dial plans for an account
as you need. If you want to use the same dial plan on more than one SIP account, you
need to add it to each account. Bria Mobile goes through the dial plans in the order in
which they appear on the screen. Dial plans can be reordered after they have been
created.
Designing a dial plan
A dial plan has two parts:
l A pattern that the number to be dialed must match.
l The modification to make if the number to be dialed matches that pattern:
l remove a prefix
l add a prefix, or
l remove one prefix and add another one.
To set up a dial plan
1.
Go to Settings > Accounts and tap beside the SIP account you are adding the
dial plan to.
2. Tap Dial Plan (Numbered Prefixes).
3. Tap +.
CounterPath Corporation 14
Bria Mobile User Guide Getting started
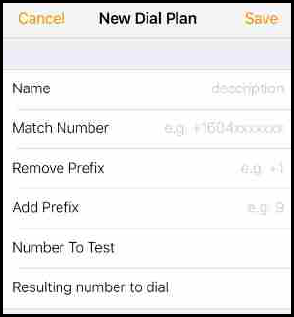
4. Complete the following fields:
l Name: The name of the rule.
l Match Number: The pattern to be matched. Use the following characters to
generate a match pattern:
l 0, 1, 2, 3, 4, 5, 6, 7, 8, 9, 0: A specific digit
l *, #, +, –: Other dialpad symbol
l [-]: A collection that can include a range. [6-9] matches any of 6, 7, 8, 9
and [013-6] matches any of 0, 1, 3, 4, 5, 6.
l x: A wildcard; matches any digit or symbol
l . (period): An element for repetition. Any element can be repeated 0 or
more times. 12. matches 12, 122, 1222, 12222, etc.
l Remove Prefix: The prefix to remove if the number matches the rule. You
can use a dial plan to remove a prefix string. If the number +16041122233
matches the pattern in Match Number and Remove Prefix is +1xxx, then the
resulting number is 1122233.
l Add Prefix: The prefix to add to a number if the number matches the pattern
in Match Number.
l Number To Test: Enter a number that begins with the pattern in Match
Number.
5. Tap Done.
6. Check the result in Resulting number to dial to see if the new number is correct.
7. Tap Save.
CounterPath Corporation 15
Bria Mobile User Guide Getting started

The dial plan is now in a list of dial plans for the SIP account. You can create as many
dial plans as required.
Advanced: Subsequence substitution
Using the format <A:B>, Bria Mobile matches string A and replaces it with string B.
For example, A=+1 and B=011. <+1:011> matches +16041122233 and modifies it
to 0116041122233.
Dial plan examples
Example:
Match number: +1613X. Remove Prefix: +1613 Add Prefix: 9
If the input starts with +1613, then remove the +1613 then add 9 and dial the
number.
+16135550012 is dialed as 95550012.
Example:
Match number: [2-9]XXXXXXXXX Add Prefix: 1
If the input is a 10-digit number starting with a number other than 1, add 1 and dial
the number.
6045550012 is dialed as 16045550012.
Tip: Rather than entering your phone number with X’s to complete the pattern, use a .
(period). For example, instead of entering 604XXXXXXX, you can enter 604x.
Testing a dial plan
You can test a dial plan when you create it, or you can use Test Account Dial Plans.
To test a dial plan
CounterPath Corporation 16
Bria Mobile User Guide Getting started
1.
Go to Settings > Accounts and tap More Info beside the SIP account you want
to test the dial plans for.
2. Tap Dial Plan (Numbered Prefixes).
3. Tap Test Account Dial Plans.
4. Enter the number you want to test in Number To Test.
Bria Mobile displays the number with all the dial plans applied in Resulting Number To
Dial.
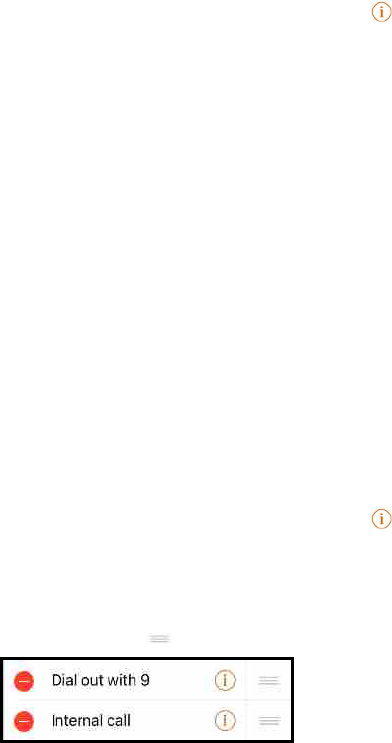
Reordering a dial plan
Dial plans are applied in the order that they appear. You do not have to create them in
order. You can reorder the dial plans.
To reorder a dial plan
1.
Go to Settings > Accounts and tap beside the SIP account with the dial plans
you want to reorder.
2. Tap Dial Plan (Number Prefixes).
3. Tap and hold Row reorder and drag it up or down until it is in the desired order.
4. Repeat with all dial plans.
The dial plans are listed in the correct order.
Using Bria Mobile's interface
Online help
Online help can be accessed from the Settings menu.
CounterPath Corporation 17
Bria Mobile User Guide Getting started
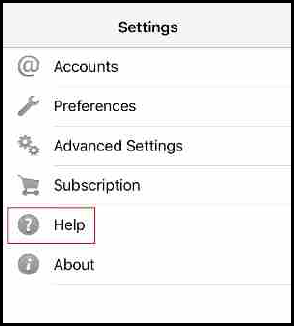
To access online help
1. Go to the Settings tab on the resource panel.
2. Tap Help.
Quick Help opens.
Navigating
To navigate, use the tabs on the resource panel.
CounterPath Corporation 18
Bria Mobile User Guide Getting started
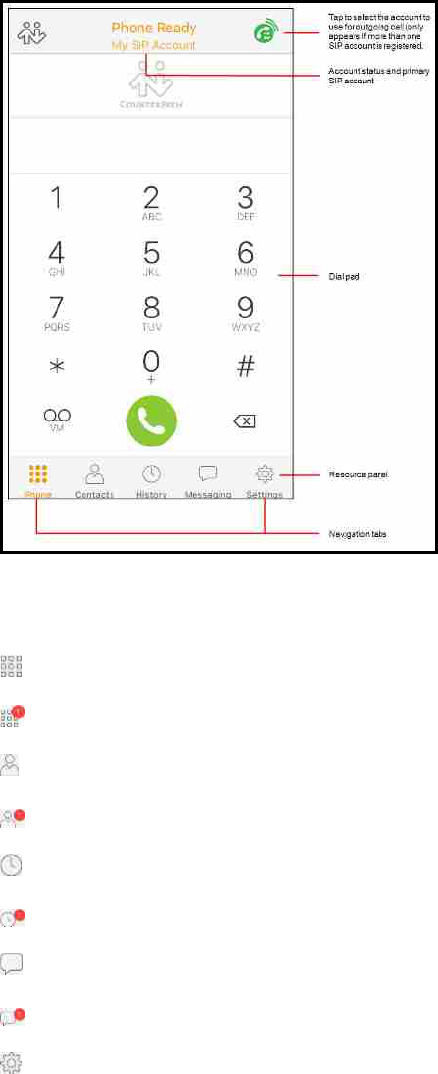
iPhone interface
Resource panel icons
Phone: Opens the dial pad
Dial pad: Indicates you have a new voicemail
Contacts: Opens Contacts
Contacts: Indicates you have a new XMPP Buddy request
History: Opens History
History: Indicates you have a new missed call
Messaging: Opens Messaging
Messaging: Indicates you have a new message
Settings: Opens Settings
CounterPath Corporation 19
Bria Mobile User Guide Getting started
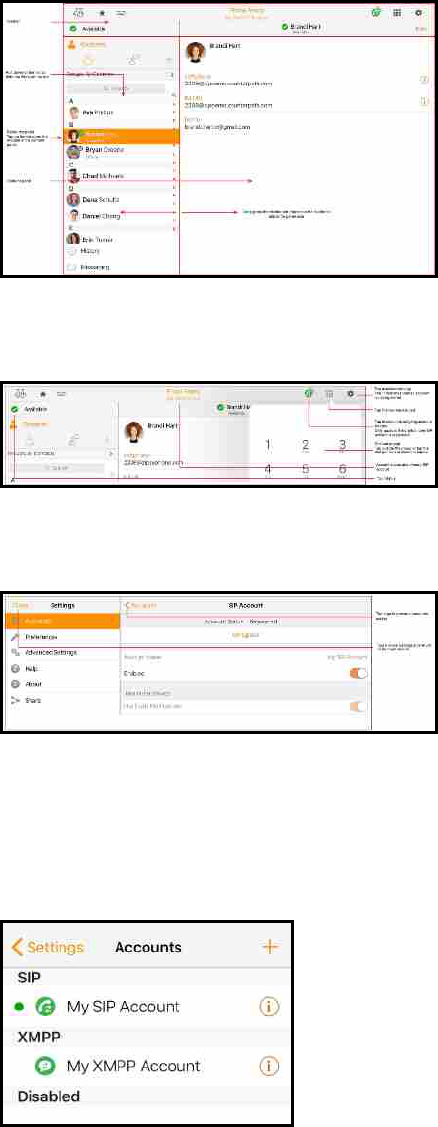
iPad interface
iPad toolbar
iPad settings screen
Account status and network quality
Each of your accounts displays its status Settings > Accounts.
CounterPath Corporation 20
Bria Mobile User Guide Getting started

Account status
Accounts can be registered, not registered, in the process of registering, or disabled.
SIP account status with Push enabled
The account is in the process of registering
The account is registered and can be used to make and receive voice and video calls
The account is registered and can only be used to make phone calls.
To allow incoming calls:
1. Turn off Settings > Enabled.
2. Turn on Settings > Accounts > Account Advanced > Incoming Calls.
3. Turn on Settings > Enabled.
The account is disabled.
Open the account and turn on Enabled.
The account is enabled but registration failed. Check that you entered your credentials
properly.
The primary account. This account is used for outgoing calls unless you select a
different account when placing a particular call.
SIP account status with Push disabled
The account is in the process of registering
The account is registered and can be used to make and receive voice and video calls
The account is registered and can only be used to make phone calls.
To allow incoming calls:
1. Turn off Settings > Enabled.
2. Turn on Settings > Accounts > Account Advanced > Incoming Calls.
3. Turn on Settings > Enabled.
The account is disabled.
CounterPath Corporation 21
Bria Mobile User Guide Getting started
Open the account and turn on Enabled.
The account is enabled but registration failed. Check that you entered your credentials
properly.
The primary account. This account is used for outgoing calls unless you select a
different account when placing a particular call.
XMPP account status
/ Alternating The account is in the process of registering.
The account is connected to an XMPP server and can be used for presence and
messaging.
The account is disabled.
Open the account and turn on Enabled.
The account is enabled but registration failed. Check that you entered your
credentials properly.
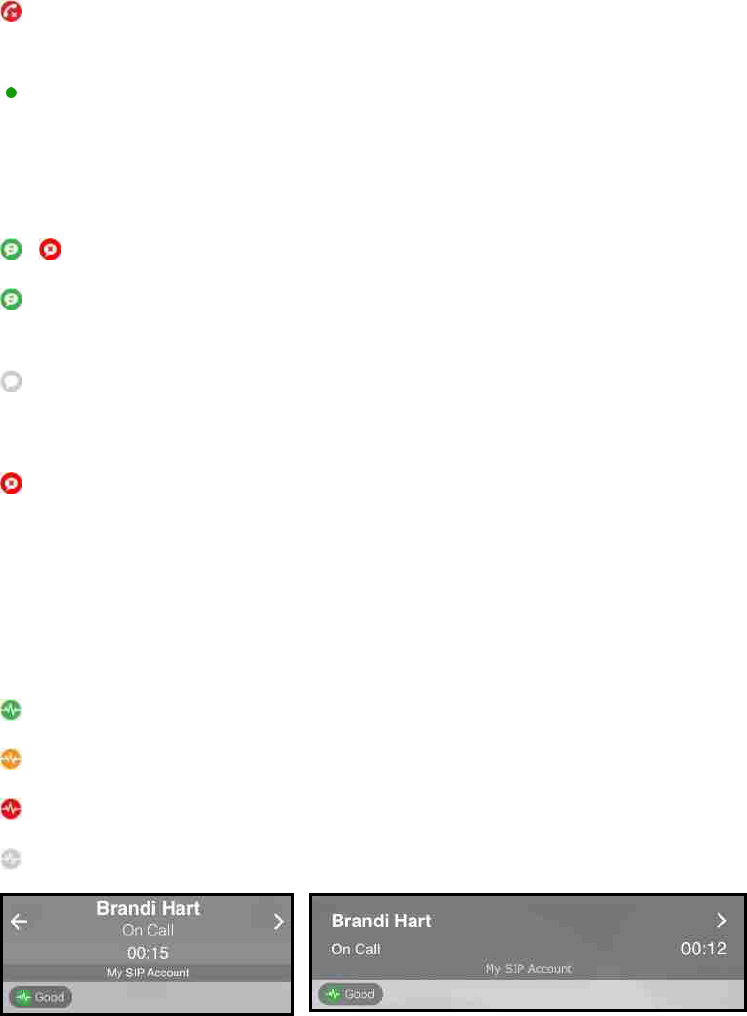
Network quality
During a call, you can view the network quality. The Network Quality Indicator on the
call panel displays the current network conditions.
Good
Fair
Poor
Unknown
CounterPath Corporation 22
Bria Mobile User Guide Getting started
Wi-Fi networks
If the Network Quality indicator shows Poor, this indicates there is network congestion
or a poor quality Wi-Fi signal. Try moving closer to your Wi-Fi access point.
Mobile networks
If the Network Quality indicator shows Poor, this indicates that you may be:
l Between cellular towers
l Experiencing adverse weather conditions
l Nearing the maximum range of the closest tower.
If possible, move closer to the tower.
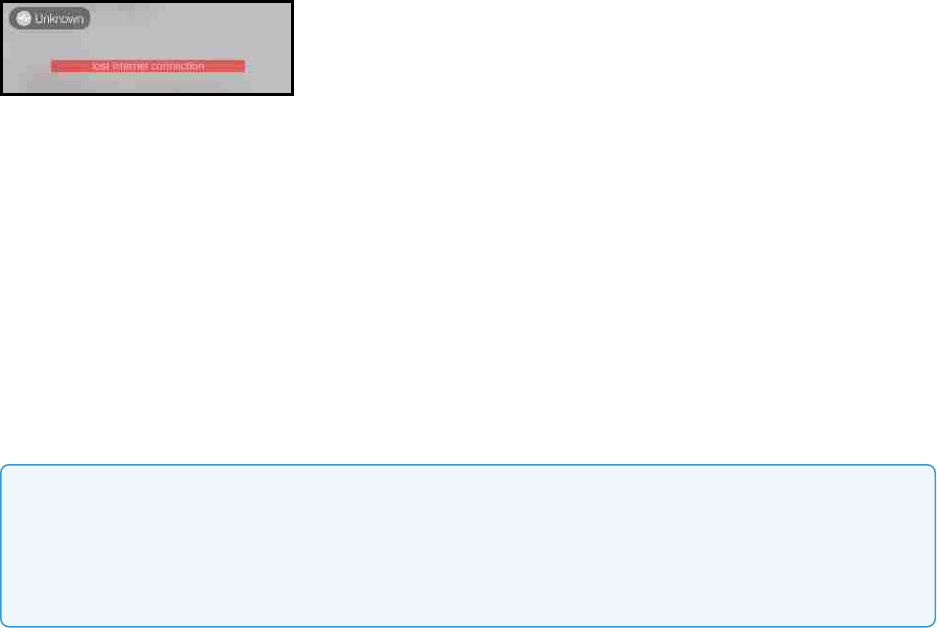
Network lost indicator
During a call, you may lose network connectivity. When this occurs, you see a visual
indicator on the screen – Lost internet connection.
To turn on an optional audio indicator, enable Settings > Preferences – Call In Progress
> Play Tone On Network Lost. When this setting is enabled, you hear an audio chime if
the network loses connectivity. You also hear a second chime when network
connectivity is restored. By default, this settings is off.
Push notifications
Bria Mobile offers Bria Push Service to users to allow users to receive incoming calls
when Bria Mobile is in the background or exited.
Note: When you use the Bria Push Service, your account configuration is stored on
CounterPath’s push notification server. The data is securely transmitted in accordance to our
Privacy Policy. In order to use the Bria Push Service, you must accept the Bria Push Service
agreement.
CounterPath Corporation 23
Bria Mobile User Guide Getting started

Enabling push notifications
When you create a new SIP account, the Bria Push Service is enabled by default. If the
Bria Push Service is not enabled on Bria Mobile, use the following procedure to turn it
on.
To enable push notifications
1.
Go to Settings > Accounts and tap More Info beside the SIPaccount you want
to enable push notifications for.
2. Turn off Enabled.
3. Turn on Use Push Notifications.
4. If required, change the settings for Registration Mode and NAT Emulation.
5. For most VoIP service providers, no changes are required in Advanced Settings. If
your VoIP service provider requires you to use difference SIP proxies for Bria
Mobile and the Bria Push server, change the settings for SIP Proxy. If your VoIP
service provider does not follow the SIP RFC specifications, find out from your
VoIP service provider if you should enable Insert R Instance, Disable Hash
Token, Auto Send 180, and Disable Override Domain, and set Service Refresh
Interval.
6. Turn on Enabled.
The Bria Push Service is enabled. You will receive calls if Bria Mobile is in the
background or exited.
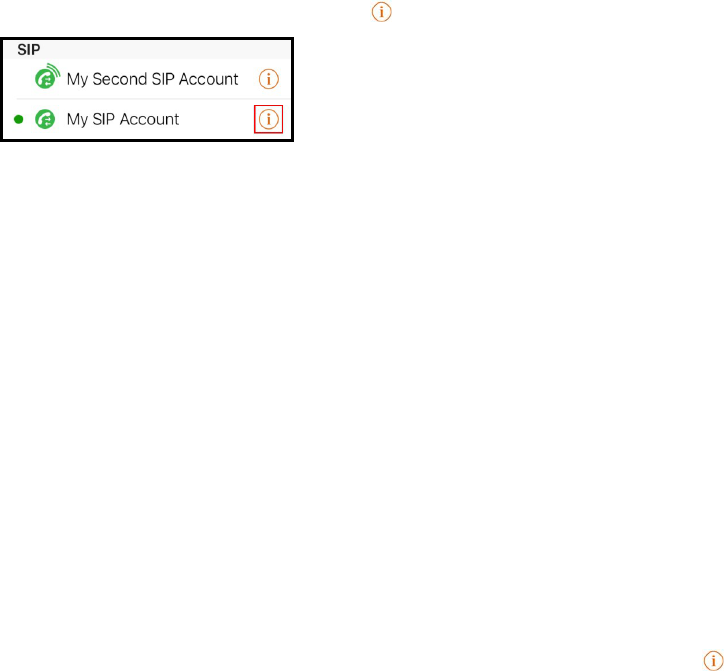
To make sure that push notifications are enabled, look at the icon beside the account in
Settings > Accounts. If the account has push enabled, there will be green lines above
the SIP account icon .
Push Registration Mode
This option controls how the combination of the Bria Mobile client and the Bria Push
CounterPath Corporation 24
Bria Mobile User Guide Getting started
server interact with the SIP server. For some customer’s SIP servers, the registration
mode may not matter or make a substantive difference to the behavior of the SIP Server
or the reliability of the reachability of the Bria Mobile client. For another customer’s, the
registration mode will matter quite a bit because one of the registration modes works
best to address the particular limitations of the customer’s SIP Server. Customer
administrators and IT staff should carefully understand these registration mode options
and their potential impacts.
l
Standard (0)
The Standard registration mode allows both the Bria Push servers and the Bria
Mobile clients to register to a customer’s SIP account in an alternating manner. In
this mode, there may be short overlaps of registration where both the Bria Push
server and the Bria Mobile client are registered to the SIP server. Some PBXs, SIP
servers or SIP services may have issues with this registration overlap. If you
encounter an issue with registering to the SIP server or receiving push
notifications, select a different registration mode.
l
Single Device Emulation (1)
The Single Device Emulation registration mode ensures that both the Bria Mobile
client and the Bria Push server unregister before the other one registers. In other
words, the Bria Mobile client and the Bria Push server never register to a PBX, SIP
server, or SIP service at the same time. The Bria Mobile client controls the
registrations by requesting the Bria Push server to register only after the Bria
Mobile client has de-registered and alternately, by receiving confirmation that the
Bria Push server has de-registered before the Bria Mobile client registers directly
to the SIP server. The Bria Mobile clients will also not register while they are in a
call delivered through the Bria Push server so that they do not cause potential
issues with the call in progress being terminated by the SIP Server.
Note that when in the Single Device Emulation registration mode, there are
periods of time (typically fractions of a second) when neither the Bria Mobile client
or the Bria Push server will be registered to the PBX, SIP server or SIP service.
This gap could lead to a missed call if the call is presented to the SIP server at the
same time that neither element is actively registered. This is a downside of the
requirement of the SIP server that only one element be registered at any one time.
l
Continuous (2)
CounterPath Corporation 25
Bria Mobile User Guide Getting started
The Continuous registration mode ensures that the Bria Push server is always
registered on behalf of the Bria Mobile client. The Bria Mobile client still registers
directly to the SIP server when in the foreground, but the Bria Push server does not
de-register from the SIP server. In this mode, all inbound calls and all outbound
calls from the Bria Mobile client are handled by the Bria Push server.
The Continuous mode, in particular, is used when a SIP server supports multiple
registrations at the same time. This mode avoids any gap in SIP registration
because the Bria Push server is always registered on behalf of the Bria Mobile
client.
In the event of a call to the SIP account while the Bria Mobile client is in the
foreground, the Bria Mobile client will receive an INVITE directly from the SIP
server and via the Bria Push server. The Bria Mobile client will filter out these
duplicate events and only allow one of the call attempts to progress.
l
Single Device Takeover (3)
The Single Device Takeover mode is an enhanced option of the Single Device
Emulation mode. The Bria Mobile client and the Bria Push server take over
registrations from each other without unregistering first. Neither the Push server or
the Bria Mobile client sends SIP de-registration messages when transitioning from
one element to the other. It aims to eliminate gaps that are present in the other
registration mode. This mode is in some cases beneficial for SIP servers that only
support single registration.
Nat Emulation
This option instructs the Bria Push server to simulate that the Bria Push server is
registering from behind a Network Address Translation (NAT) router or another network
element. Enable NAT Emulation if your VoIP service provider uses a session border
controller. If enabling NAT Emulation results in no push notifications or no audio, disable
NAT Emulation.
More details
The Bria Push server simulates this NAT situation by inserting a SIP VIA header into the
SIP REGISTER method that the Bria Push server sends to the SIP server. This VIA
CounterPath Corporation 26
Bria Mobile User Guide Getting started
header often assists with ensuring that various NAT traversal techniques are enabled on
a customer’s Session Border Controller and/or SIP server. Enabling the various
techniques supported by these platforms may assist with ensuring that registrations are
maintained or may help with issues related to call delivery or RTP stream establishment.
Advanced push settings
SIP Proxy
The option allows the customer to specify a SIP Proxy specifically for use by the Bria
Push Server. It is important to note that this is an alternative to the SIP proxy configured
as part of the regular SIP account configuration. In some very specific customer
deployments, the customer would like the Bria Push server to register and receive calls
from the SIP Server using a particular proxy while the Bria Mobile clients would use a
different SIP Proxy either internally to a customer’s local network or external to the
customer’s network.
Insert R Instance
The Insert RInstance option instructs the Bria Push server to use a hash token as the
rinstance in the contact header of SIP register. RInstance assists some SIP servers with
identifying different clients contact addresses when servers support multiple registrations
for a single SIP account. Refer to the Disable Hash Token option for an example of
when to use RInstance.
Disable Hash Token
The Bria Push server generates a globally-unique hash token for each customer to avoid
possible SIPusername collisions. The Bria Push server uses this token when
registering to the SIPservice on behalf of the Bria Mobile client's SIP account. In most
cases, using the hash token is beneficial and does not cause any problems for
registration and call processing. However, some SIPservers, mainly PBXs that are not
compliant to the SIP RFC specifications, cannot handle this token. If this is the case,
disable hash token and try using RInstance instead in order to help the Bria Push server
identify the clients. Note that some PBXs do not support RInstance either.
More details
When the Disable Hash Token option is off (therefore using the token), the Bria Push
CounterPath Corporation 27
Bria Mobile User Guide Getting started
server inserts a hash token in the uri.user portion in the contact header of SIP register.
However, some SIP servers do not include the hash token in an INVITEmessage when
sending it to the Bria Push server, which does not benefit the Bria Push server.
Auto Send 180
The Auto Send 180 Ringing option instructs the Bria Push server to issue a SIP 180
RINGING message to the SIP server without waiting for the Bria Mobile client to be
waken up for an incoming call. This option may help situations where your SIP service
may timeout before the push notification is delivered to your device.
More details
With Bria Push enabled, the Bria Mobile client establishes a secure WebSocket tunnel
with the Bria Push server after the Bria Push server receives an INVITE from the SIP
service. Once the tunnel is established, the Bria Push server relays the INVITE to the
Bria Mobile client. The Bria Mobile client then sends 180 Ringing back to the Bria Push
server and the Bria Push server relays it to the SIP service. This process takes longer
than what occurs during a normal (non-push) foreground call.
When the Auto Send 180 option is enabled, the Bria Push server generates its own 180
ringing response and does not wait for the Bria Mobile client to create the secure
WebSocket tunnel. This aims to shorten the delay and allows the Bria Push server to
respond to the SIP service right away to the incoming INVITE. Note that this option aims
to address only a part of the delay; the Bria Push Service involves processing through
various elements that result in this time lag.
Disable Override Domain
The Disable Domain Override option stops the Push server from replacing the To
Header Domain Part of the INVITE with the domain included in the SIP account
information.
Server Refresh Interval
The Server Refresh Interval option instructs the Bria Push server to register with the SIP
server for a particular requested re-registration interval. Value in seconds. Some SIP
servers do not specify minimal refresh time in the registration response and ignore the
REGISTER expires value. Note that according to the SIP standards, a SIP server can
CounterPath Corporation 28
Bria Mobile User Guide Getting started
return a lower value in the 200OK which the Bria Push server will respect by re-
registering at or before the lower interval requested.
Testing push notifications
After setting up push on your SIP account, you can use the Test Push Service button to
make sure that your device can communicate with the Bria Push server and that your
device is able to receive push notifications from the Apple APNS push notification
system. Your SIP account must be enabled in order to test push notifications.
To test push notifications
1.
Go to Settings > Accounts and tap More Info beside the SIP account you to test.
2. Tap Test Push Service.
If you see Push test passed, push notifications are working. If push notifications fail,
review your push notification settings and check the Bria Mobile Push Checklist to see if
your device and your server can be used with the Bria Push Service.
You can also test push notifications by putting Bria Mobile in the background and trying
to call it from another number. If you receive a notification of an incoming call, you have
correctly set up the Bria Push Service.
Stop receiving push notifications
There are multiple ways to stop receiving push notifications.
To stop receiving push notifications
l
Disable the Bria Push Service: Go to Settings > Accounts and tap beside the
SIP account and turn off Settings > Accounts > Account (SIP) > Enabled. Turn off
Settings > Accounts - Bria Push Service > Use Push Notifications. Make sure to
turn on Enabled to use the SIP account.
CounterPath Corporation 29
Bria Mobile User Guide Getting started

l
Disable the SIP account: Go to Settings > Account and tap beside the SIP
account and turn off Enabled.
l Change your presence to Do Not Disturb: When you change your presence to Do
Not Disturb, incoming calls are rejected. Calls show in History as a Missed Call
entry. To change your presence, see Changing your status.
l Turn on Do Not Disturb on your device: When you use the device’s Do Not
Disturb setting, the call is shown on the screen but you will not hear an audible
alert.
l Turn on Client-Side Call Forwarding: Go to Settings > Preferences > Forward
Calls. Enter the number you want to forward the calls to in To Number.
l Disable incoming calls: Go to Settings > Accounts > Account (SIP) > Account
Advanced and turn off Incoming Calls. Make sure to turn on Enabled to use the
SIP account to continue to use your account for outgoing calls.
l Turn off device notifications for Bria Mobile: Go to the device Settings >
Notifications > Bria Mobile and clear Show Notifications.
For more detailed information of push notifications, settings, and requirements for using
push, see Bria Push Service.
CounterPath Corporation 30
Bria Mobile User Guide Getting started
Calls
You can use Bria Mobile to place and receive audio and video calls, as well as host a
three-party audio conference call. You can also use Bria Mobile to record and transfer
calls.
A user must have at least one SIPaccount registered in order to place and receive audio
calls.
Incoming call handling
When multiple call handling features are enabled, Bria Mobile uses the enabled features
in the following order.
1. Call Blocking
2. DND
3. Call Forwarding - Global (in Preferences)
4. Call Forwarding - per account (in SIP account)
Placing a voice or video call
You can place a voice or video call from almost anywhere in the Bria Mobile app. If you
know the number, you can place a call using the dial pad. If you do not know a number,
you can place the call from Contacts, from History, or from a chat room. You can use Siri
to place a call for you.
To place a video call on your iPhone or iPad, Settings > Accounts (SIP) > Account
Specific Features > Enable Video and Settings > Preferences > Enable Video must be
on.
The remote party will be offered video no matter which calling method you use if
Settings > Accounts (SIP) > Account Specific Features > Always Offer Video is on.
In Contacts and History, you do not have to tap the Call prompt to place a voice call
CounterPath Corporation 31
Bria Mobile User Guide Calls
when all of the following conditions are met:
l Settings > Accounts (SIP) > Account Specific Features > Enable SMS is off
l Settings > Accounts (SIP) > Account Specific Features > Enable Video is off
l Settings > Preferences > Single Touch to Call is on
l You only have one active SIP account
The call starts as soon as you tap the phone number.
Using the dial pad
The dial pad can only be used to place voice calls unless Settings > Accounts (SIP) >
Account Specific Features > Always Offer Video is on. You can add video to the call
once it has started.
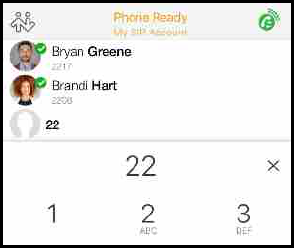
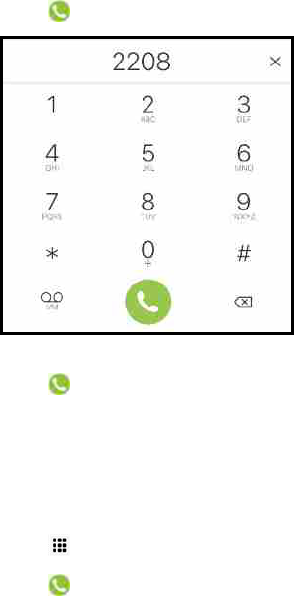
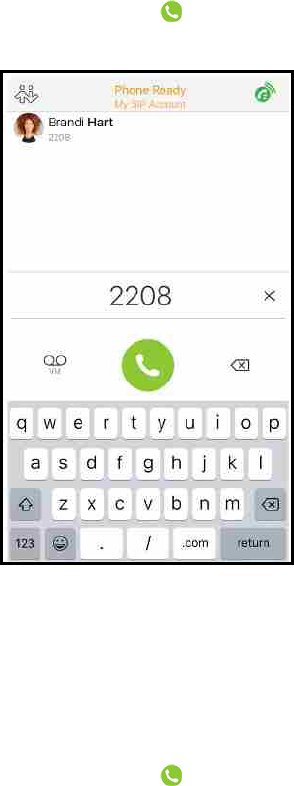
To place a call using the dial pad
iPhone
1. Go to the Phone tab on the resource panel.
2. Type the number you want to dial. Tap X Clear Number to clear the entry or tap in
the entry field to bring up the keyboard. Tap RETURN to close the keyboard. Bria
Mobile brings up a list of matches and refines the list as you enter numbers and
characters.
3. Tap Dial or tap on the contact you want to call.
Bria Mobile completes the call.
CounterPath Corporation 32
Bria Mobile User Guide Calls
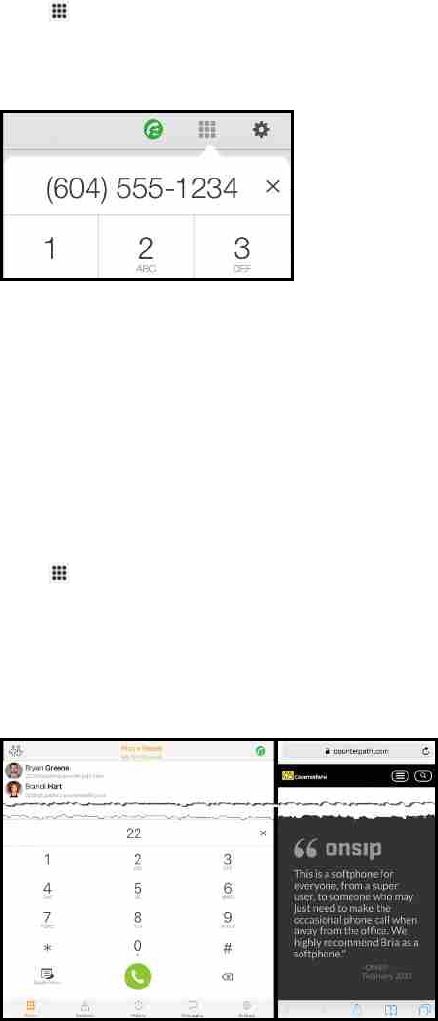
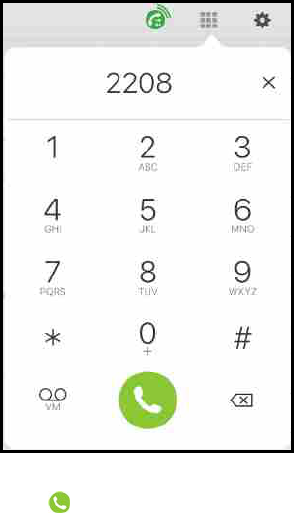
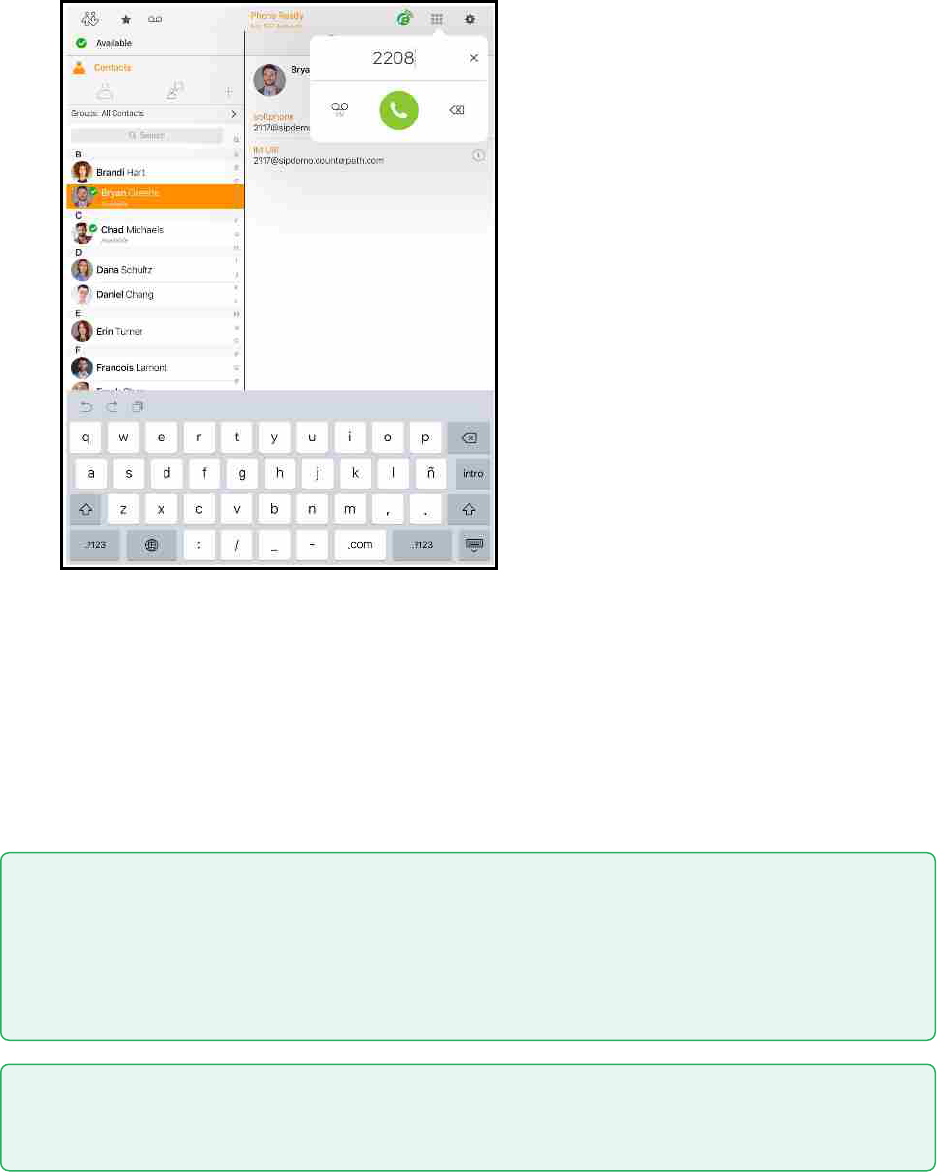
iPad
1.
Tap Dial pad in the tool bar.
2. Type the number you want to dial. Tap X Clear Number to clear the entry or tap in
the entry field to bring up the keyboard. Tap RETURN to close the keyboard.
3. Tap Dial .
Bria Mobile completes the call.
iPad in Split Screen
If you are using Bria Mobile in Split Screen mode with your iPad in portrait mode, you
see contact suggestions as you enter a number.
1.
Tap Dial pad in the tool bar.
2. Type the number you want to dial. Tap X Clear Number to clear the entry or tap in
the entry field to bring up the keyboard. Tap RETURN to close the keyboard. Bria
Mobile brings up a list of matches and refines the list as you enter numbers and
characters.
3. Tap Dial after entering the number or tap on the contact you want to call.
Bria Mobile completes the call.
CounterPath Corporation 33
Bria Mobile User Guide Calls
Using Bria Mobile's contacts
If phone numbers from Contacts need to be modified before you dial (for example, to
remove extra characters such as +), you can set up a dial plan.
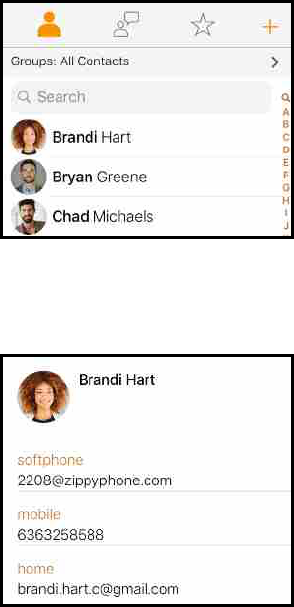
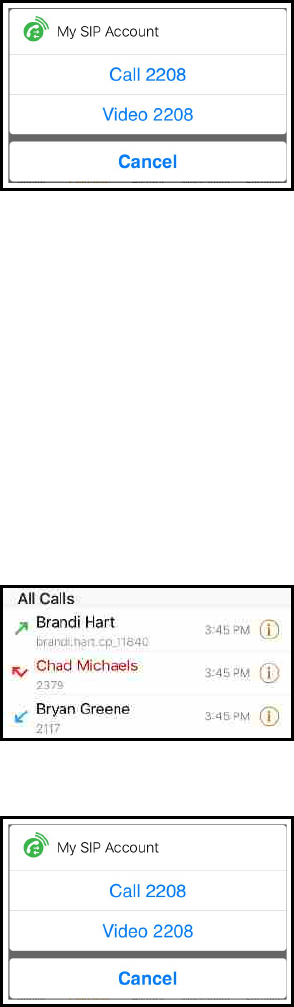
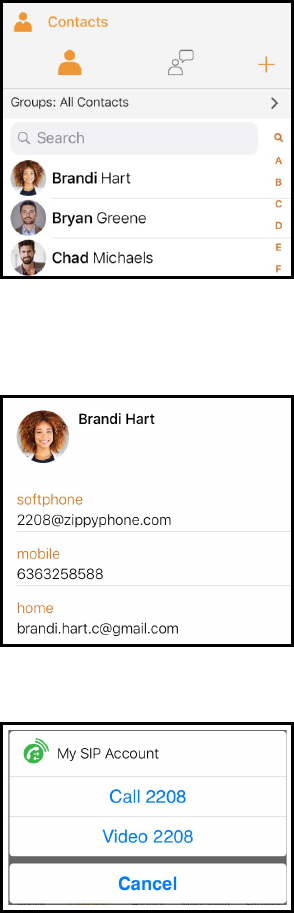
To place a call using Bria Mobile's contacts
iPhone
1. Go to the Contacts tab on the resource panel.
2. Select a contact by tapping on the contact or typing their name in the Search bar
and tapping on the contact.
Contact Details opens.
3. Tap the number you want to dial.
4. Tap Call… or Video….
CounterPath Corporation 34
Bria Mobile User Guide Calls
Bria Mobile starts the call. If you are placing a video call, Bria Mobile starts sending your
video as soon as the other party accepts the incoming call.
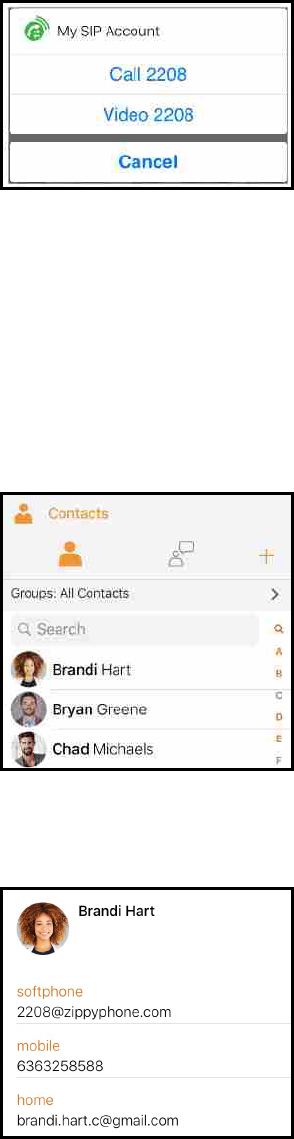
iPad
1. Go to the Contacts tab on the resource panel.
2. Select a contact by tapping on the contact or typing their name in the Search bar
and tapping on the contact.
Contact Details opens.
3. Tap the number you want to dial.
CounterPath Corporation 35
Bria Mobile User Guide Calls
4. Tap Call… or Video….
Bria Mobile starts the call. If you are placing a video call, Bria Mobile starts sending your
video as soon as the other party accepts the incoming call.
Using History
You can place a call from History when reviewing calls.
To place a call by tapping the History entry – iPhone only
1. Go to the History tab on the resource panel.
2. Tap the history entry containing the contact you want to call.
3. Tap Call… or Video….
Bria Mobile starts the call. If you are placing a video call, Bria Mobile starts sending your
video as soon as the other party accepts the incoming call.
CounterPath Corporation 36
Bria Mobile User Guide Calls

To place a call using History details
iPhone
1. Go to the History tab on the resource panel.
2.
Tap beside the entry to open call details.
3. Tap the phone number in the call entry.
4. Tap the Call… or Video….
Bria Mobile starts the call. If you are placing a video call, Bria Mobile starts sending your
video as soon as the other party accepts the incoming call.
CounterPath Corporation 37
Bria Mobile User Guide Calls

iPad
1. Go to the History tab on the resource panel.
2. Tap the entry to open call details.
3. Tap the phone number in the call entry.
4. Tap the Call… or Video….
Bria Mobile starts the call. If you are placing a video call, Bria Mobile starts sending your
video as soon as the other party accepts the incoming call.
Redial
You can place an audio call to the last number you dialed.
CounterPath Corporation 38
Bria Mobile User Guide Calls
To use redial
iPhone
1. Go to the Phone tab on the resource panel.
2.
Tap Dial. The last number you dialed appears in the dialer.
3.
Tap Dial again.
Bria Mobile redials the last number called.
iPad
1.
Tap Dial pad in the tool bar.
2.
Tap Dial. The last number dialed appears in the dialer.
CounterPath Corporation 39
Bria Mobile User Guide Calls
3.
Tap Dial again.
Bria Mobile redials the last number called.
Using Siri
You can use Siri to place a voice or video call when Bria Mobile is in the foreground,
background, exited or when your iPhone or iPad is locked. The first time you use Siri,
you must give Siri permission to access Bria Mobile’s data. To phone a person using
their name, the person must be in Bria Mobile’s Contacts.
To place a call using Siri
1. Press and hold the Home button on your iPhone and iPad.
2. To place a voice call: Ask Siri to “Call Ava Phillips with Bria Mobile” or “Call
6045551234 with Bria Mobile".
To place a video call: Ask Siri to "Video call Ava Phillips with Bria Mobile" or
"Video call 6045551234 with Bria Mobile
Bria Mobile starts the call. If you are placing a video call, Bria Mobile starts sending your
video as soon as the other party accepts the incoming call.
CounterPath Corporation 40
Bria Mobile User Guide Calls
Adding video to a voice call
You can add video to the voice call after the call is established.
To add video to a voice call by swiping left – iPhone only
1. Swipe left on the screen.
Bria Mobile starts initializing video. You see the remote party’s video after they add
video on their end.
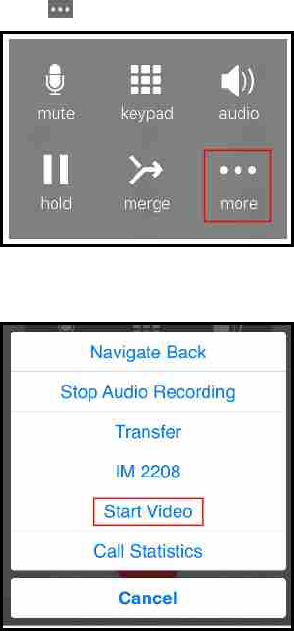
To add video to a voice call using the More menu – iPhone only
1. Tap More.
2. Tap Start Video.
Bria Mobile starts initializing video. You see the remote party’s video after they add
video on their end.
CounterPath Corporation 41
Bria Mobile User Guide Calls
To add video to a voice call using the toolbar - iPad only
1.
Tap Video.
Bria Mobile starts initializing video. You see the remote party’s video after they add
video on their end.
Note: The camera is not available when you are running Bria Mobile on an iPad in split view
mode. Video is not sent and you see Video Not Available on your video preview.
Changing SIP Accounts
Your primary SIP account is displayed under Phone Ready. If you have more than one
SIP account enabled, you can change the account to use on a given phone call. The
change to the SIP account can be on-going — all calls placed after the change will be on
the new primary SIP account — or the change only applies to the current call.
Using settings — On-going
This method changes your primary SIP account for all future outgoing calls.
To change your primary SIP account using settings
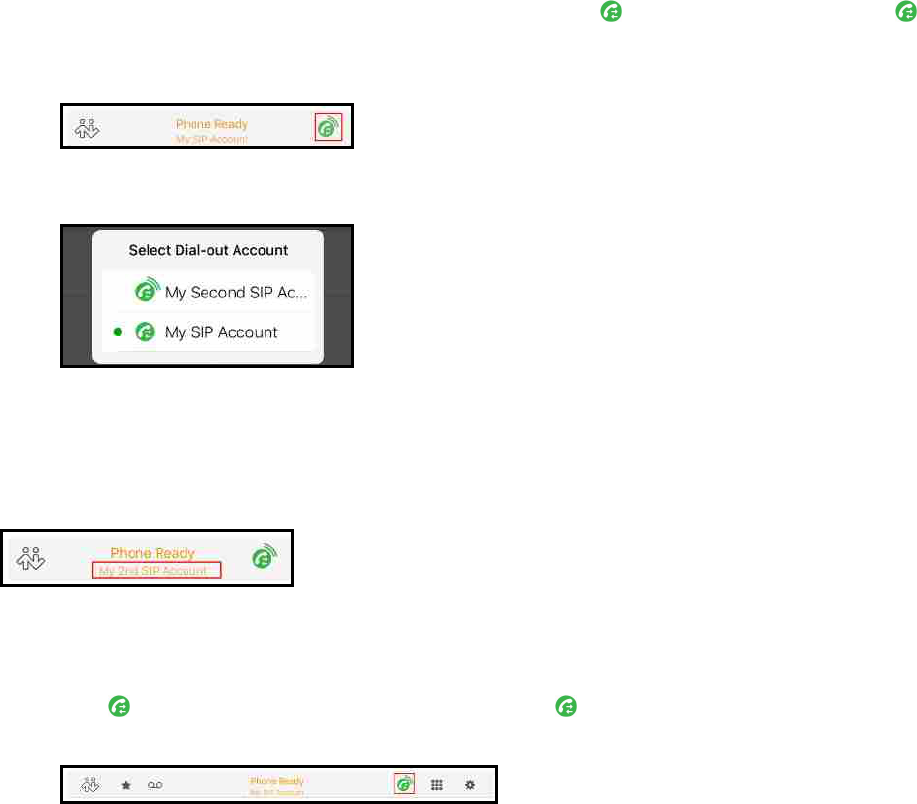
1. Go to Settings > Accounts.
2. Tap the account you want to set as your primary account.
Your primary account has a green dot beside it in Settings > Accounts.
CounterPath Corporation 42
Bria Mobile User Guide Calls
Using the status bar — On-going
This method changes your primary SIP account for all future outgoing calls.
To change the SIP account using the status bar
iPhone
1.
Go to the Phone tab on the resource panel and tap Select Dial-out Account.
Select Dial-out Account is only displayed if your have more than one SIPaccount
enabled.
2. Tap the SIP account you want to use from Select Dial-out Account.
Bria Mobile displays the chosen account under Phone Ready. This account will be used
for any future calls. Dial the number you want to call and Bria Mobile uses the selected
SIP account to place the call.
iPad
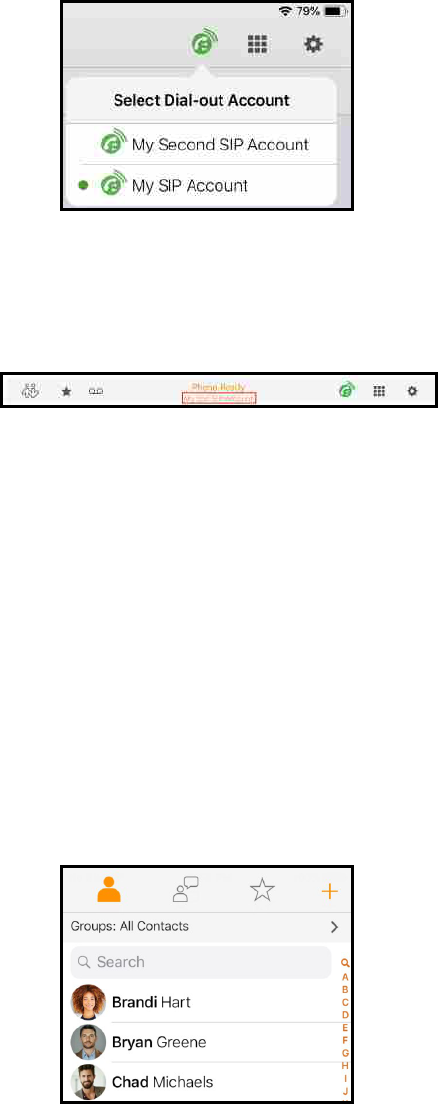
1.
Tap Select Dial-out Account on the toolbar. Select Dial-out Account is only
displayed if your have more than one SIPaccount enabled.
2. Tap the SIP account you want to use from Select Dial-out Account.
CounterPath Corporation 43
Bria Mobile User Guide Calls
Bria Mobile displays the chosen account under Phone Ready. This account will be used
for any future calls. Dial the number you want to call and Bria Mobile uses the selected
SIP account to place the call.
Using Bria Mobile's Contacts — Temporary
This method changes your primary SIP account for the outgoing call only.
If Settings > Accounts (SIP) > Account Specific Features > Enable Video, Enable IM &
Presence, and Enable SMS are off and Preferences > Single Touch to Dial is on, you
cannot change the SIP account when you place the call using Bria Mobile’s Contacts.
To pick your outgoing SIP account using Contacts - iPhone only
1. Go to the Contacts tab on the resource panel.
2. Select a contact by tapping on the contact or typing their name in the Search bar
and tapping on the contact.
3. Tap the number you want to call.
CounterPath Corporation 44
Bria Mobile User Guide Calls

4.
Tap Select Dial-out Account and tap the SIP account you want to use from
Select Dial-out Account.
5. Tap the Call… or Video….
Bria Mobile displays the new SIP account above the Call… and Video… prompts. The SIP
account is changed for this call only.
Navigating away from a call
While on a call, you can navigate away from the call screen to any of the tabs on the
resource panel or you can put Bria Mobile in the background. To move within Bria
Mobile, by tap the arrow at the top of the screen. To put Bria Mobile in the background,
tap the device's Home button.
To return to an active call
Return to an active call once you have navigated away.
CounterPath Corporation 45
Bria Mobile User Guide Calls
To return to an active call
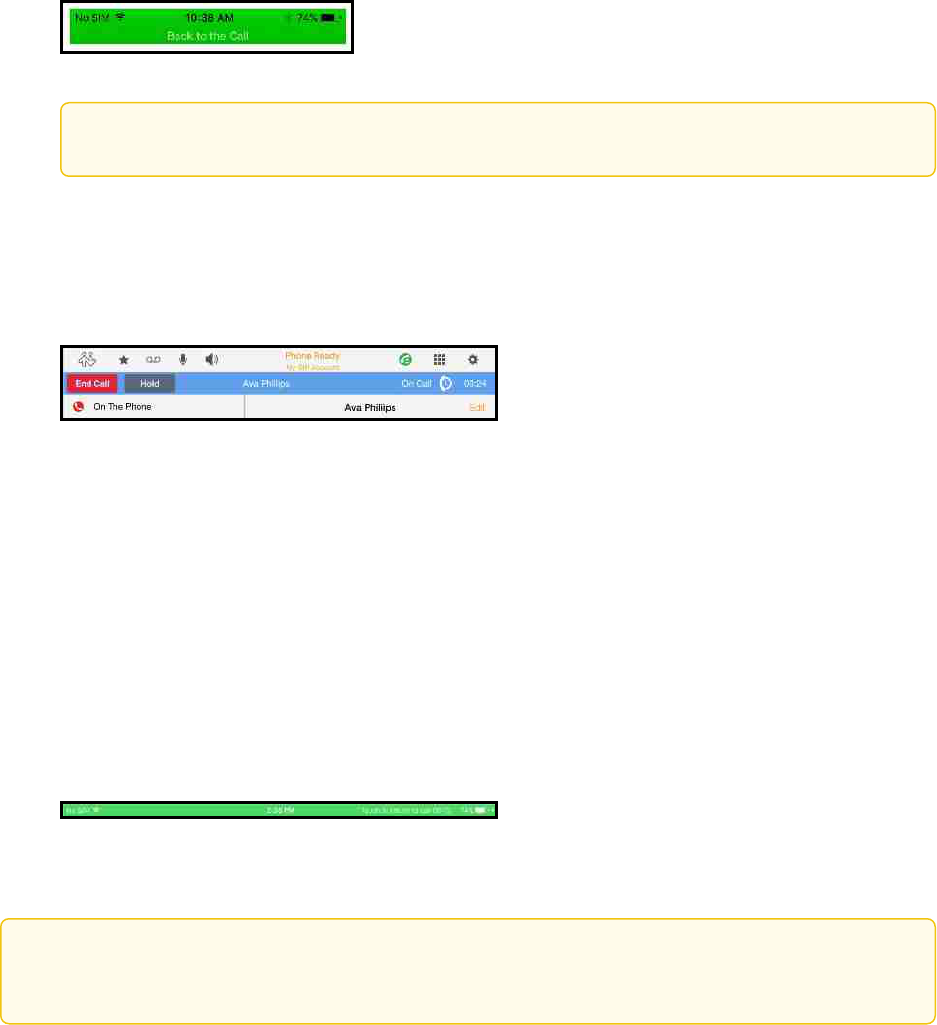
iPhone
1. Tap the green back-to-call element at the top of the screen.
Tip: Aim to tap the bottom edge of the green element.
Bria Mobile returns to the call.
iPad – Single call in the foreground
1. Tap the blue back-to-call element to return to a single established call.
Bria Mobile returns to the call screen.
iPad – Multiple calls in the foreground
1. Tap the gray or blue back-to-call element to navigate back to either call when you
have two calls established.
Bria Mobile goes back to the call screen of the call you tapped.
iPad - Bria Mobile in the background
1. Tap the green back-to-call element.
Bria Mobile returns to the call screen.
Tip:
Use End Call, Hold, or Unhold on the back-to-call elements.
CounterPath Corporation 46
Bria Mobile User Guide Calls

Changing letters to numbers
Some phone numbers are given with words to help you remember them — “1-800-
numbers”. Rather than convert the letters to numbers — n=6, u=8, m=6, … to get 1-800-686-
2377 — you can type letters into the dial pad and Bria Mobile will convert the letters to
numbers when placing the call.
To turn letters to numbers
1. Go to the Settings tab on the resource panel.
2. Go to Preferences - Outgoing Call.
3. Turn on Turn Letters to Numbers.
Turning letters to numbers is enabled. Letters entered in the dial pad are converted to
numbers.
To enter letters on the dial pad, tap the dial pad entry field. The keyboard opens. Use the
keyboard to enter the numbers into the dial pad. Tap RETURN to bring back the regular
digit dial pad.
CounterPath Corporation 47
Bria Mobile User Guide Calls

Hiding your identity
You can hide your identity on a call so that the remote party will not see your name or
number on their phone.
To hide your number
1. Go to the Settings tab on the resource panel.
2. Go to Preferences - Outgoing Call.
3. Turn on Hide My Number.
Anonymous calling in enabled. Your ID is hidden for all outgoing calls until you turn off
anonymous calling.
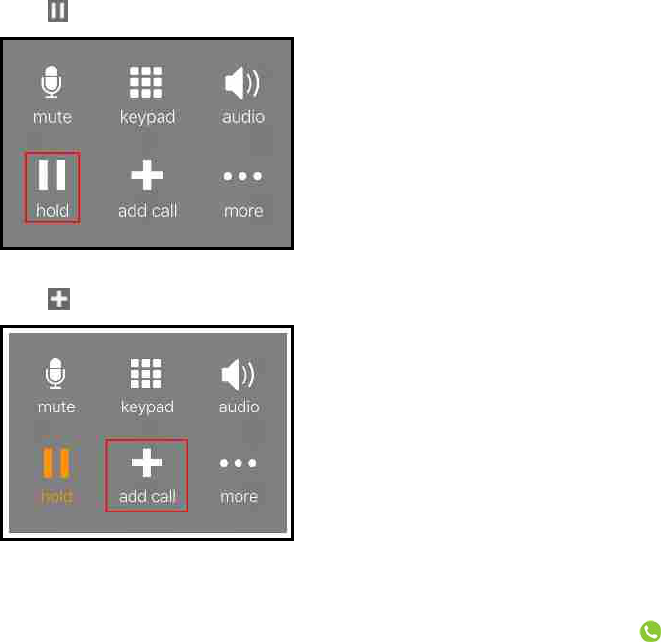
Placing a second call
When you have one call established, you can place that call on hold and make a second
call.
CounterPath Corporation 48
Bria Mobile User Guide Calls
Using the dial pad
The dial pad can only be used to place voice calls unless Settings > Accounts (SIP) >
Account Specific Features > Always Offer Video is on. You can add video to the call
once it has started.
To place a second call using the dial pad
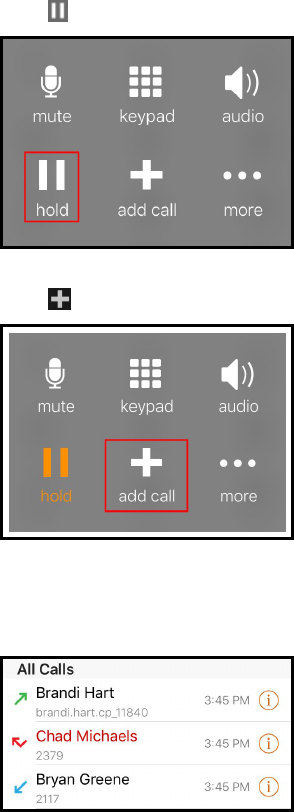
iPhone
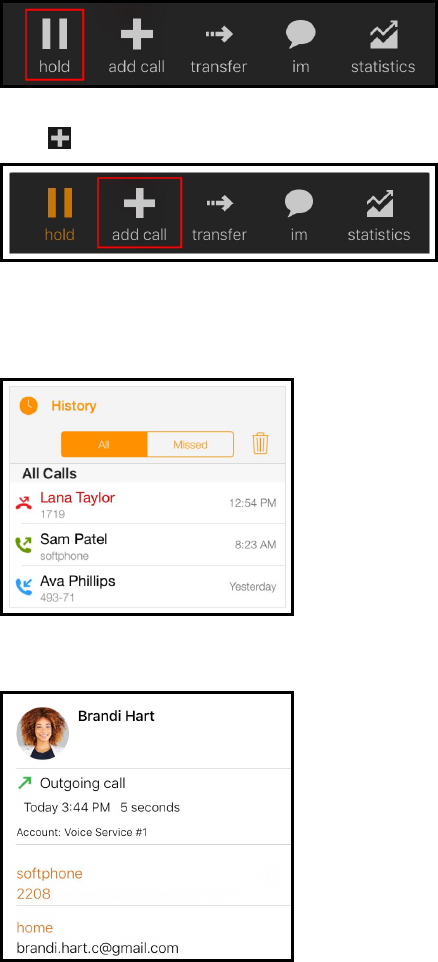
1.
Tap Hold to put the first call on hold.
2.
Tap Add call.
3. Tap the Phone tab on the resource panel to display the dial pad, if necessary.
4.
Dial the number of the second party you want to call and tap Dial.
Bria Mobile connects the second call. If you end one of the calls, Bria Mobile
automatically switches back to the other call.
CounterPath Corporation 49
Bria Mobile User Guide Calls
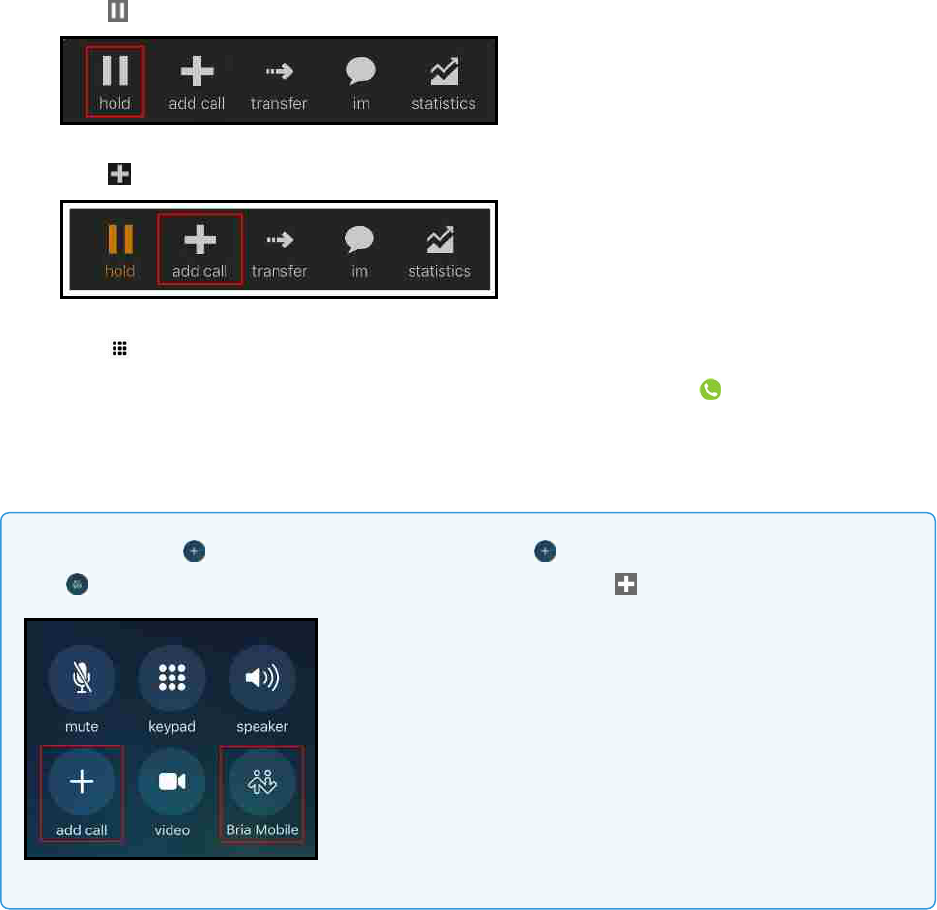
iPad
1.
Tap Hold to put the first call on hold.
2.
Tap Add Call.
3.
Tap Dial in the toolbar to display the dial pad, if necessary.
4.
Dial the number of the second party you want to call and tap Dial.
Bria Mobile connects the second call. If you end one of the calls, Bria Mobile
automatically switches back to the other call.
When you use Add Call from the lock screen, Add Call opens the native dialer.
Tap Bria Mobile instead to open Bria Mobile, then use Add call.
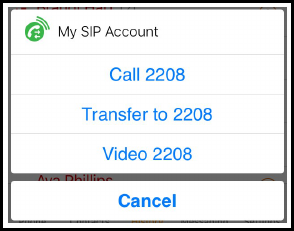
Using Bria Mobile's Contacts
Place a second call to anyone in Contacts.
To place a second call using Bria Mobile Contacts
iPhone
CounterPath Corporation 50
Bria Mobile User Guide Calls
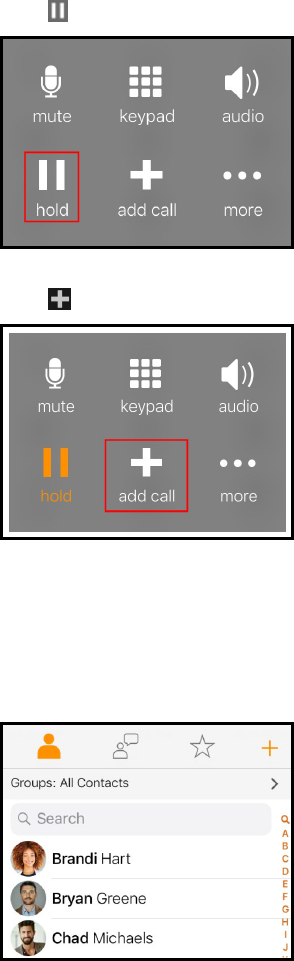
1.
Tap Hold to put the first call on hold.
2.
Tap Add Call.
3. If necessary, go to the Contacts tab on the resource panel to display Bria Mobile’s
Contacts.
4. Select a contact by tapping on the contact or typing their name in the Search bar
and tapping on the contact.
Contact Details opens.
5. Tap the number you want to dial.
CounterPath Corporation 51
Bria Mobile User Guide Calls
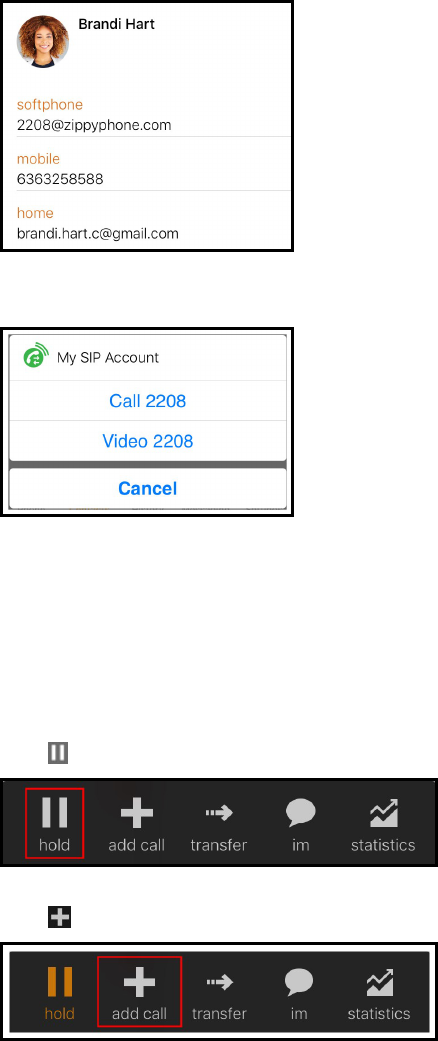
6. Tap Call… or Video….
Bria Mobile connects the second call. If you are placing a video call, Bria Mobile starts
sending your video as soon as the other party accepts the incoming call. If you end one
of the calls, Bria Mobile automatically switches to the other call.
iPad
1.
Tap Hold to put the first call on hold.
2.
Tap Add Call.
3. If necessary, go to the Contacts tab on the resource panel to display Bria Mobile’s
Contacts.
CounterPath Corporation 52
Bria Mobile User Guide Calls
4. Select a contact by tapping on the contact or typing their name in the Search bar
and tapping on the contact.
Contact Details opens.
5. Tap the number you want to dial.
6. Tap Call… or Video….
Bria Mobile connects the second call. If you are placing a video call, Bria Mobile starts
sending your video as soon as the other party accepts the incoming call. If you end one
of the calls, Bria Mobile automatically switches to the other call.
CounterPath Corporation 53
Bria Mobile User Guide Calls
Using History
You can place a second call using entries in Bria Mobile's History using the History
entry or History details.
To place a second call by tapping the History entry – iPhone only
1.
Tap Hold to put the first call on hold.
2.
Tap Add Call.
3. Go to the History tab on the resource panel.
4. Tap the history entry containing the contact you want to call.
5. Tap Call… or Video….
CounterPath Corporation 54
Bria Mobile User Guide Calls
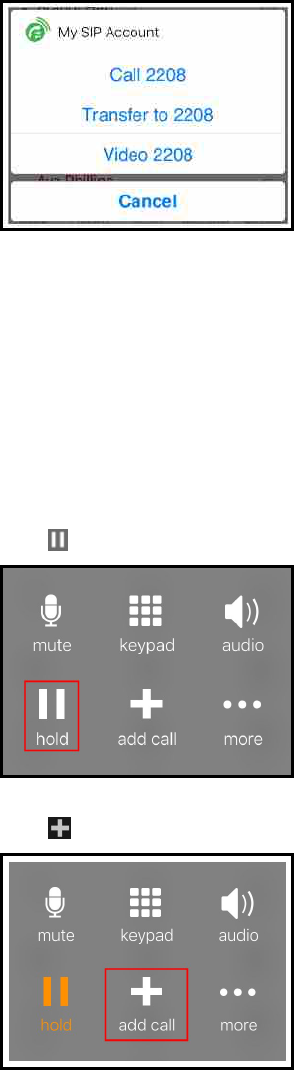
Bria Mobile connects the second call. If you are placing a video call, Bria Mobile starts
sending your video as soon as the other party accepts the incoming call. If you end one
of the calls, Bria Mobile automatically switches to the other call.
To place a second call using History details
iPhone
1.
Tap Hold to put the first call on hold.
2.
Tap Add Call.
3. Go to the History tab on the resource panel.
CounterPath Corporation 55
Bria Mobile User Guide Calls
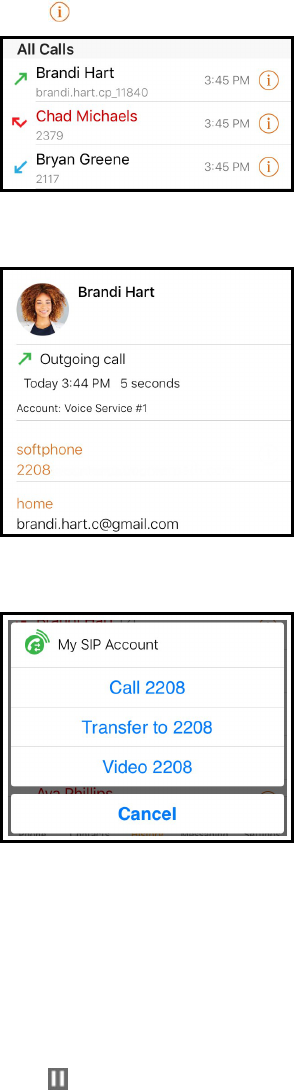
4.
Tap beside the entry to open call details.
5. Tap the phone number in the call entry.
6. Tap Call… or Video….
Bria Mobile connects the second call. If you are placing a video call, Bria Mobile starts
sending your video as soon as the other party accepts the incoming call. If you end one
of the calls, Bria Mobile automatically switches to the other call.
iPad
1.
Tap Hold to put the first call on hold.
CounterPath Corporation 56
Bria Mobile User Guide Calls
2.
Tap Add Call.
3. Go to the History tab on the resource panel.
4. Tap the entry to open call details.
5. Tap the phone number in the call entry.
6. Tap the Call… or Video….
CounterPath Corporation 57
Bria Mobile User Guide Calls
Bria Mobile connects the second call. If you are placing a video call, Bria Mobile starts
sending your video as soon as the other party accepts the incoming call. If you end one
of the calls, Bria Mobile automatically switches to the other call.
Swapping between calls
When you have two established calls, you can swap between them.
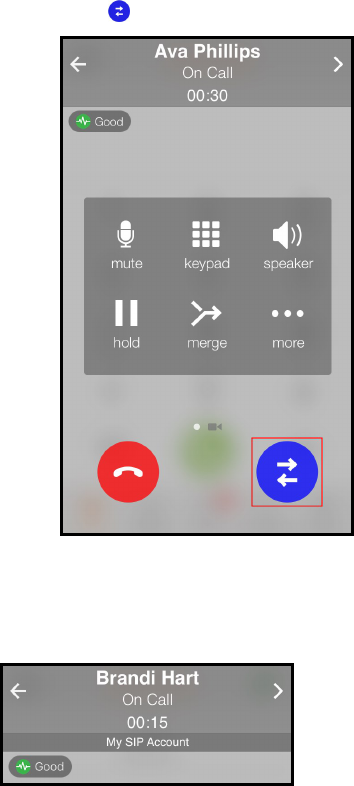
To swap between calls
iPhone
The active call is displayed in Bria Mobile.
CounterPath Corporation 58
Bria Mobile User Guide Calls
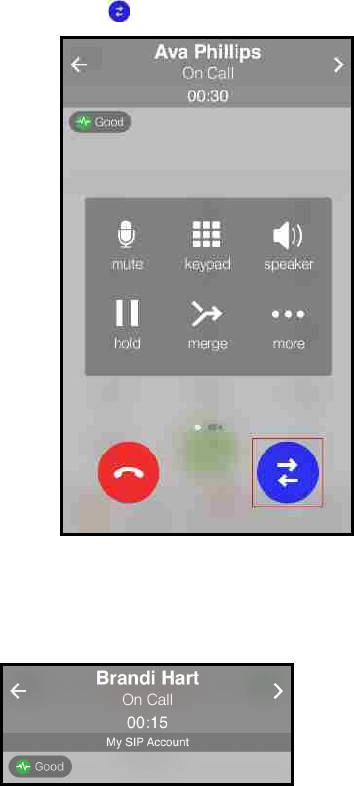
1.
Tap Swap Calls .
Bria Mobile places the first call on hold and connects the second call. Bria Mobile
displays the name of the remote party for the active call.
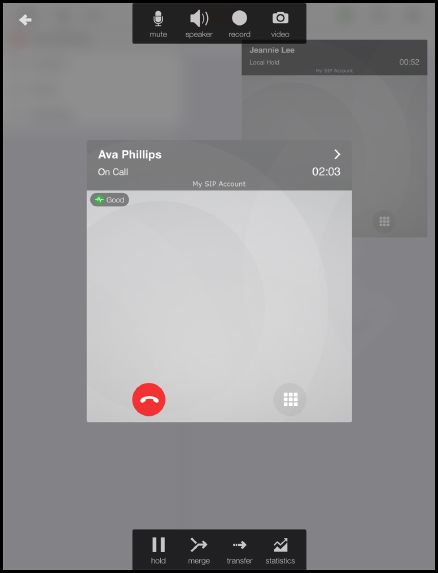
iPad
1. Both calls display on the screen. Tap the call at the back of the screen.
CounterPath Corporation 59
Bria Mobile User Guide Calls
Bria Mobile places the first call on hold and connects the second call. Bria Mobile
displays the active call in front.
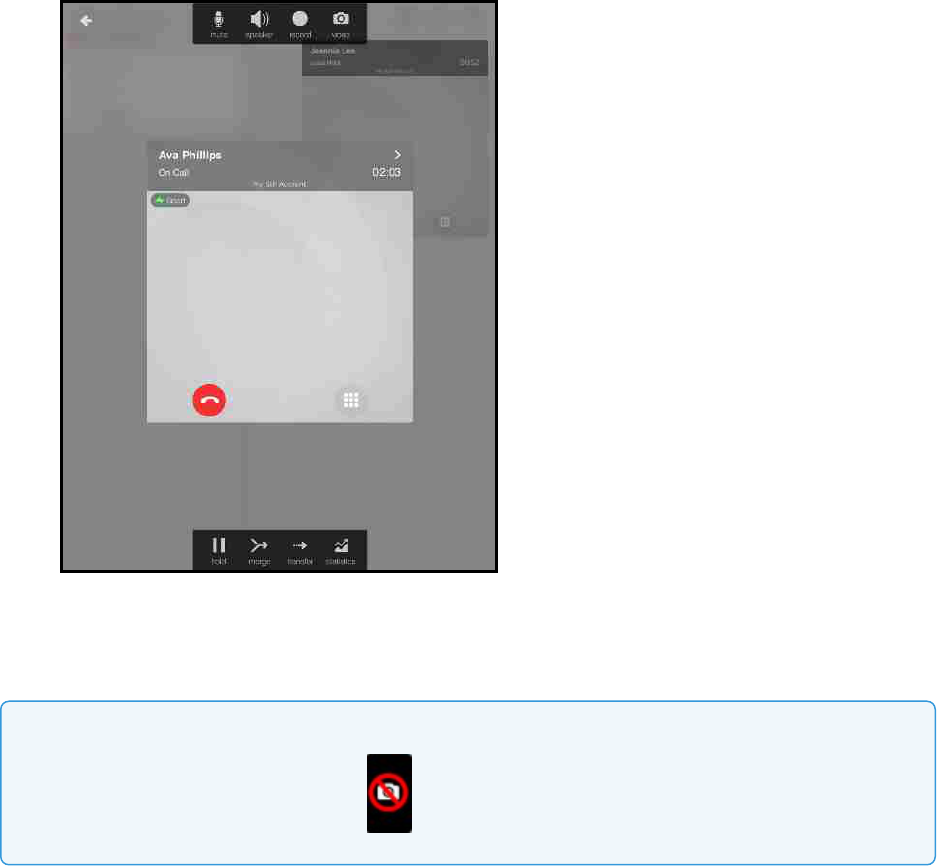
Note: The camera is not available when you are running Bria Mobile on an iPad in split view
mode. Video is not sent and you see Video Not Available on your video preview.
Dealing with an auto attendant (Pause dialing)
You can use DTMF or pause dialing for auto attendant when you dial call or during a
call.
Using DTMF when you dial a call
If you know that your call will be answered by an auto attendant and you know what
menu items to choose, you can include those menu items (DTMF) in the phone number
CounterPath Corporation 60
Bria Mobile User Guide Calls
when you dial it.
To use DTMF when you dial a call
iPhone
1. Enter the number you want to call in the dial pad.
2.
Before you tap Dial, use the DTMF dialing rules to add the required DTMF
digits. Tap in the call entry field to bring up the keyboard.
Bria Mobile dials the number and adds the DTMF digits to the call.
iPad
1. Enter the number you want to call in the dial pad.
2.
Before you tap Dial, use the DTMF guidelines to add the required DTMF digits.
Tap in the call entry field to bring up the keyboard.
CounterPath Corporation 61
Bria Mobile User Guide Calls
Bria Mobile dials the number and adds the DTMF digits to the call.
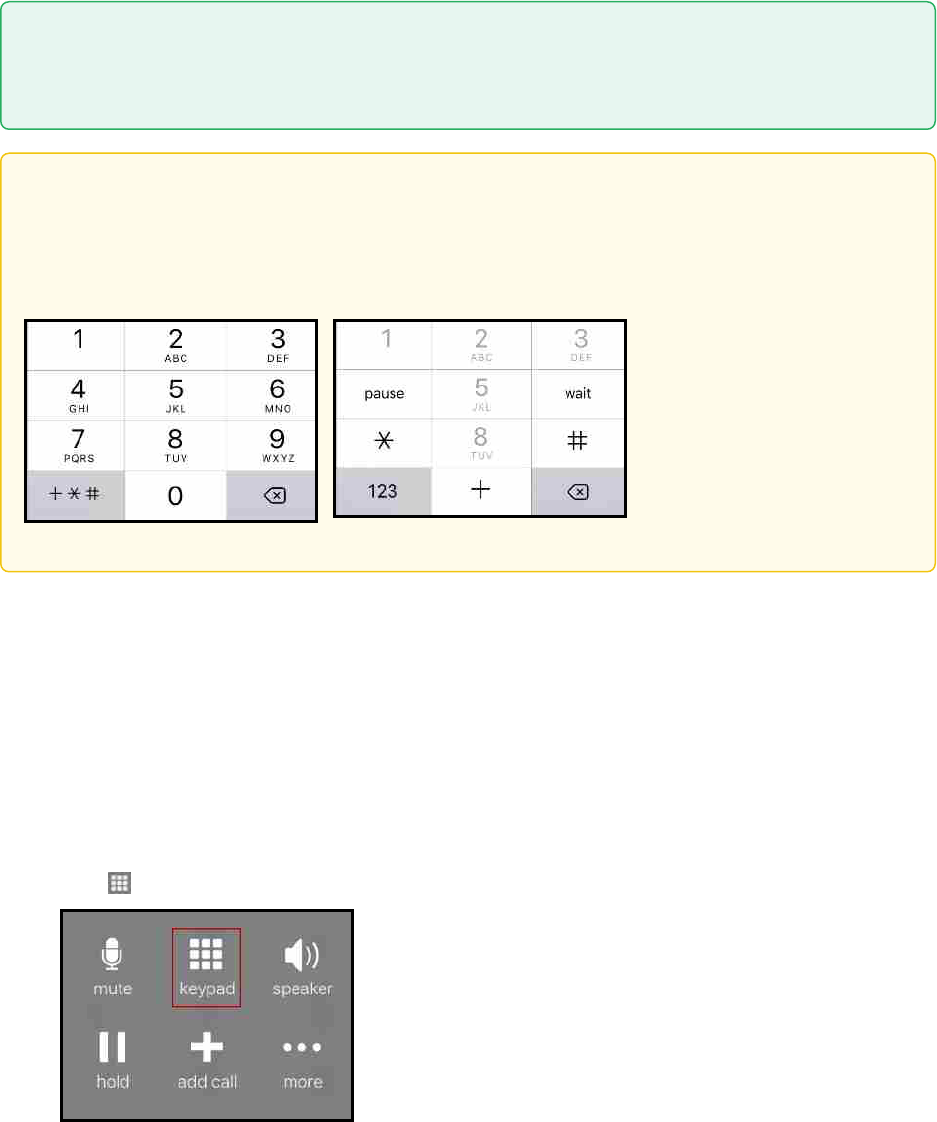
DTMF dialing rules
l You must include at least one comma before the first DTMF number.
l You can include other commas. Each comma causes Bria Mobile to pause for one
second before sending the next character.
Example:
To dial a number, add a 3-second delay and then press 44, enter this dialing string
in the call entry field:
6045551212,,,44
Example:
To dial a number, add a 6-second delay, then press 1 then 3 then 2, each with a two
CounterPath Corporation 62
Bria Mobile User Guide Calls
second delay, enter this dialing string in the call entry field:
6045551212,,,,,,1,,3,,2
Tip:
You can save the number in this format in your Contacts. On iPhone, tap the symbol
key on the bottom left corner of the numeric keypad to change between symbols and
numbers. Use Pause to enter a , (comma).
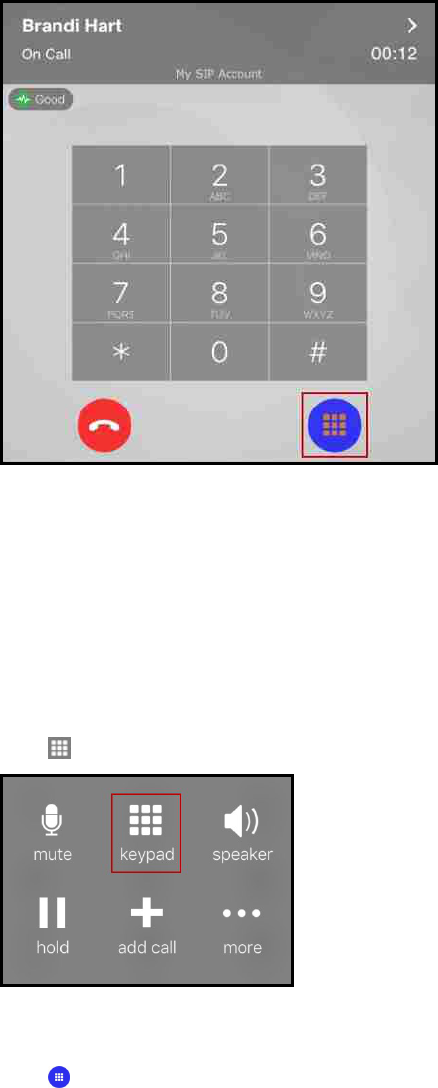
Using DTMFduring a call
If an auto attendant requires you to press numbers during a call, you can bring up the
keyboard and enter the DTMF digits.
To use DTMF during an audio call
iPhone
1.
Tap Keypad.
CounterPath Corporation 63
Bria Mobile User Guide Calls
2. Tap the required DTMF numbers.
3.
Tap Close Keypad to return to the call interface.
Bria Mobile sends the DTMF tones.
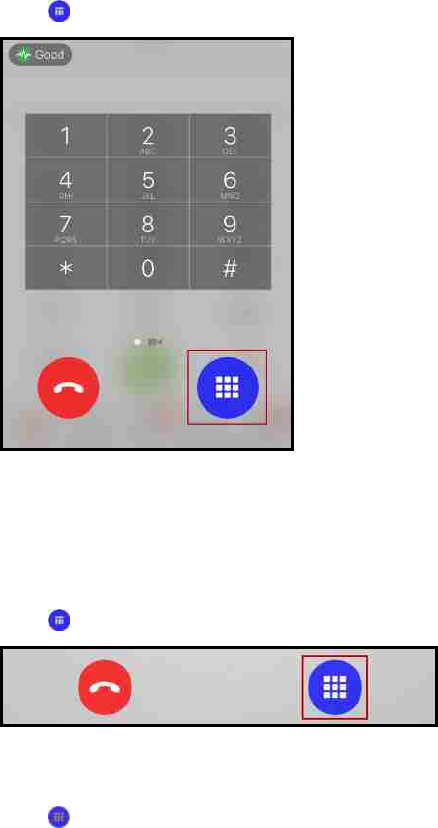
iPad
1.
Tap Keypad.
2. Tap the required DTMF numbers.
3.
Tap Close Keypad to return to the call interface.
CounterPath Corporation 64
Bria Mobile User Guide Calls
Bria Mobile sends the DTMF tones.
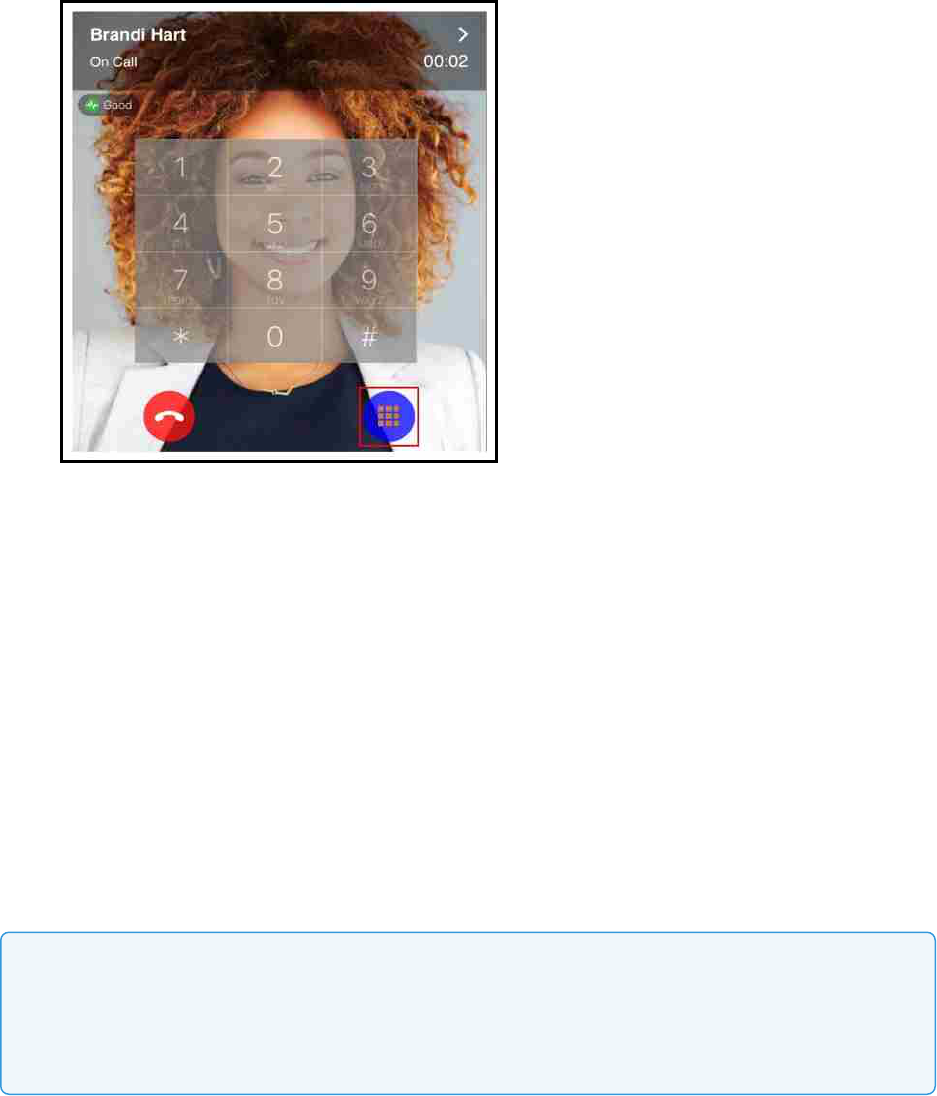
To use DTMF during a video call
iPhone
1. Swipe right on the video screen.
2.
Tap Keypad.
3. Tap the required DTMF numbers.
4.
Tap Close Keypad to return to the call interface.
CounterPath Corporation 65
Bria Mobile User Guide Calls
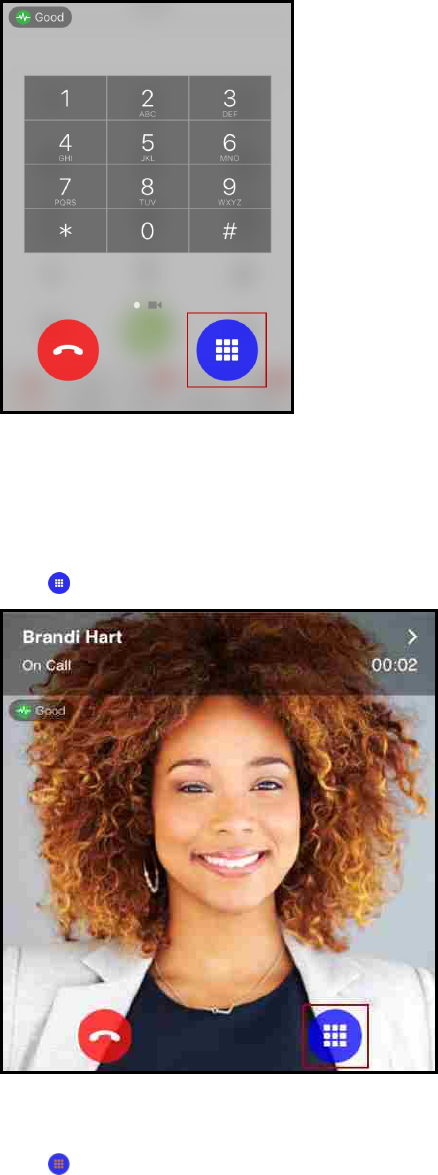
Bria Mobile sends the DTMF tones.
iPad
1.
Tap Keypad.
2. Tap the required DTMF numbers.
3.
Tap Close Keypad to return to the call interface.
CounterPath Corporation 66
Bria Mobile User Guide Calls
Bria Mobile sends the DTMF tones.
Handling an incoming call
Incoming calls generally appear the same as a native incoming call.
To receive calls when Bria Mobile is in the background or when Bria Mobile is exited,
you can set up push notifications.
All methods for handling incoming calls on an iPhone assume that Settings >
Preferences > Native Integration is on. For information on how Bria Mobile interacts
with iPhone’s native dialer and how to handle a call if Native Integration is off, see
Native integration.
Note: Bria Mobile users in China: CallKit cannot be used in China. For this reason, Settings >
Preferences > Call Handling – Native Integration does not appear in Bria Mobile if you are in
China. Please see Handling calls with Native Integration off for information on how to handle
incoming calls.
CounterPath Corporation 67
Bria Mobile User Guide Calls
Tip: Tap the device's power button or the volume buttons to silence the incoming ring tone
without answering the call.
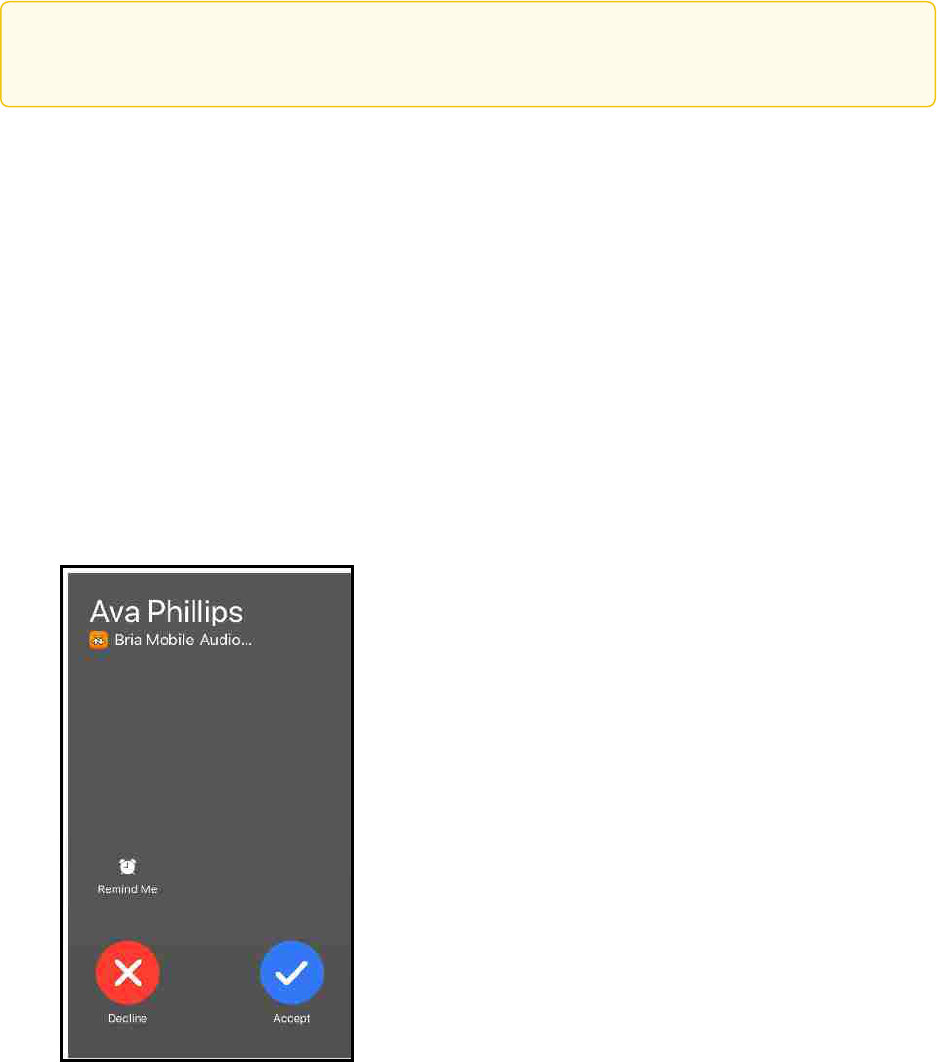
Answering calls with Bria Mobile in the foreground or background
When Bria Mobile is in the foreground or the background, Bria Mobile displays the name
of the remote party and the available options to handle the call.
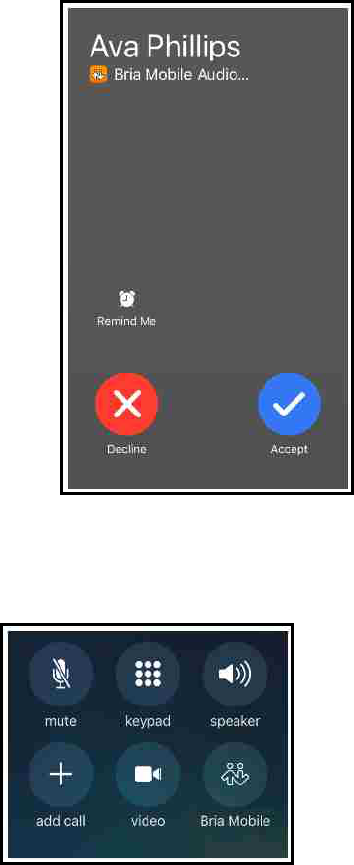
To respond to an incoming Bria Mobile call
iPhone
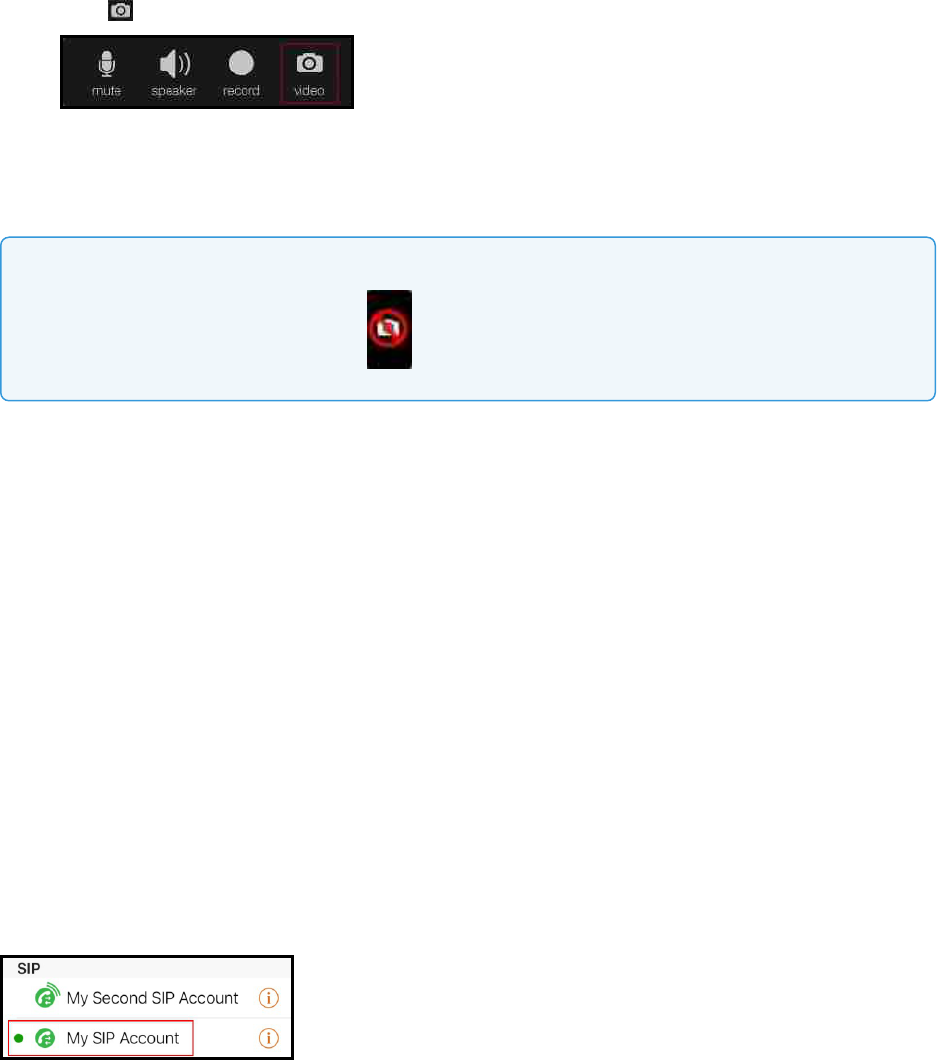
1. Tap the option you want to use.
l Accept: Bria Mobile answers the incoming call.
l Decline: Bria Mobile ends the incoming call.
l Remind Me: Bria Mobile ends the incoming call and sets a call reminder.
Bria Mobile declines or starts the call.
CounterPath Corporation 68
Bria Mobile User Guide Calls

iPad
1. Tap the option you want to use.
l Accept: Bria Mobile answers the incoming call.
l Decline: Bria Mobile ends the incoming call.
l Remind Me: Bria Mobile ends the incoming call and sets a call reminder.
Bria Mobile declines or starts the call.
Device is locked
When your device is locked, you receive an incoming call notification on the lockscreen.
To answer an incoming call when the device is locked
iPhone
1. Slide the phone icon to the right to answer the call. Tap the iPhone and iPad
CounterPath Corporation 69
Bria Mobile User Guide Calls
power button or the volume buttons to silence the incoming ring tone without
answering the call.
Bria Mobile starts the call. To access any other calling features, tap the Bria Mobile icon
and, if required, enter the passcode for the iPhone and iPad.
iPad
1. Slide the phone icon to the right to answer the call. Tap the iPhone and iPad
power button or the volume buttons to silence the incoming ring tone without
answering the call.
CounterPath Corporation 70
Bria Mobile User Guide Calls

Bria Mobile starts the call. To access any other calling features, tap the Bria Mobile icon
and, if required, enter the passcode for the iPhone and iPad.
Answering a second incoming call
On an iPhone, you can have two concurrent Bria Mobile calls and one native call.
On an iPad, you can have two concurrent Bria Mobile calls.
CounterPath Corporation 71
Bria Mobile User Guide Calls

To answer a second incoming Bria Mobile call
iPhone
1. Tap the option you want to use.
l End & Accept: Bria Mobile ends the first call and answers the incoming call.
l Decline: Bria Mobile continues with the first call and ends the incoming call.
l Hold & Accept: Bria Mobile puts the first call on hold and answers the
incoming call.
l Remind Me: Bria Mobile ends the call and sets a reminder
Bria Mobile declines or starts the call.
iPad
1. Tap the option you want to use.
l End & Accept: Bria Mobile ends the first call and answers the incoming call.
l Decline: Bria Mobile continues with the first call and ends the incoming call.
l Hold & Accept: Bria Mobile puts the first call on hold and answers the
CounterPath Corporation 72
Bria Mobile User Guide Calls

incoming call.
l Remind Me: Bria Mobile ends the call and sets a reminder
Bria Mobile declines or starts the call.
Swapping between calls
When you have two established calls, you can swap between them.
To swap between calls
iPhone
The active call is displayed in Bria Mobile.
CounterPath Corporation 73
Bria Mobile User Guide Calls
1.
Tap Swap Calls .
Bria Mobile places the first call on hold and connects the second call. Bria Mobile
displays the name of the remote party for the active call.
iPad
1. Both calls display on the screen. Tap the call at the back of the screen.
CounterPath Corporation 74
Bria Mobile User Guide Calls
Bria Mobile places the first call on hold and connects the second call. Bria Mobile
displays the active call in front.
Handling an incoming video call
When the remote party places a video call, you see their video on Bria Mobile when you
answer the call. You can add your video, remove your video but continue to receive
video, or you can remove all video and downgrade the call to audio only.
On an iPhone, the video controls auto-hide. If the video controls are missing, tap the
screen to make them reappear.
See Handling a video call for more details.
Disabling call waiting
You can turn on Disable Call Waiting so active calls are not interrupted by incoming
calls. You can enable this feature during a call and it will take effect right away. The calls
will appear as Missed Calls in History. Any new incoming calls ring busy (to the caller)
or go straight to voice mail if you have this service.
CounterPath Corporation 75
Bria Mobile User Guide Calls

To disable call waiting
1. Go to the Settings tab on the resource panel.
2. Go to Preferences - Incoming Call.
3. Turn on Disable Call Waiting.
Disable Call Waiting is enabled.
Enabling call blocking
With this feature, Bria Mobile blocks incoming calls with:
l No number,
l Anonymous Caller ID, and/or
l any number you added to the block list.
You can add up to 20 phone numbers in Bria Mobile.
A SIPaddress with alphabets cannot be blocked.
Call History shows blocked calls.
To enable call blocking
1. Go to the Settings tab on the resource panel.
2. Go to Preferences - Incoming Call.
3. Tap Call Blocking.
4. Enable options and/or add phone numbers to block.
Call blocking is enabled.
To add a phone number to the block list from History
iPhone
1. Go to the History tab on the resource panel.
2.
Tap beside the entry to open call details.
CounterPath Corporation 76
Bria Mobile User Guide Calls
3. Tap Block… in the call entry.
Bria Mobile adds this number to the block list.
iPad
1. Go to the History tab on the resource panel.
2. Tap the entry to open call details.
3. Tap Block… in the call entry.
Bria Mobile adds this number to the block list.
Handling a video call
When the remote party places a video call, you see their video on Bria Mobile when you
answer the call. You can send your video, stop sending your video, or turn off all video.
On an existing call, you can add your video, remove your video but continue to receive
video, or you can remove all video and downgrade the call to audio only.
On an iPhone, the video controls auto-hide. If the video controls are missing, tap the
screen to make them reappear.
CounterPath Corporation 77
Bria Mobile User Guide Calls
Sending your video
On an existing call, you can send your video to the remote party.
To send your video
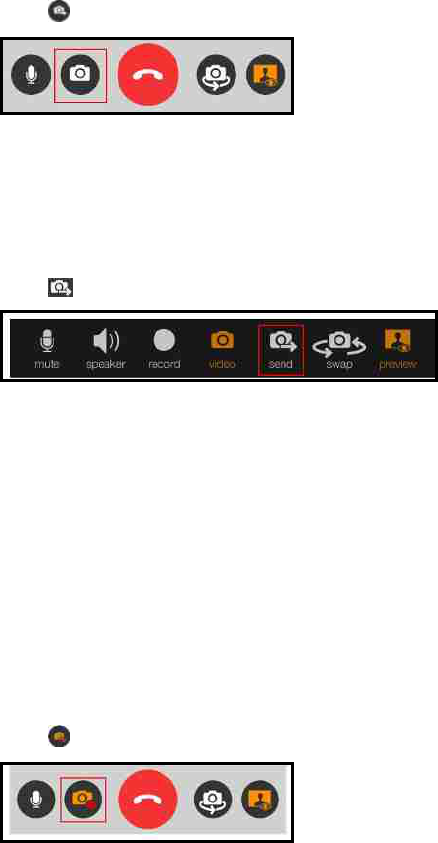
iPhone
1.
Tap Send in the toolbar at the bottom of the screen.
Bria Mobile starts sending your video to the remote party.
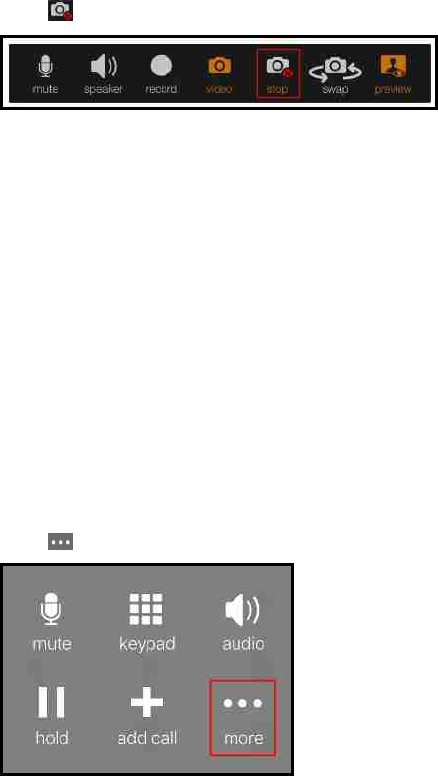
iPad
1. Tap Send in the toolbar at the top of the screen.
Bria Mobile starts sending your video to the remote party.
Stop sending your video
You can stop sending your video but continue to receive incoming video.
To stop sending your video
iPhone
1.
Tap Stop at the bottom of the screen.
Bria Mobile no longer sends your video. You can still see the remote party’s video if they
are sending it.
CounterPath Corporation 78
Bria Mobile User Guide Calls
iPad
1.
Tap Stop at the top of the screen.
Bria Mobile no longer sends your video. You can still see the remote party’s video if they
are sending it.
Removing your video
You can remove all video from the call and turn it into an audio only call.
To remove all video
iPhone
1. Swipe right on the screen.
2. Tap More.
3. Tap Stop Video.
CounterPath Corporation 79
Bria Mobile User Guide Calls
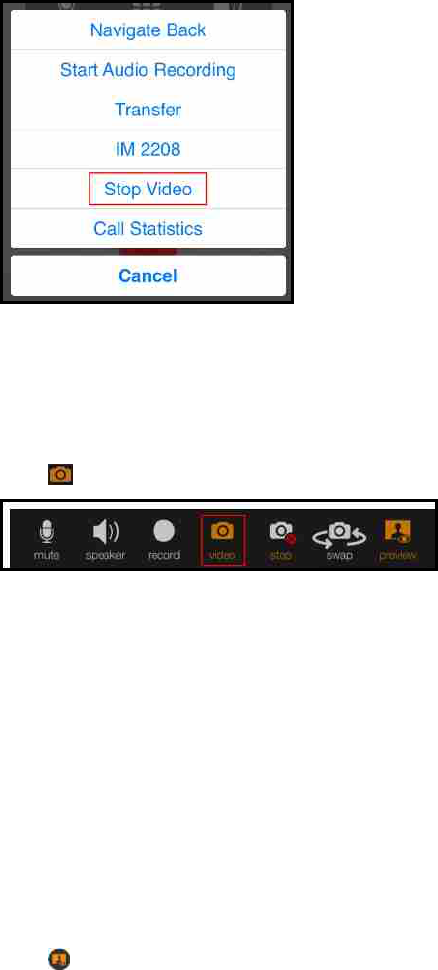
Bria Mobile switches the call to an audio call.
iPad
1.
Tap Video.
Bria Mobile switches the call to an audio call.
Local video preview
If you want to see what the remote party sees for your video, you can view the local
video preview.
To show or hide the local video preview
iPhone
1.
Tap Preview.
CounterPath Corporation 80
Bria Mobile User Guide Calls

Bria Mobile adds or removes the video preview.
iPad
1.
Tap Preview.
Bria Mobile adds or removes the video preview.
CounterPath Corporation 81
Bria Mobile User Guide Calls
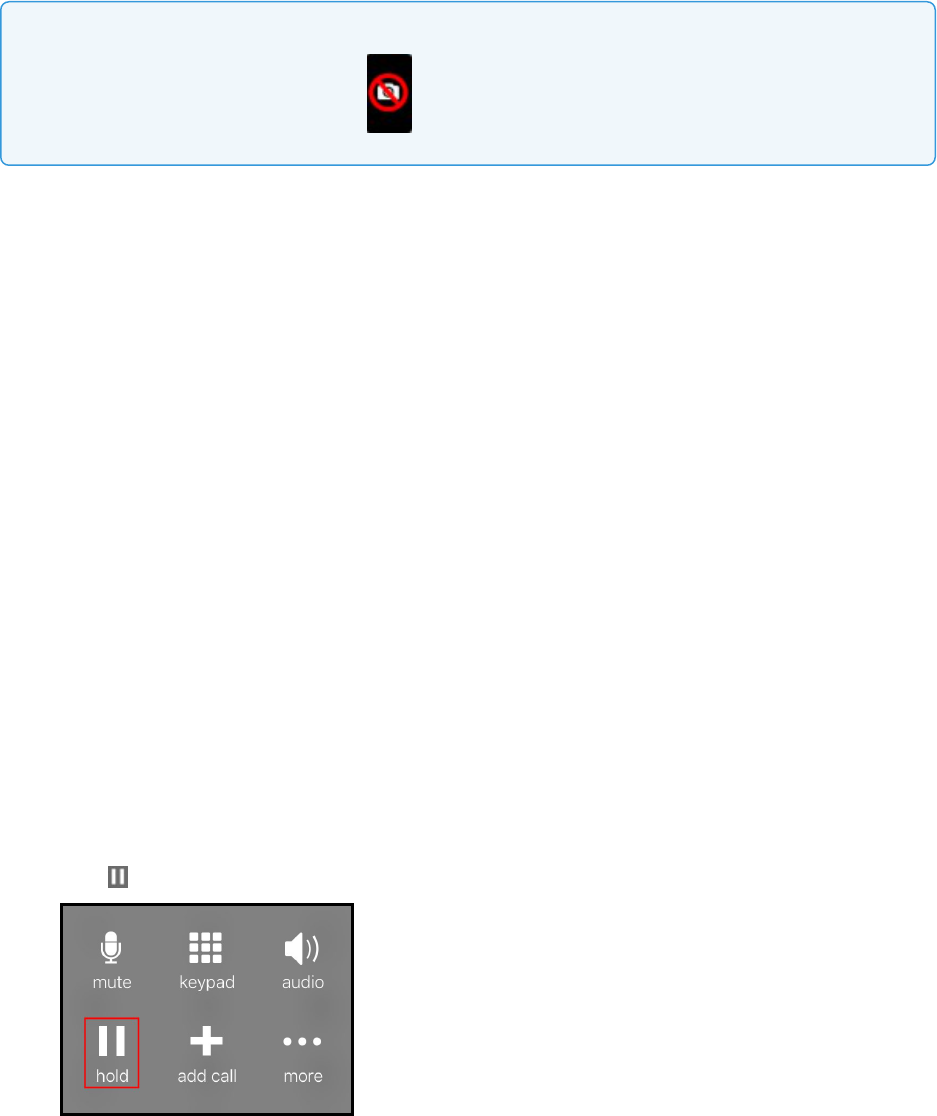
Note: The camera is not available when you are running Bria Mobile on an iPad in split view
mode. Video is not sent and you see Video Not Available on your video preview.
Transferring a call
Calls can be transferred to a target in two ways. In an attended transfer, the first party
speaks to the target before transferring the call. In an unattended (blind) transfer, the first
party sends the call to the target without talking to the target in advance.
When you transfer a video call, the call is transferred as an audio call. Both parties can
add video to the audio call.
Attended transfer
In an attended transfer, you speak to the target before transferring the call. You can make
an attended transfer from the dial pad, from Contacts, or from History.
Using the dial pad
If you know the number, you can use the dial pad to make an attended transfer.
To make an attended transfer using the dial pad
iPhone
1.
Tap Hold to put the first call on hold.
CounterPath Corporation 82
Bria Mobile User Guide Calls
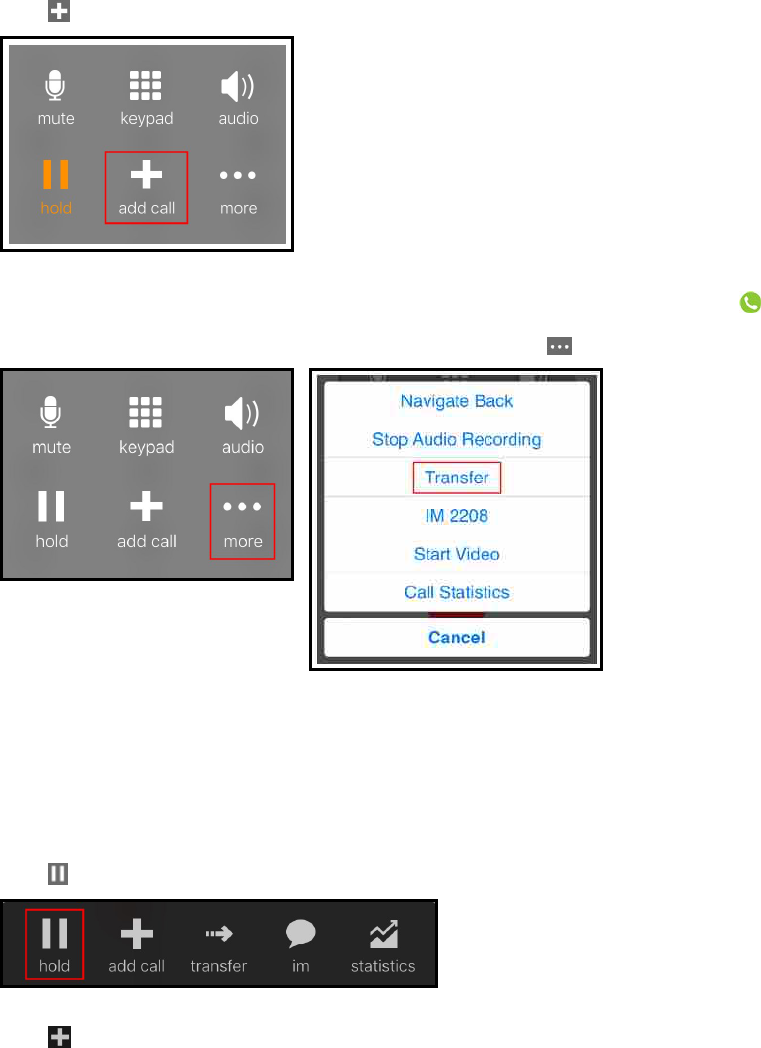
2.
Tap Add call.
3.
Enter the number of the person you want to transfer the call to and tap Dial.
4. When you are finished speaking with the target, tap More and tap Transfer.
Bria Mobile connects the remote party to the target. Bria Mobile disconnects you from
both calls.
iPad
1.
Tap Hold to put the first call on hold.
2.
Tap Add Call.
CounterPath Corporation 83
Bria Mobile User Guide Calls
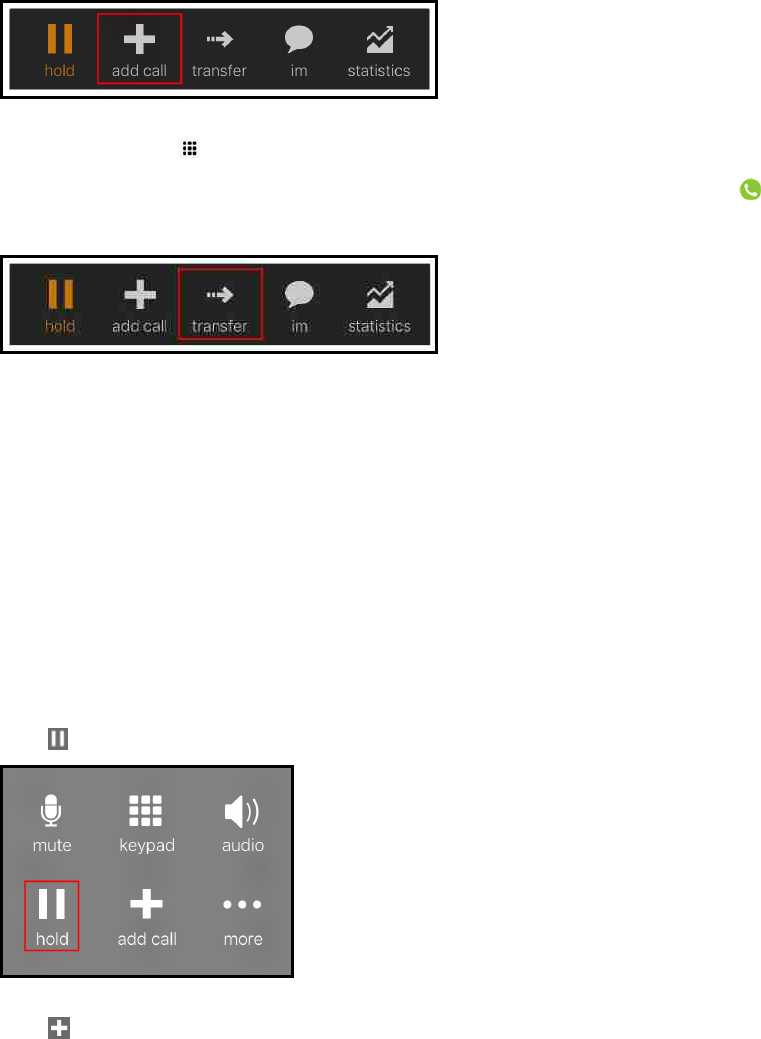
3.
If necessary, tap Dial pad in the toolbar.
4.
Enter the number of the person you want to transfer the call to and tap Dial.
5. Tap Transfer when you have finished speaking with the target.
Bria Mobile connects the remote party to the target. Bria Mobile disconnects you from
both calls.
Using Bria Mobile's Contacts
You can make an attended transfer by selecting one of your contacts.
Using Bria Mobile's Contacts to make an attended transfer
iPhone
1.
Tap Hold to put the first call on hold.
2.
Tap Add call.
CounterPath Corporation 84
Bria Mobile User Guide Calls

3. If necessary, go to the Contacts tab on the resource panel to display Bria Mobile’s
Contacts.
4. Select a contact by tapping on the contact or typing their name in the Search bar
and tapping on the contact.
ContactDetails opens.
5. Tap the number you want to transfer the call to.
6. Tap Call… or Video….
CounterPath Corporation 85
Bria Mobile User Guide Calls
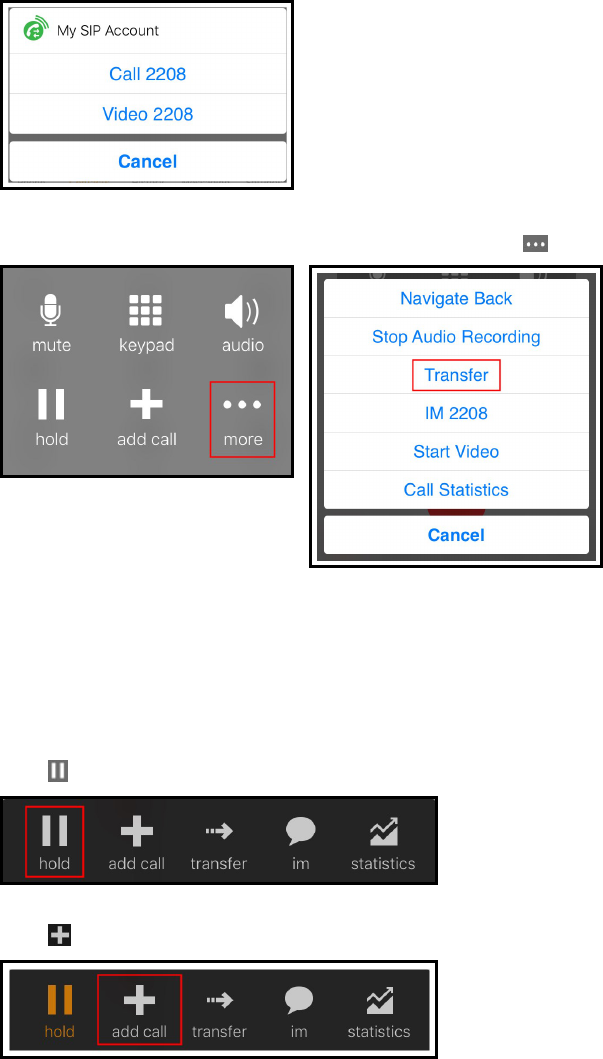
7. When you are finished speaking to the target, tap More and tap Transfer.
Bria Mobile connects the remote party to the target. Bria Mobile disconnects you from
both calls.
iPad
1.
Tap Hold to put the first call on hold.
2.
Tap Add Call.
3. If necessary, go to the Contacts tab on the resource panel to display Bria Mobile’s
Contacts.
CounterPath Corporation 86
Bria Mobile User Guide Calls
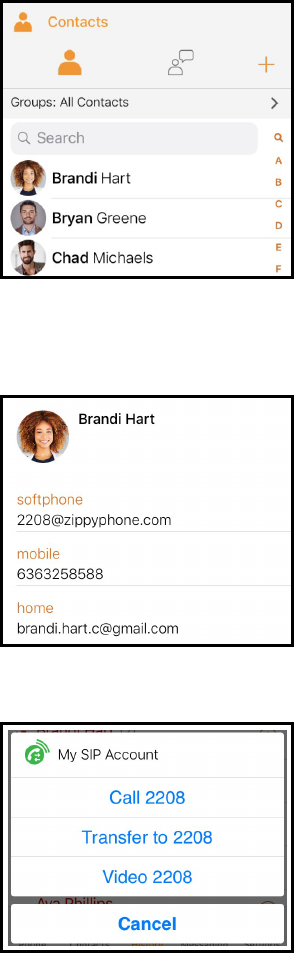
4. Select a contact by tapping on the contact or typing their name in the Search bar
and tapping on the contact.
ContactDetails opens.
5. Tap the number you want to transfer the call to.
6. Tap Call… or Video….
7. Tap transfer when you have finished speaking to the target.
CounterPath Corporation 87
Bria Mobile User Guide Calls
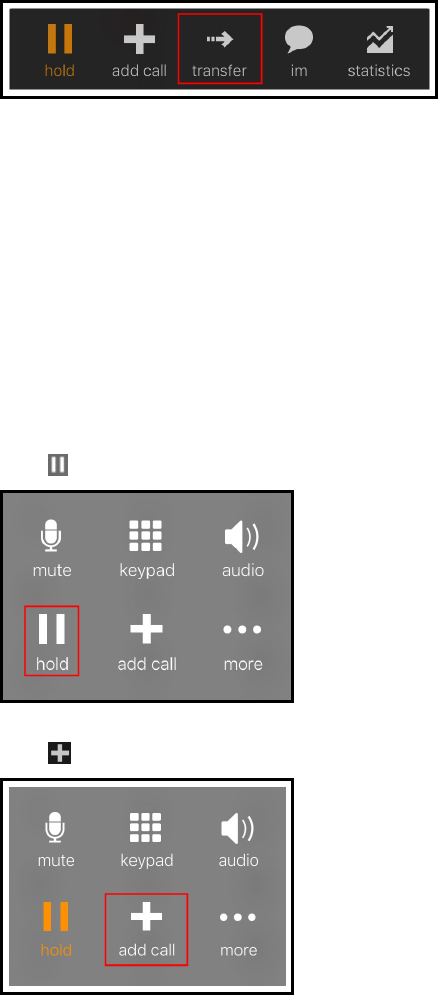
Bria Mobile connects the remote party to the target. Bria Mobile disconnects you from
both calls.
Using Bria Mobile's History
You can make an attended transfer to someone you have previously had a call with.
To make an attended transfer by tapping a History entry – iPhone
only
1.
Tap Hold to put the first call on hold.
2.
Tap Add Call.
3. Go to the History tab on the resource panel.
4. Tap the history entry containing the contact you want to transfer the call to.
CounterPath Corporation 88
Bria Mobile User Guide Calls
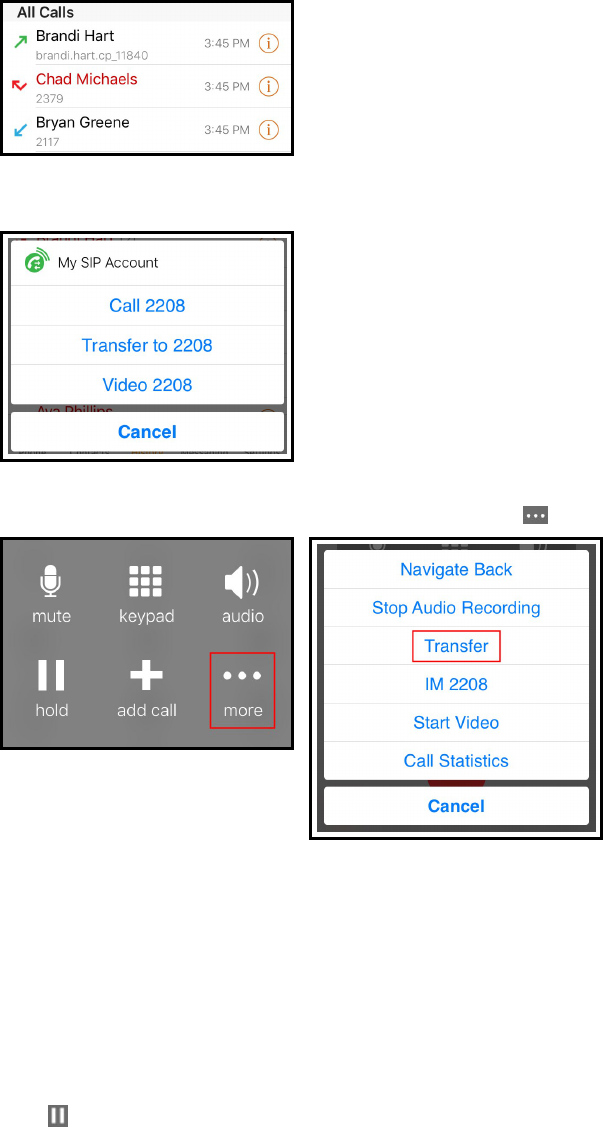
5. Tap Call… or Video….
6. When you are finished speaking to the target, tap More and tap Transfer.
Bria Mobile connects the remote party to the target. Bria Mobile disconnects you from
both calls.
To make an attended transfer using History details
iPhone
1.
Tap Hold to put the first call on hold.
CounterPath Corporation 89
Bria Mobile User Guide Calls
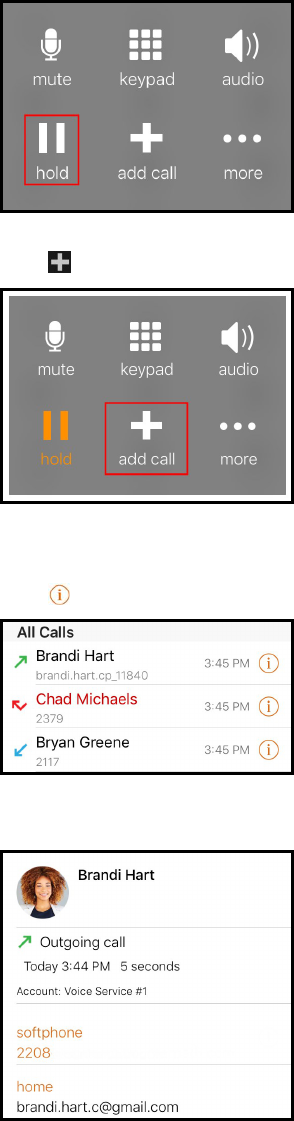
2.
Tap Add Call.
3. Go to the History tab on the resource panel.
4.
Tap More Info beside the entry to open call details.
5. Tap the phone number in the call entry.
CounterPath Corporation 90
Bria Mobile User Guide Calls
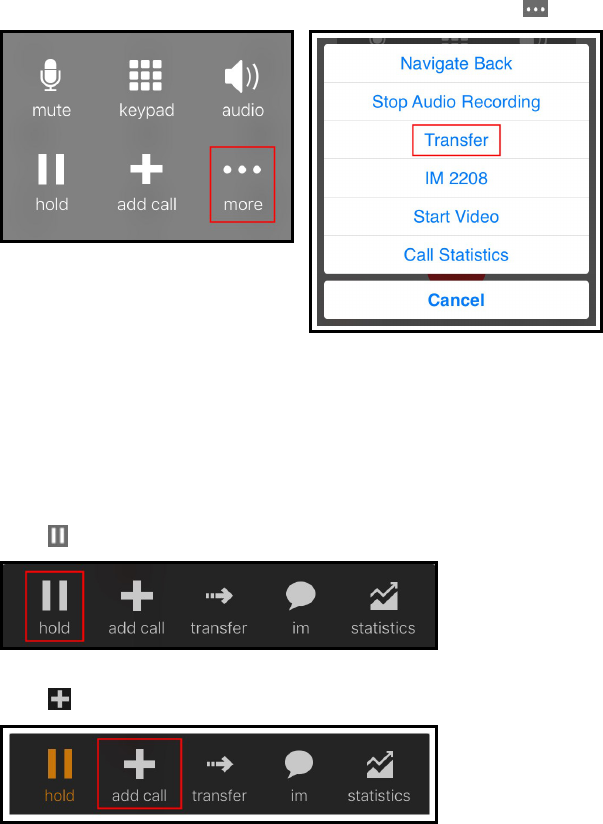
6. When you are finished speaking to the target, tap More and tap Transfer to….
Bria Mobile connects the remote party to the target. Bria Mobile disconnects you from
both calls.
iPad
1.
Tap Hold to put the first call on hold.
2.
Tap Add Call.
3. Go to the History tab on the resource panel.
4. Tap the entry to open call details.
CounterPath Corporation 91
Bria Mobile User Guide Calls
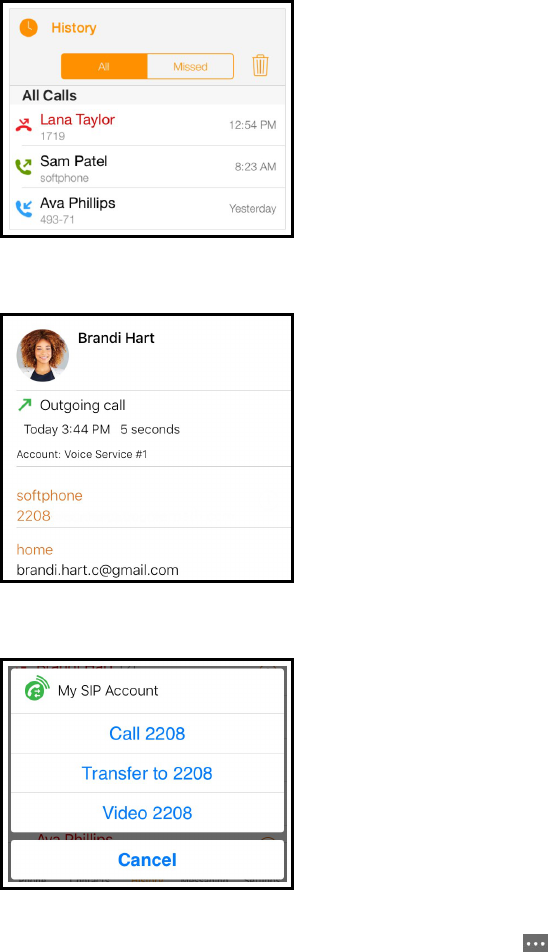
5. Tap the phone number in the call entry.
6. Tap the Call… or Video….
7. When you are finished speaking to the target, tap More and tap Transfer to….
CounterPath Corporation 92
Bria Mobile User Guide Calls
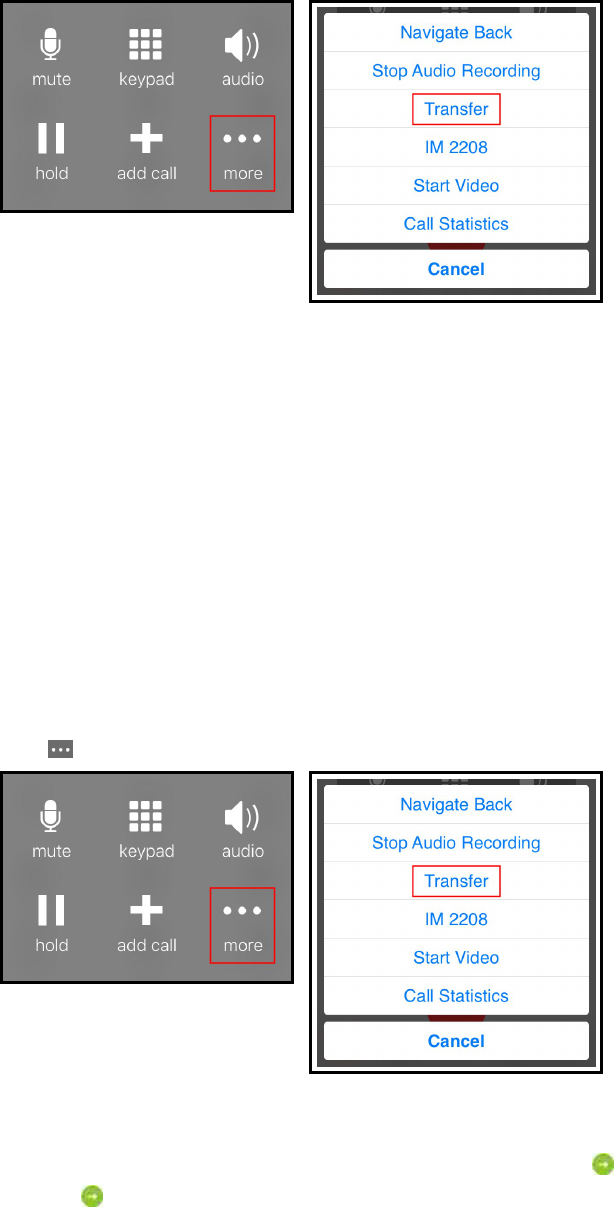
Bria Mobile connects the remote party to the target. Bria Mobile disconnects you from
both calls.
Unattended transfer
In an unattended transfer, you do not speak to the target before transferring the call.
Using the dial pad
To make an unattended transfer using the dial pad
iPhone
1. Tap More and tap Transfer.
2. If necessary, go to the Phone tab on the resource panel.
3.
Type the number you want to transfer the call to and tap Transfer.
After tapping Transfer, Bria Mobile puts the remote party on hold while dialing the
CounterPath Corporation 93
Bria Mobile User Guide Calls
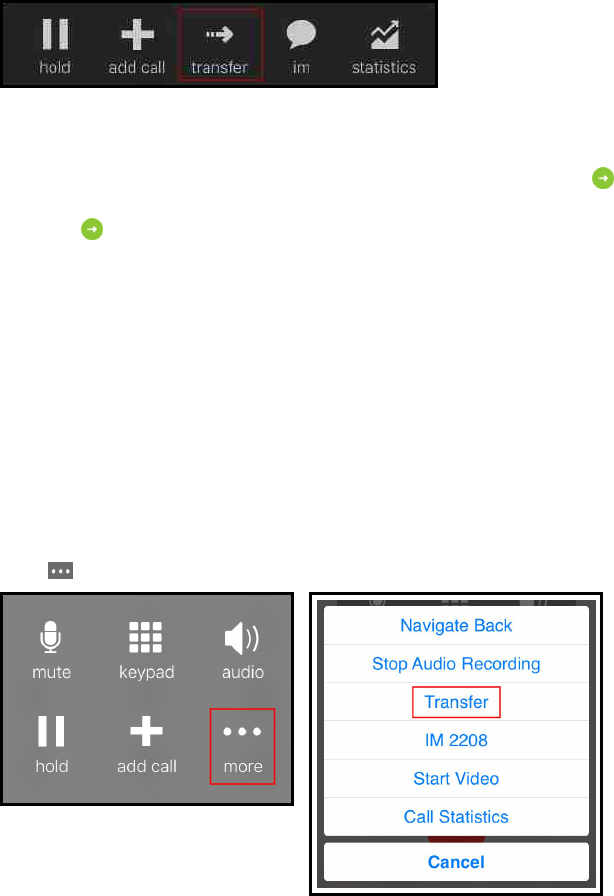
target. Once the call connects, Bria Mobile ends the call between you and the remote
party. If the target answers the call, the call continues between the target and the remote
party. If the target declines the call, the call ends.
iPad
1. Tap Transfer.
2. Tap the dial pad in the toolbar.
3.
Type the number you want to transfer the call to and tap Transfer.
After tapping Transfer, Bria Mobile puts the remote party on hold while dialing the
target. Once the call connects, Bria Mobile ends the call between you and the remote
party. If the target answers the call, the call continues between the target and the remote
party. If the target declines the call, the call ends.
Using Bria Mobile Contact's
To make an unattended transfer using Bria Mobile's Contacts
iPhone
1. Tap More and tap Transfer.
2. Go to the Contacts tab on the resource panel to display Bria Mobile’s Contacts.
CounterPath Corporation 94
Bria Mobile User Guide Calls
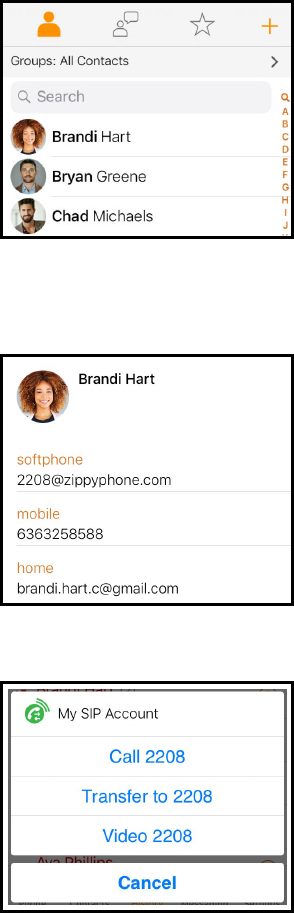
3. Select a contact by tapping on the contact or typing their name in the Search bar
and tapping on the contact.
ContactDetails opens.
4. Tap the number you want to transfer the call to.
5. Tap Transfer to….
After tapping Transfer To, Bria Mobile puts the remote party on hold while dialing the
target. Once the call connects, Bria Mobile ends the call between you and the remote
party. If the target answers the call, the call continues between the target and the remote
party. If the target declines the call, the call ends.
CounterPath Corporation 95
Bria Mobile User Guide Calls
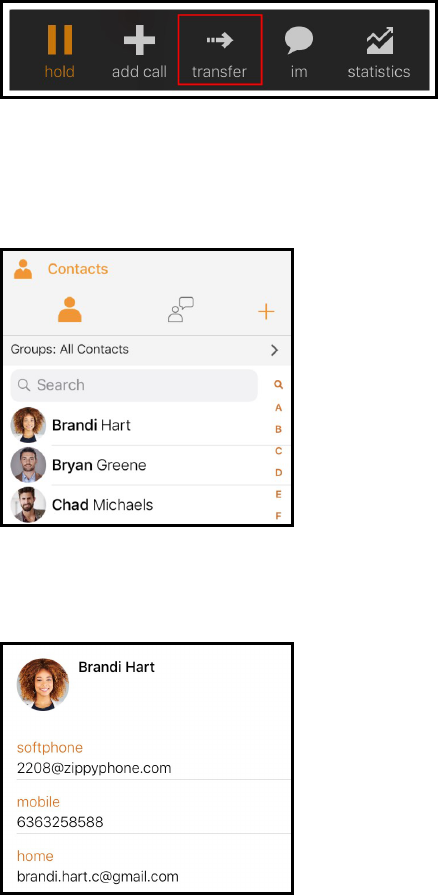
iPad
1. Tap transfer.
2. Go to the Contacts tab on the resource panel to display Bria Mobile’s Contacts.
3. Select a contact by tapping on the contact or typing their name in the Search bar
and tapping on the contact.
ContactDetails opens.
4. Tap the number you want to transfer the call to.
5. Tap Transfer to….
CounterPath Corporation 96
Bria Mobile User Guide Calls
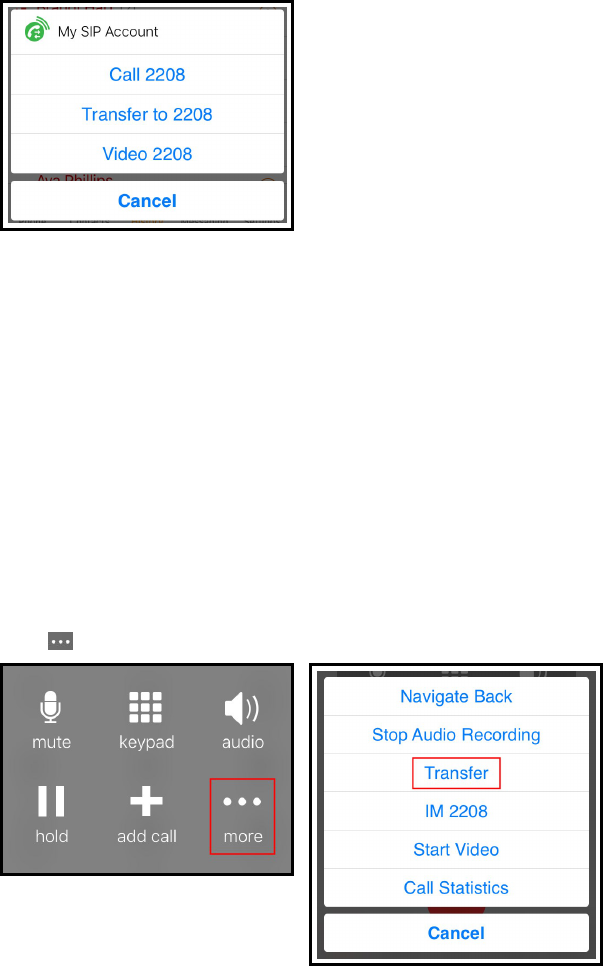
After tapping Transfer To, Bria Mobile puts the remote party on hold while dialing the
target. Once the call connects, Bria Mobile ends the call between you and the remote
party. If the target answers the call, the call continues between the target and the remote
party. If the target declines the call, the call ends.
Using Bria Mobile's History
You can make an unattended transfer from Bria Mobile's History using long-press or
using the History icon.
To make an unattended transfer by tapping a History entry – iPhone only
1. Tap More and tap Transfer.
2. Go to the History tab on the resource panel.
3. Tap the history entry containing the contact you want to transfer the call to.
CounterPath Corporation 97
Bria Mobile User Guide Calls
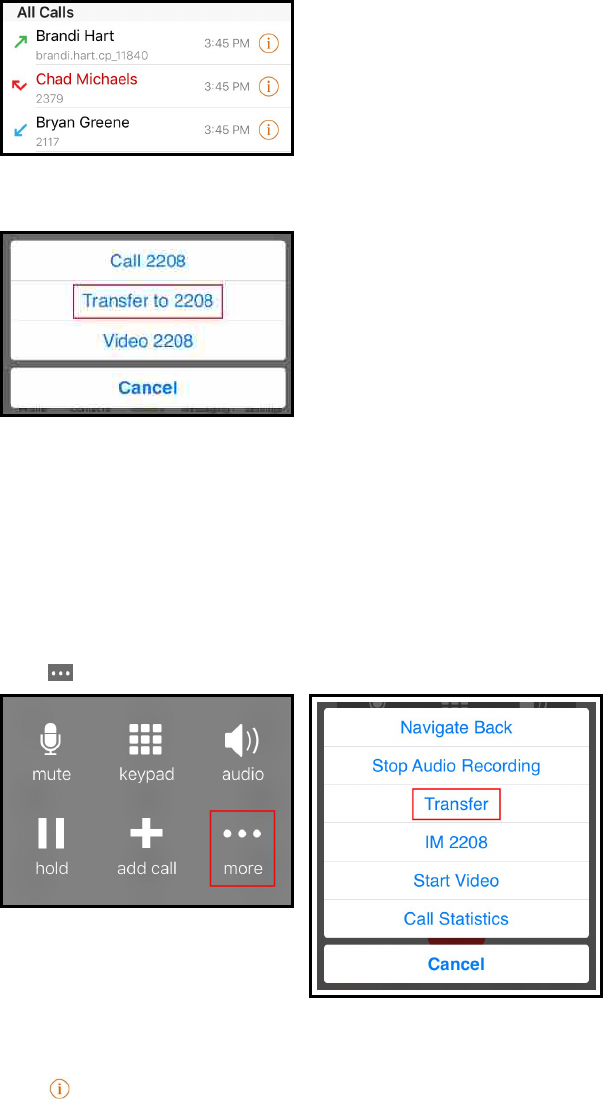
4. Tap Transfer to….
Bria Mobile connects the remote party to the target. Bria Mobile disconnects you from
both calls.
To make an unattended transfer using History details
iPhone
1. Tap More and tap Transfer.
2. Go to the History tab on the resource panel.
3.
Tap More Info beside the entry to open call details.
CounterPath Corporation 98
Bria Mobile User Guide Calls
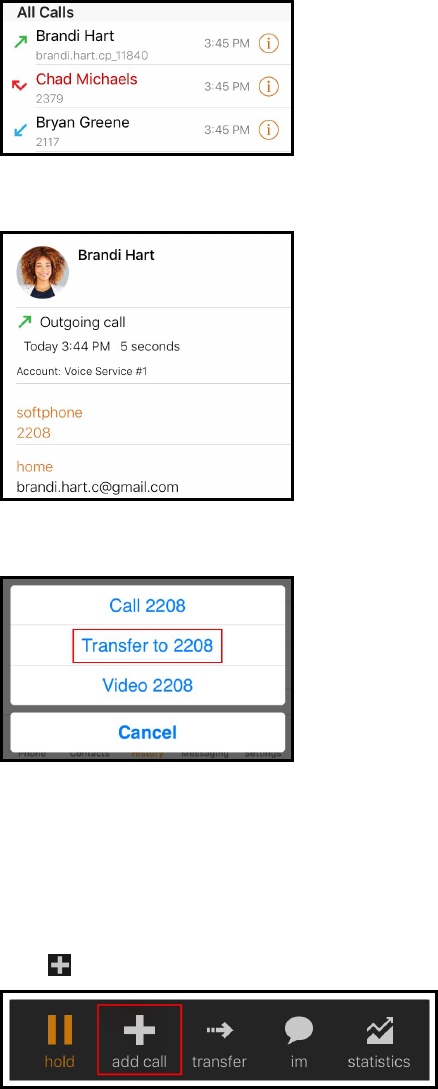
4. Tap the phone number in the call entry.
5. Tap Transfer to….
Bria Mobile connects the remote party to the target. Bria Mobile disconnects you from
both calls.
iPad
1.
Tap Add Call.
2. Go to the History tab on the resource panel.
CounterPath Corporation 99
Bria Mobile User Guide Calls
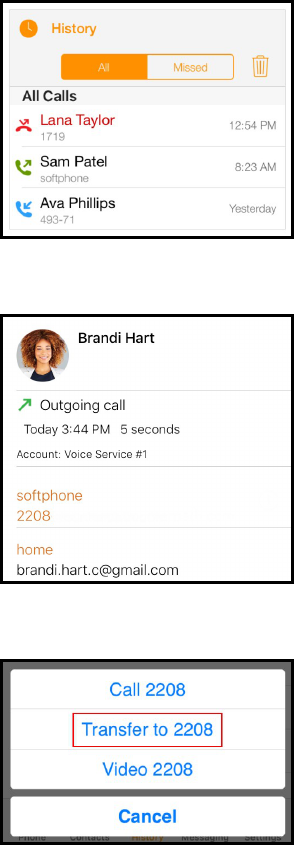
3. Tap the entry to open call details.
4. Tap the phone number in the call entry.
5. Tap Transfer to….
Bria Mobile connects the remote party to the target. Bria Mobile disconnects you from
both calls.
Encrypting a call
Bria Mobile allows you to encrypt incoming and outgoing calls. This feature is turned on
in Settings > Accounts > SIP Account > Account Advanced. Encrypt audio only works if
it is supported by your SIP provider.
CounterPath Corporation 100
Bria Mobile User Guide Calls
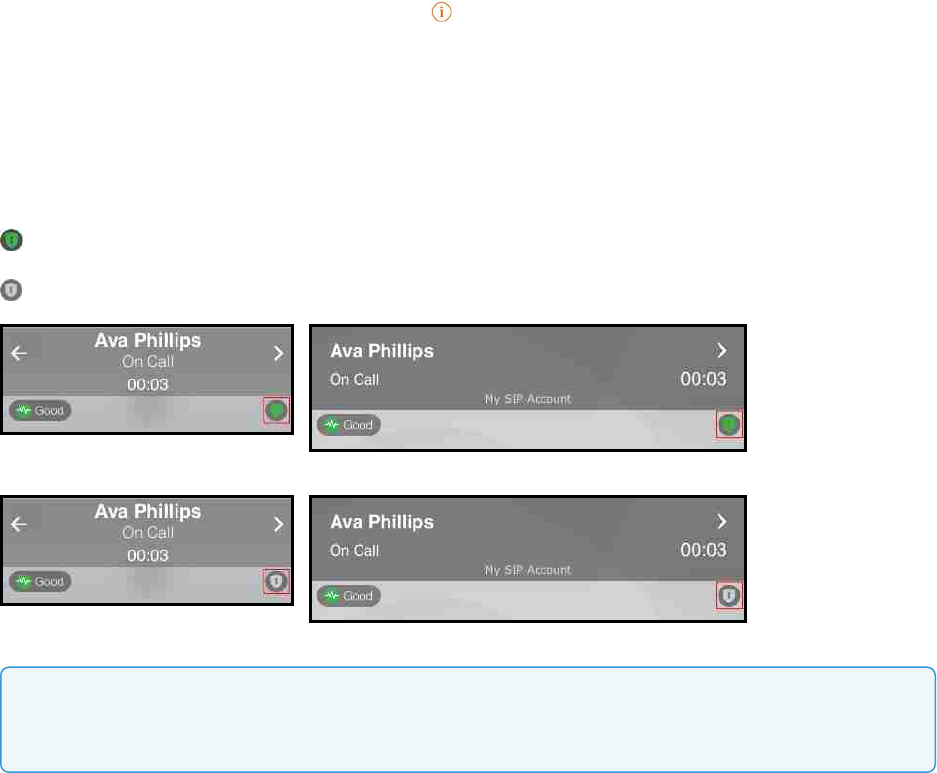
To turn on call encryption
1.
Go to Settings > Accounts and tap More Info beside your SIP account.
2. Tap Account Advanced.
3. Select Always for Transport and Security – Encrypt Audio.
Calls you place using Bria Mobile are encrypted and displays an encryption indicator.
Encryption indicators
– Bria Mobile is using SRTP for encryption and TLS for transport.
– Bria Mobile is using SRTP for encryption and UDP or TCP for transport.
Note: Calls fail if the remote party does not support SRTP call encryption. Set Transport
Security – Encrypt Audio to Never to complete the call.
Recording a call
When you record a call, Bria Mobile plays a call recording tone to the remote party when
the recording starts.
You can record a video call, but only the audio portion of the call is recorded.
l Muting a call does not silence the tone.
l If a call is put on hold (either by yourself or the remote party), the recording is
CounterPath Corporation 101
Bria Mobile User Guide Calls
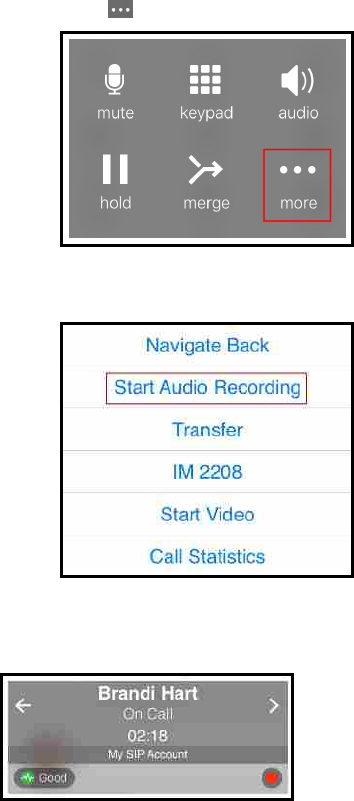
paused. Bria Mobile plays the call recording tone to the remote party when the call
resumes.
l Bria Mobile stops recording when you are redirecting a call. Bria Mobile plays the
call recording tone to the remote party when the recording resumes.
To record a call
iPhone
1. Tap More during an established call.
2. Tap Start Audio Recording.
Bria Mobile displays a small red, flashing icon to show that the call is being recorded.
CounterPath Corporation 102
Bria Mobile User Guide Calls
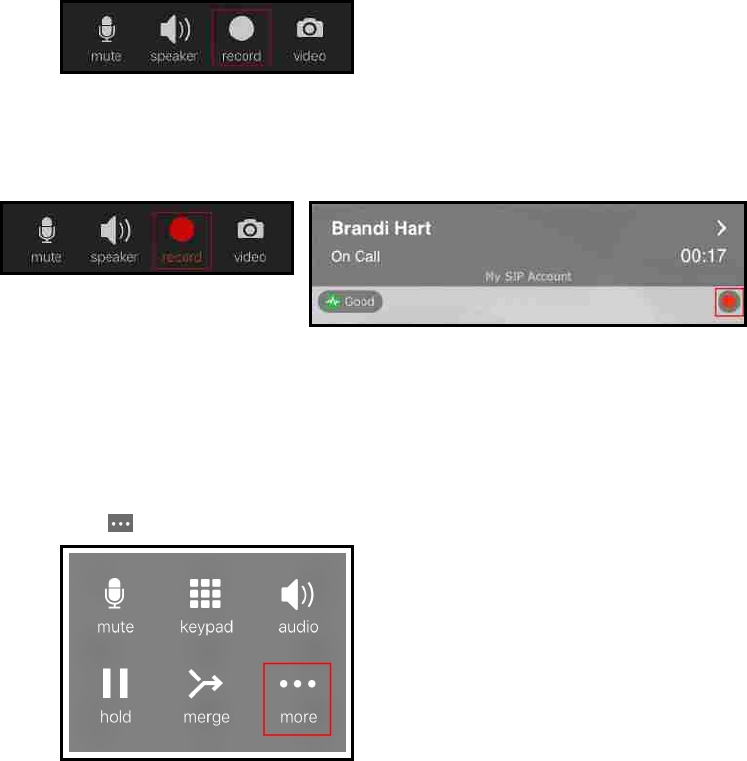
iPad
1. Tap Record during an established call.
Record turns red and Bria Mobile displays a small red, flashing icon to show that the
call is being recorded.
To stop recording a call
iPhone
1. Tap More during an established call.
2. Tap Stop Audio Recording.
CounterPath Corporation 103
Bria Mobile User Guide Calls
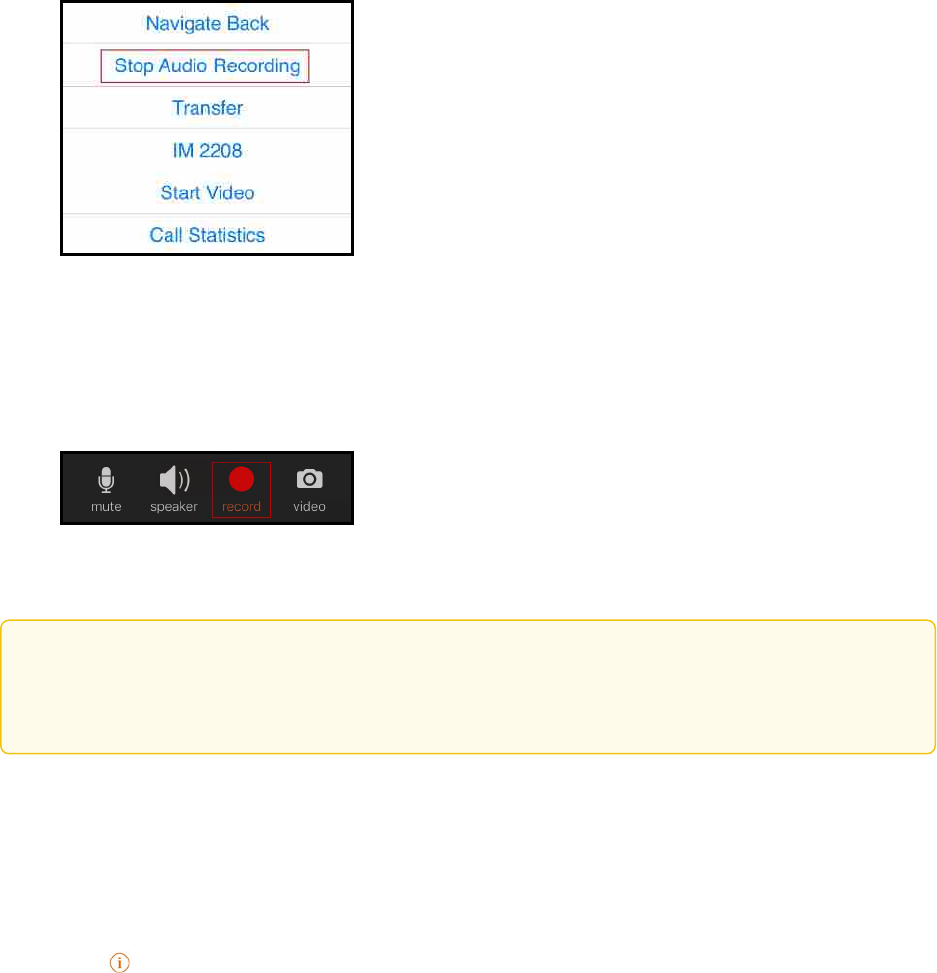
Bria Mobile stops or pausing call recording the call.
iPad
1. Tap Record.
Bria Mobile stops or pausing call recording the call.
Tip: Bria Mobile automatically ends the recording when you end the call. To pause the
recording, stop recording the call and restart recording the call when you want to resume
recording. Bria Mobile saves both recordings in the same file.
To listen to a recording
iPhone
1. Go to the History tab on the resource panel.
2.
Tap More Info beside the call with the call recording indicator.
CounterPath Corporation 104
Bria Mobile User Guide Calls
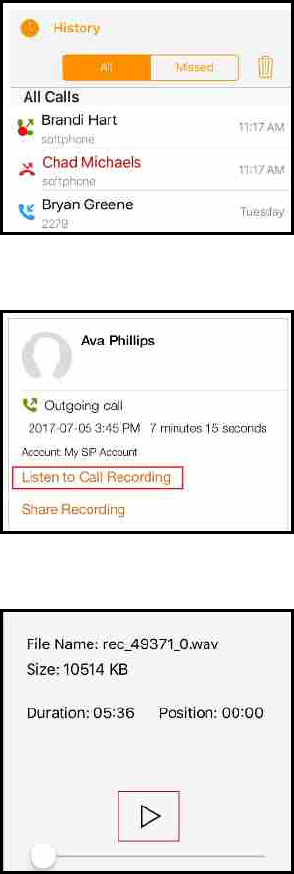
3. Tap Listen to Call Recording.
4. Tap the Play icon to listen to the recording.
Bria Mobile plays the call recording.
iPad
1. Go to the History tab on the resource panel.
2. Tap the call entry with the call recording indicator.
CounterPath Corporation 105
Bria Mobile User Guide Calls

3. Tap Listen to Call Recording.
4. Tap Play to listen to the recording.
Bria Mobile plays the call recording.
To share a call recording
iPhone
1. Go to the History tab on the resource panel.
2.
Tap More Info beside the call with the call recording indicator.
CounterPath Corporation 106
Bria Mobile User Guide Calls
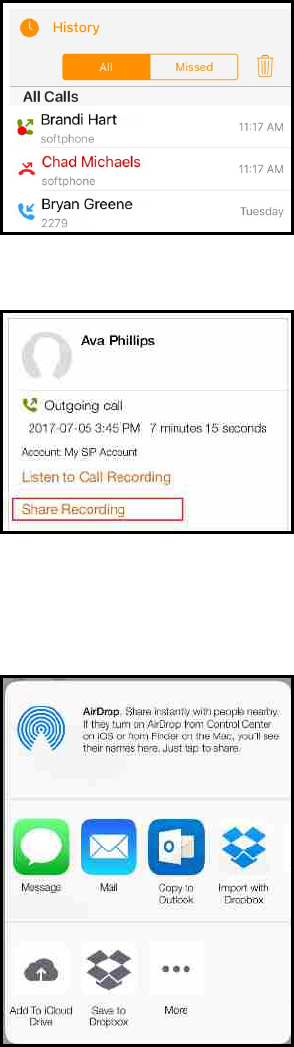
3. Tap .
4. Choose what app you want to use to share the recording. You will see Airdrop,
Message, and Mail. You may see additional apps you can use to share a recording
depending on the apps you have installed on your device.
Bria Mobile opens the app you chose to share the recording. Follow any instructions in
the chosen app.
CounterPath Corporation 107
Bria Mobile User Guide Calls
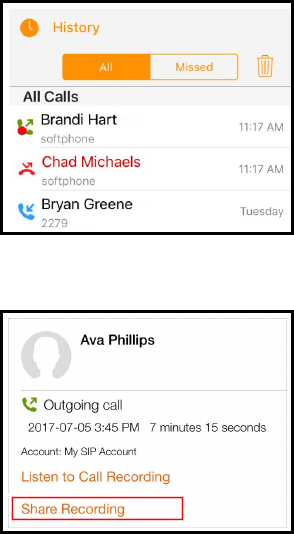
iPad
1. Go to the History tab on the resource panel.
2. Tap the call entry with the call recording indicator.
3. Tap Share Recording.
4. Choose what app you want to use to share the recording. You will see Airdrop,
Message, and Mail. You may see additional apps you can use to share a recording
depending on the apps you have installed on your device.
CounterPath Corporation 108
Bria Mobile User Guide Calls
Bria Mobile opens the app you chose to share the recording. Follow any instructions in
the chosen app.
Bria Mobile opens the app you chose to share the recording. Follow any instructions in
the chosen app.
To delete a call recording
iPhone
1. Go to the History tab on the resource panel.
2.
Tap More Info beside the call with the call recording indicator.
3. Tap Listen to Call Recording.
CounterPath Corporation 109
Bria Mobile User Guide Calls

4. Tap Delete Recording.
5. Tap Delete.
Bria Mobile deletes that call recording. Bria Mobile removes the call recording indicator
from the call log in History. All other details of the call remain unchanged.
You can also manage the recording in iTunes
®
. Select your device in iTunes, click the
Apps tab at the top of the screen, scroll down to file sharing, then click the Bria Mobile
icon in the Apps panel. The recordings appear in theBria Mobile Documents panel.
iPad
1. Go to the History tab on the resource panel.
2. Tap the call entry with the call recording indicator.
CounterPath Corporation 110
Bria Mobile User Guide Calls
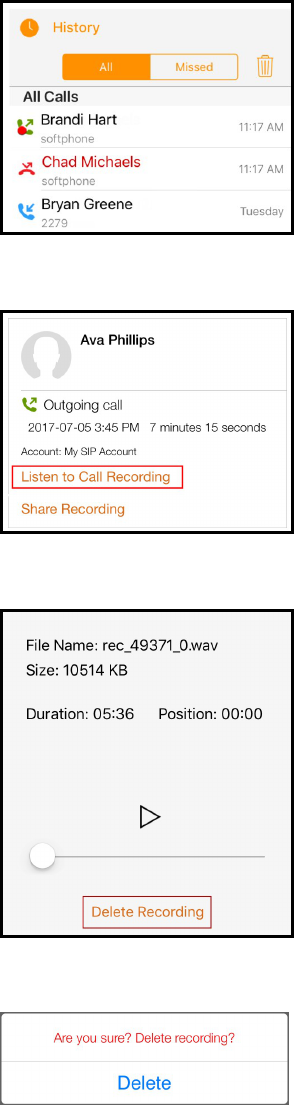
3. Tap Listen to Call Recording.
4. Tap Delete Recording.
5. Tap Delete.
CounterPath Corporation 111
Bria Mobile User Guide Calls
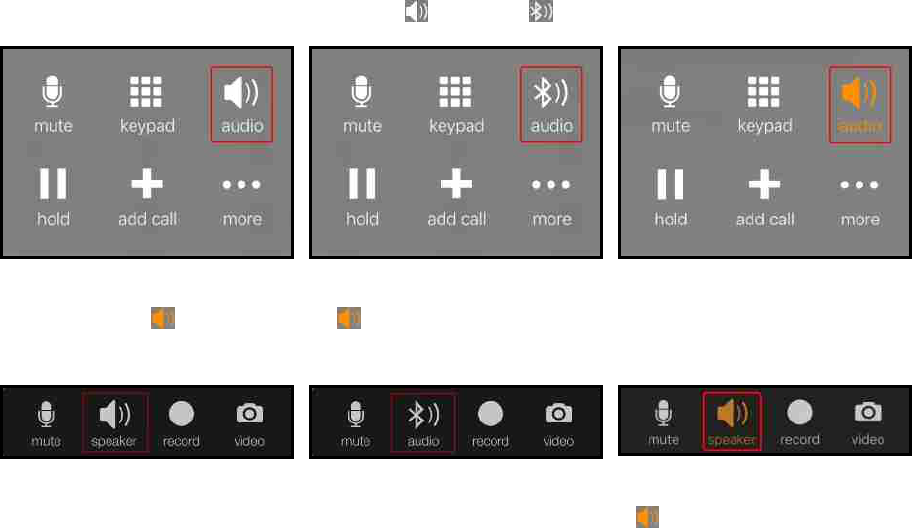
Bria Mobile deletes that call recording. Bria Mobile removes the call recording indicator
from the call log in History. All other details of the call remain unchanged.
You can also manage the recording in iTunes
®
. Select your device in iTunes, click the
Apps tab at the top of the screen, scroll down to file sharing, then click the Bria Mobile
icon in the Apps panel. The recordings appear in theBria Mobile Documents panel.
Call audio
Bria Mobile can play audio through the iPhone and iPad, over the speaker phone
(iPhone), or through supported accessories.
When a Bluetooth device is connected and Settings > Preferences > Native Integration
is on, answering the call by tapping on the iPhone and iPad plays the audio through the
iPhone and iPad. Answering the call by tapping a button on your Bluetooth device plays
the audio through the Bluetooth device.
Turning on speaker phone
To turn on speaker phone, quickly tap Audio or Audio.
On your iPad, Audio may say Speaker if you have no other devices connected to
your iPad.
On iPad, you can even turn off/mute Speaker by tapping the Speaker if you want no
audio being played at all - for example, you have another device in your room for the
same call and want to avoid feedback. When you connect headsets to the iPad, Speaker
CounterPath Corporation 112
Bria Mobile User Guide Calls
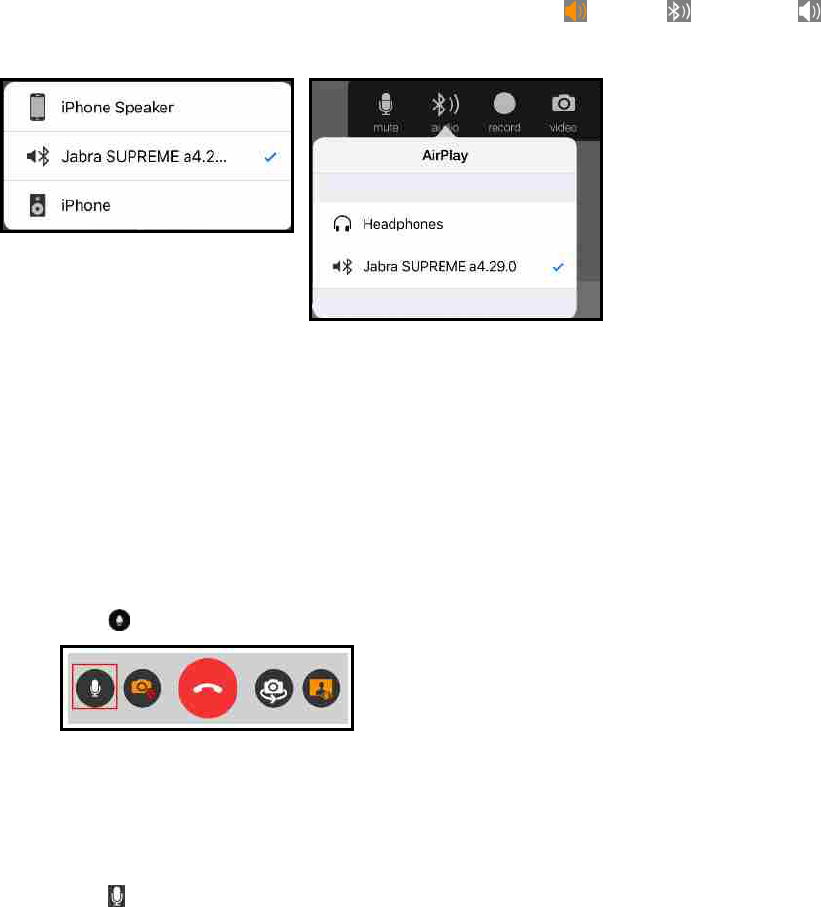
mute is cancelled automatically; you hear audio via headsets. Speaker mute applies to
all subsequent calls, not per call.
Switching audio output
To choose a different audio output option, long-press Audio, Audio, or Audio,
and select your preferred audio output.
Muting calls
Mute calls by using the tool bars so your audio is not sent to the remote party.
To mute a call by using the call controls
iPhone
1.
Tap Mute.
Bria Mobile mutes the call.
iPad
1.
Tap Mute.
CounterPath Corporation 113
Bria Mobile User Guide Calls
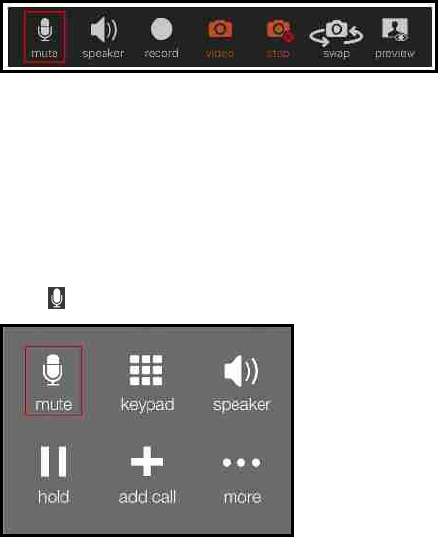
Bria Mobile mutes the call.
To mute a call using the menu – iPhone only
1. Swipe right.
2.
Tap Mute
Bria Mobile mutes the call.
CounterPath Corporation 114
Bria Mobile User Guide Calls
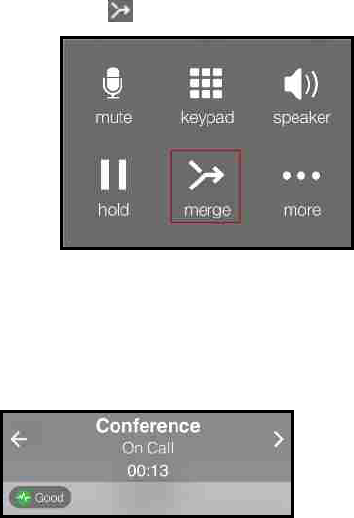
Creating a conference call
When you have two calls established, you can merge the two calls into a three-way
conference call. You can split the conference call back to two separate calls.
Merging calls
You can merge two existing calls into a conference call. If either of the calls is a video
call, you can still merge the calls but the merged call is an audio only call. Video
conference calls are not supported at this time.
To merge two calls
iPhone
1.
Tap Merge .
Bria Mobile merges the calls into a conference call and displays Conference. If you end
the call, both remote parties are disconnected. The remote parties cannot continue the
call without you.
CounterPath Corporation 115
Bria Mobile User Guide Creating a conference call
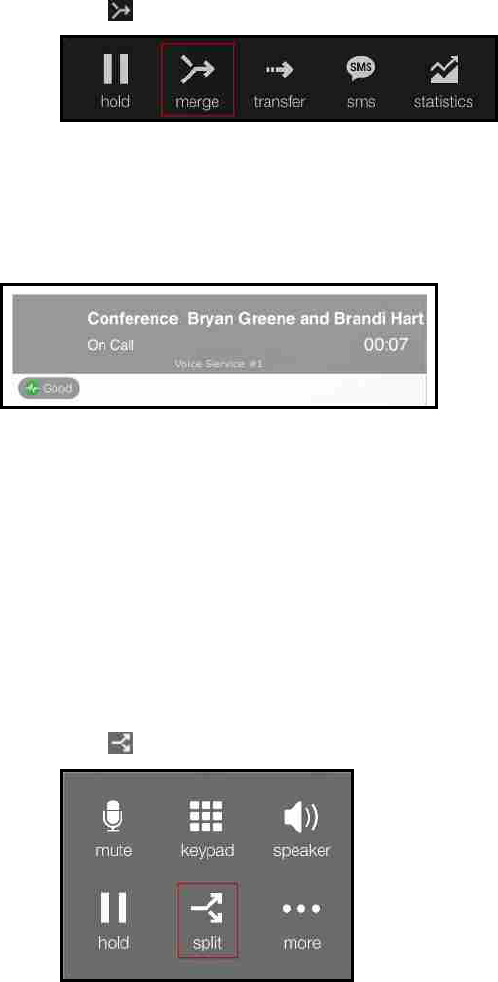
iPad
1.
Tap Merge .
Bria Mobile merges the calls into a conference call and displays Conference. If you end
the call, both remote parties are disconnected. The remote parties cannot continue the
call without you.
Splitting calls
After you have merged two call together, you can split them back into two separate calls.
To split a merged call
iPhone
1.
Tap Split.
Bria Mobile splits the calls. On iPhone, Bria Mobile displays the name of the remote
party for the active call. On iPad, Bria Mobile displays the active call in front.
CounterPath Corporation 116
Bria Mobile User Guide Creating a conference call
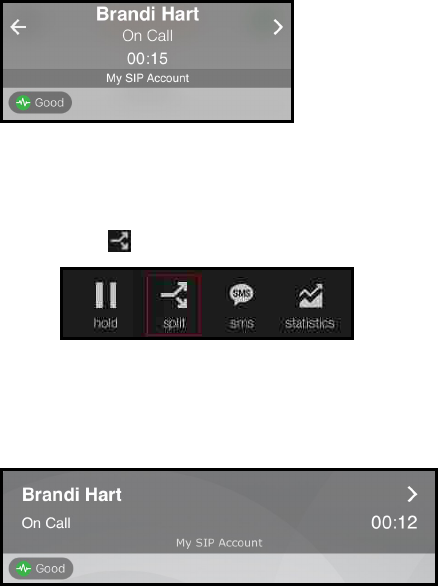
iPad
1.
Tap Split.
Bria Mobile splits the calls. On iPhone, Bria Mobile displays the name of the remote
party for the active call. On iPad, Bria Mobile displays the active call in front.
CounterPath Corporation 117
Bria Mobile User Guide Creating a conference call
Accessing voice mail
Voice mail is offered through your VoIP service provider or through your enterprise’s IP
PBX. It is not part of Bria Mobile. Contact your VoIP service provider or your system
administrator for information on using voicemail. If your service includes voice mail, can
set up voice mail configuration to access your provider's voicemail using Bria Mobile.
If your VoIP service provider offers a voice mail service, incoming calls go to voice mail if
you have voice mail configured and
l Bria Mobile is not running
l You already have two calls established
On the iPhone and iPad home screen, a badge notification indicates the total number of
voice mails, missed calls and new IMs.
On iPhone, a small red number on Phone in the resource panel indicates the total
number of new voice mail messages you have.
On iPad, a small red number on the voice mail icon in the toolbar indicates how many
voice mail messages you have.
To access your voice mail
iPhone
CounterPath Corporation 118
Bria Mobile User Guide Accessing voice mail
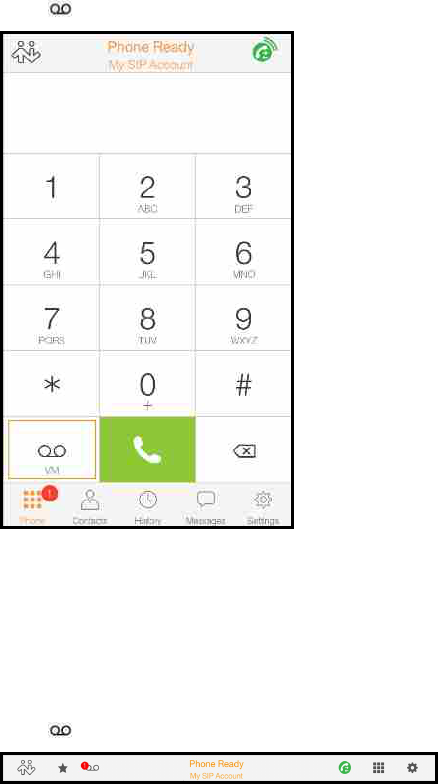
1. Go to the Phone tab on the resource panel.
2. Tap Tap to listen to voicemail. The voice mail number appears in the entry field.
Bria Mobile dials you voice mail number. Follow any instructions to play your voice mail
messages.
iPad
1. Tap Tap to listen to voicemail on the toolbar.
2. Tap Call Voice Mail.
CounterPath Corporation 119
Bria Mobile User Guide Accessing voice mail
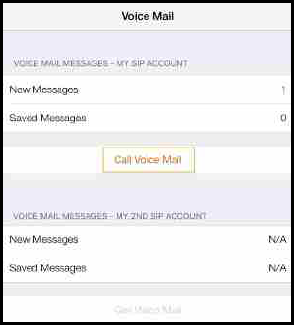
Bria Mobile dials you voice mail number. Follow any instructions to play your voice mail
messages.
CounterPath Corporation 120
Bria Mobile User Guide Accessing voice mail

Messaging
There are two types of messages in Bria Mobile - instant messages (IMs) and chat
rooms.
l IMs are messages that you send to an individual Buddy.
l Chat rooms have multiple members and allow you to send messages to all the
members of the room.
IMs are found in the People section of the Messages tab. Chat rooms are found in the
Rooms section.
Instant messages
You can send instant messages (IMs) to a Buddy – including using Siri. You can send
SMS to PSTNcell phone numbers if your VoIP service provider supports SMS over SIP
SIMPLE. You can delete single or mutliple messages from an IMsession, or delete the
entire IM session.
To send messages to more than one person, see Chat rooms.
Sending instant messages
You can send an instant message (IM) to a Buddy. If you do not have any Buddies, see
Adding a Buddy.
If Settings > Preferences > [Enter] As Newline is on, tap Return to enter a new line. Tap
Send to send the IM.
If Settings > Preferences > [Enter] As Newline is off, tap Quick Responses (iPhone)
or Quick Responses (iPad) and select Enter a new line. Tap Return to send the IM.
CounterPath Corporation 121
Bria Mobile User Guide Messaging
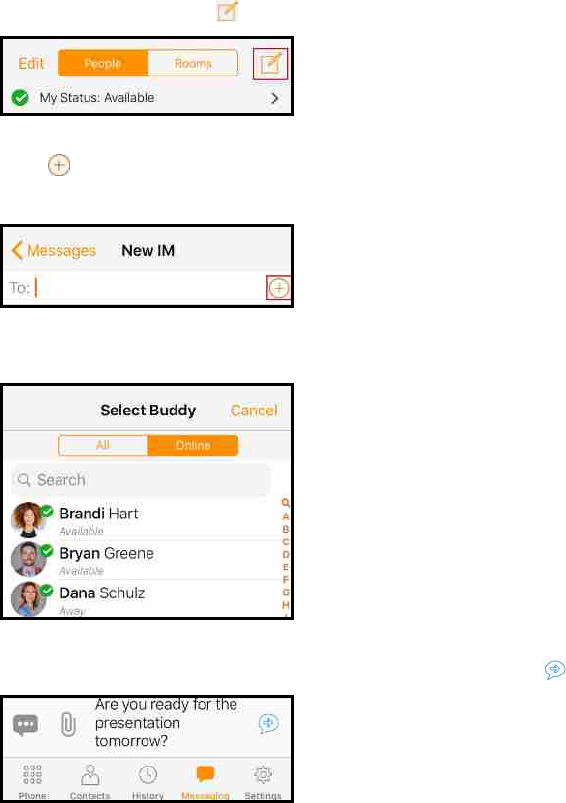
Using messaging
You can use the Messaging tab to send an IM to a Buddy or to send an IM to a member
of a chat room.
To send an IMusing Messaging
iPhone
1. Go to the Messaging tab on the resource panel.
2.
Tap People and tap Compose.
3.
Tap Add recipient or start typing the name of the contact you want to add to the
IM.
4. Tap a Buddy.
5.
Type your message in Compose Message and tap Send.
Bria Mobile sends the IM.
CounterPath Corporation 122
Bria Mobile User Guide Messaging
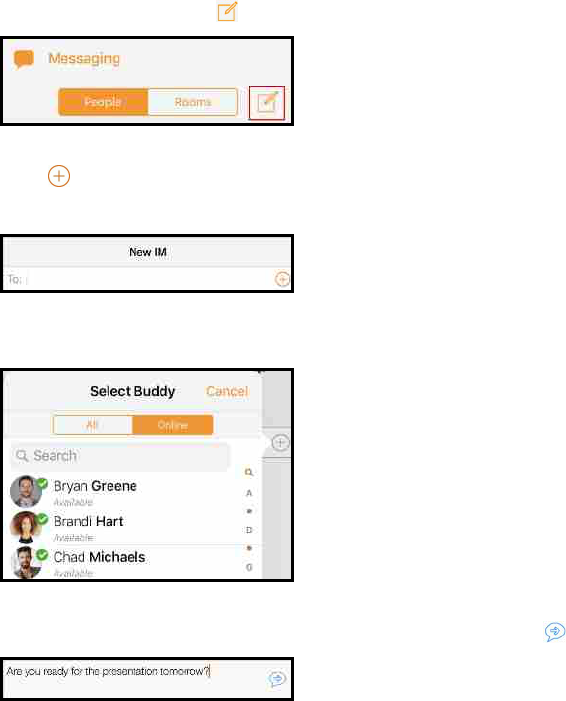
iPad
1. Go to the Messaging tab on the resource panel.
2.
Tap People and tap Compose.
3.
Tap Add recipient or start typing the name of the contact you want to add to the
IM.
4. Tap a Buddy.
5.
Type your message in Compose Message and tap Send.
Bria Mobile sends the IM.
To send an IM from a chat room
iPhone
1. Go to the Messaging tab on the resource panel.
2. Tap Rooms and tap the chat room.
CounterPath Corporation 123
Bria Mobile User Guide Messaging
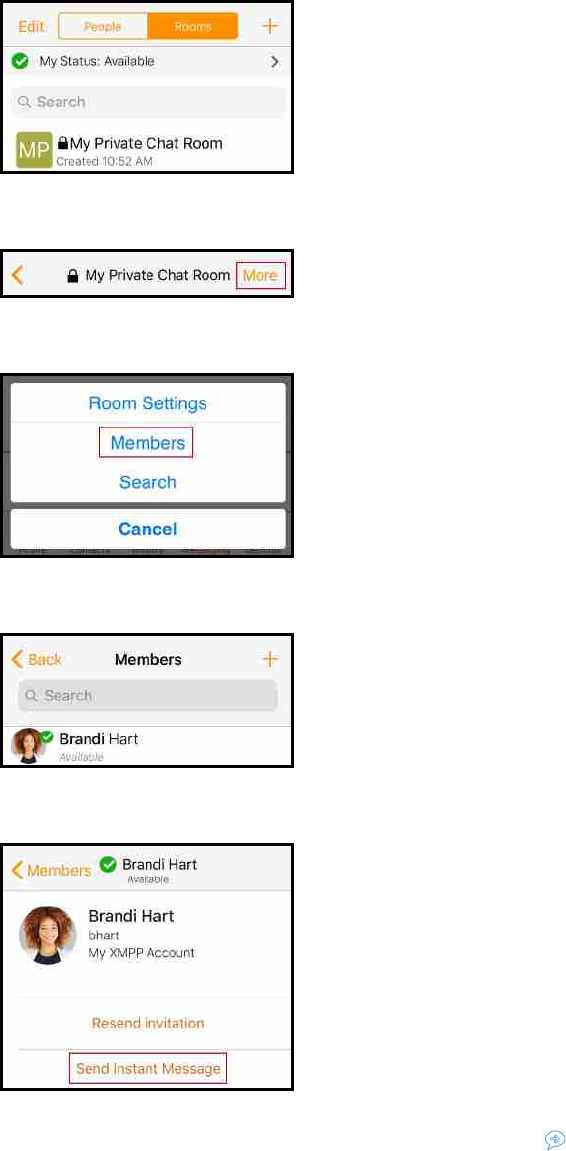
3. Tap More.
4. Tap Members.
5. Tap the room member you want to IM.
6. Tap Send Instant Message.
7.
Type your message in Compose Message and tap Send.
CounterPath Corporation 124
Bria Mobile User Guide Messaging
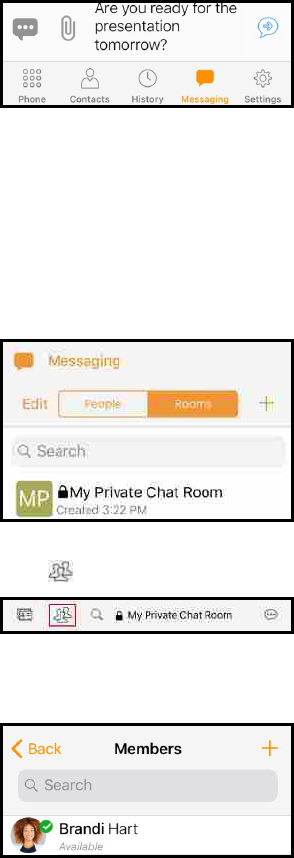
Bria Mobile sends the IM.
iPad
1. Go to the Messaging tab on the resource panel.
2. Tap Rooms and tap the chat room.
3.
Tap Members.
4. Tap the room member you want to IM.
5. Tap Send Instant Message.
CounterPath Corporation 125
Bria Mobile User Guide Messaging
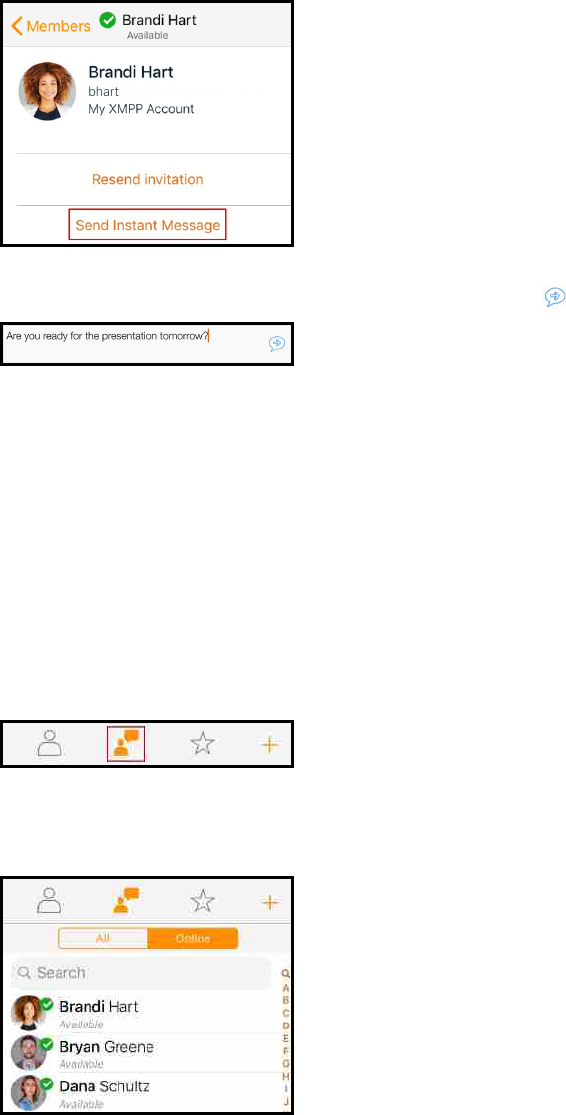
6.
Type your message in Compose Message and tap Send.
Bria Mobile sends the IM.
Using Contact details
You can send an IMto a Buddy directly from the Buddies tab in Contacts.
To send an IMfrom Contacts
iPhone
1. Go to the Contacts tab on the resource panel and tap Buddies.
2. Select a Buddy by tapping on the Buddy or typing their name in the Search bar
and tapping the Buddy.
Buddy Details opens.
CounterPath Corporation 126
Bria Mobile User Guide Messaging
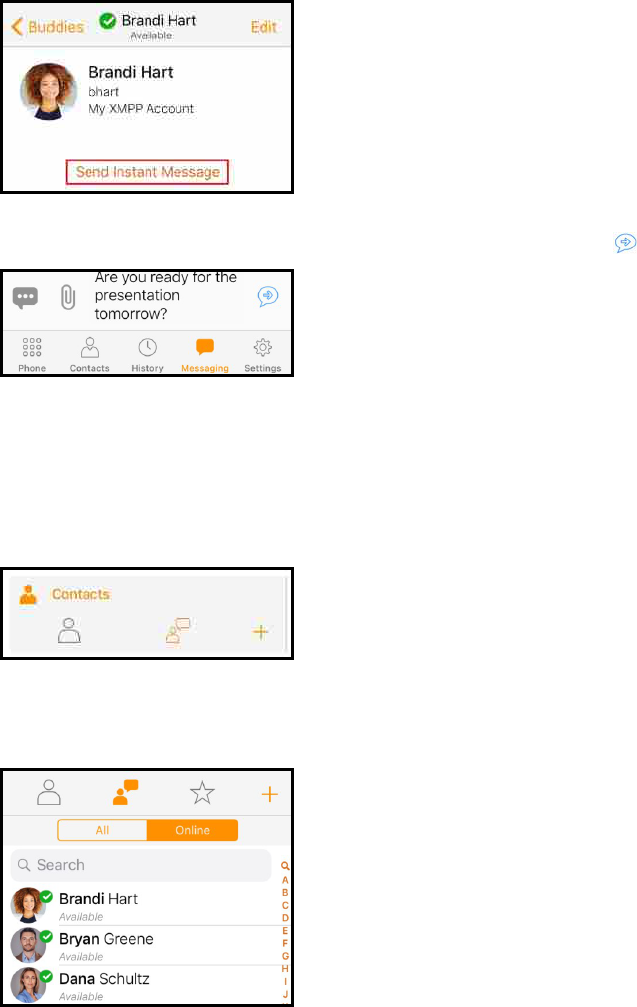
3. Tap Send Instant Message.
4.
Tap inside the message area, type your message and tap Send .
Bria Mobile sends the IM.
iPad
1. Go to the Contacts tab on the resource panel and tap Buddies.
2. Select a Buddy by tapping on the Buddy or typing their name in the Search bar
and tapping the Buddy.
Buddy Details opens.
3. Tap Send Instant Message.
CounterPath Corporation 127
Bria Mobile User Guide Messaging
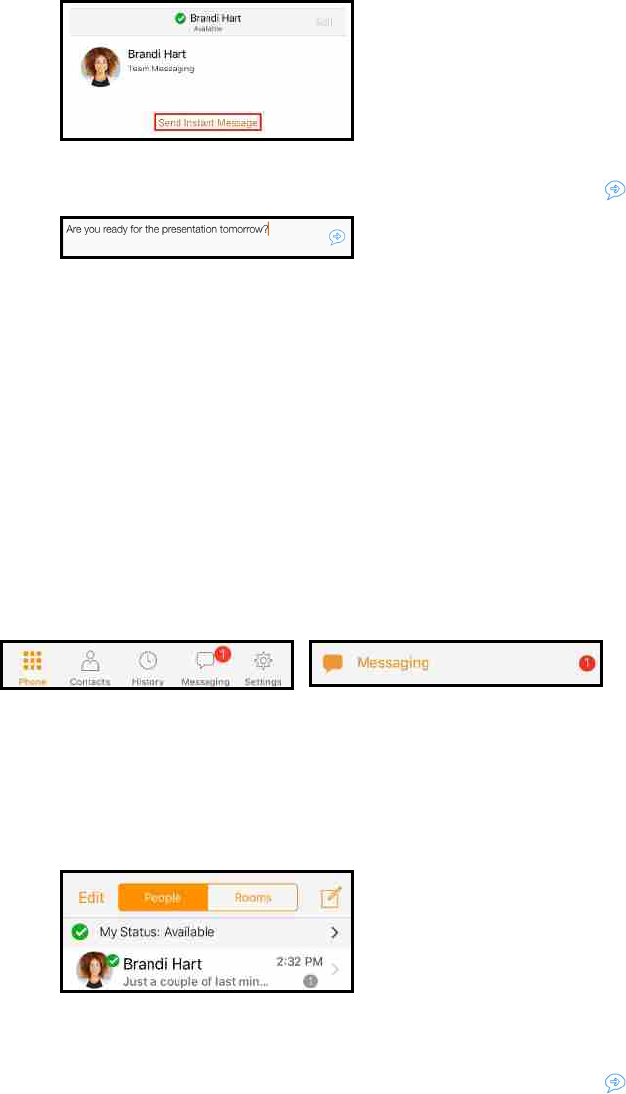
4.
Type your message in Compose Message and tap Send.
Bria Mobile sends the IM.
Receiving an instant message
With Bria Mobile running, you can reply to an instant message (IM) from the foreground,
background, or the lockscreen.
Bria Mobile in the foreground
Bria Mobile displays the number of conversations (IMs and chat rooms) with new
messages with a badge notification on the resource panel.
To reply to an IM with Bria Mobile in the foreground
1. Go to the Messaging tab on the resource panel.
2. Tap People and tap the IM session.
The message and any previous messages in IM session open.
3.
Type your message in Compose Message and tap Send.
CounterPath Corporation 128
Bria Mobile User Guide Messaging
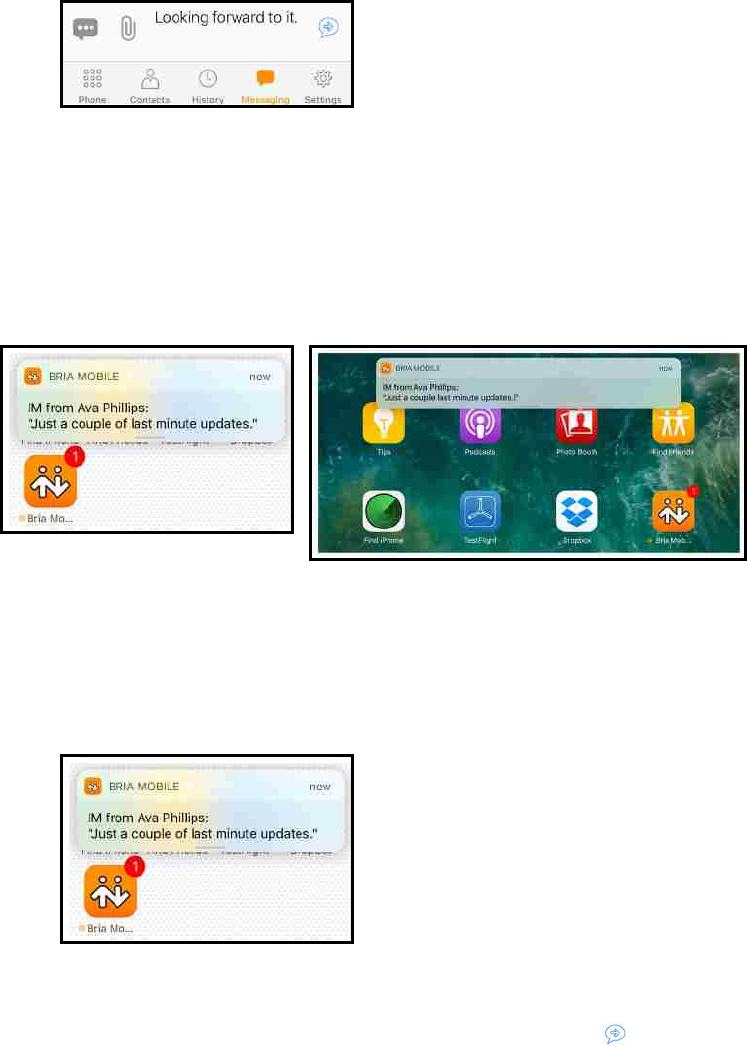
Bria Mobile sends the IM.
Bria Mobile is in the background
When Bria Mobile is in the background, you receive a notification that you have a new
message and the number of messages shows on Bria Mobile’s icon.
To reply to an IM with Bria Mobile in the background
iPhone
1. Tap the IMnotification.
Bria Mobile opens in the Messaging tab.
2.
Type your message in Compose Message and tap Send.
CounterPath Corporation 129
Bria Mobile User Guide Messaging
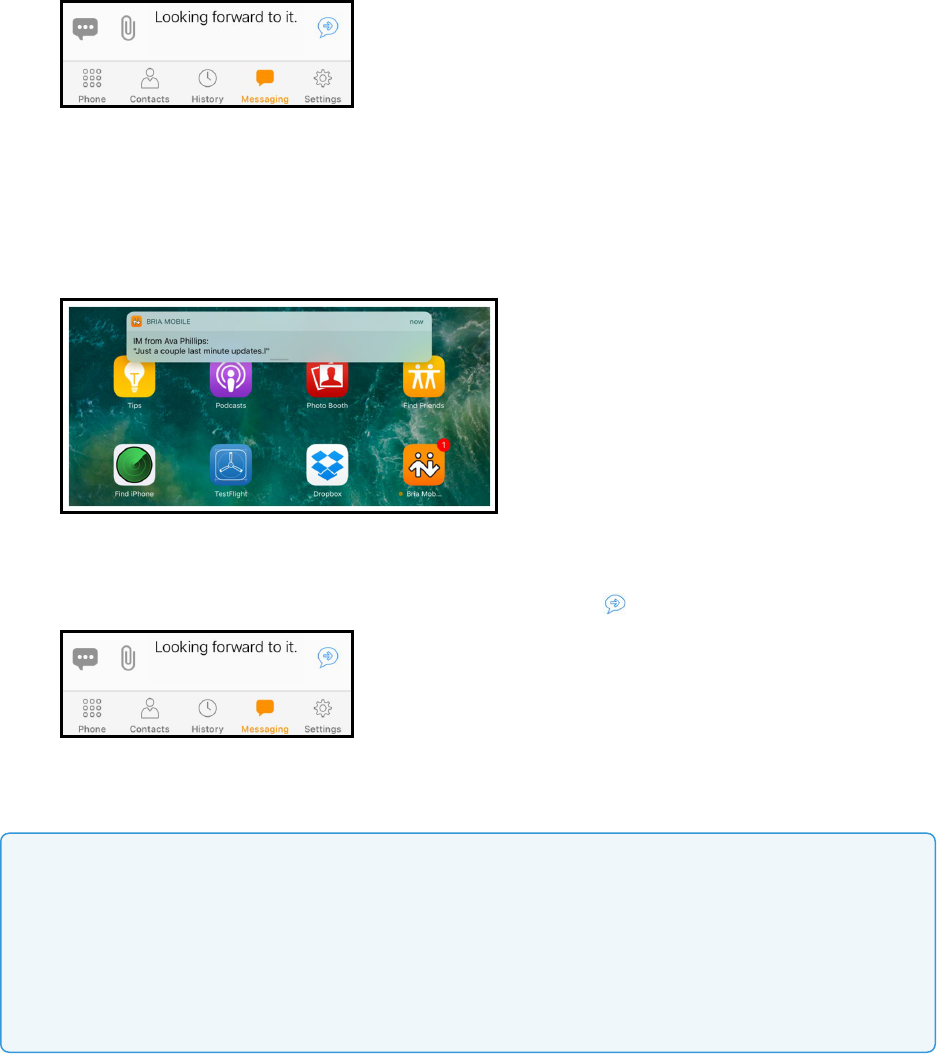
Bria Mobile sends the IM.
iPad
1. Tap the IMnotification.
Bria Mobile opens in the Messaging tab.
2.
Type your message in Compose Message and tap Send.
Bria Mobile sends the IM.
Note: With the release of iOS 10.3, Apple introduced more aggressive battery life
management. This can cause Bria Mobile to become non-responsive or suspended in the
background. If you find you are not receiving IMs with Bria Mobile in the background on iPhone
or iPads running iOS 10.3 or higher, turn on Settings > Preferences - General> Improve
Reachability. If you are still have problems, change Settings > Preferences - General >
Reachability Strategy to Enhanced. Setting this to Enhanced may consume more battery life.
Device is locked
When the device is locked, you receive a notification on the lock screen when you have
a new IM.
CounterPath Corporation 130
Bria Mobile User Guide Messaging
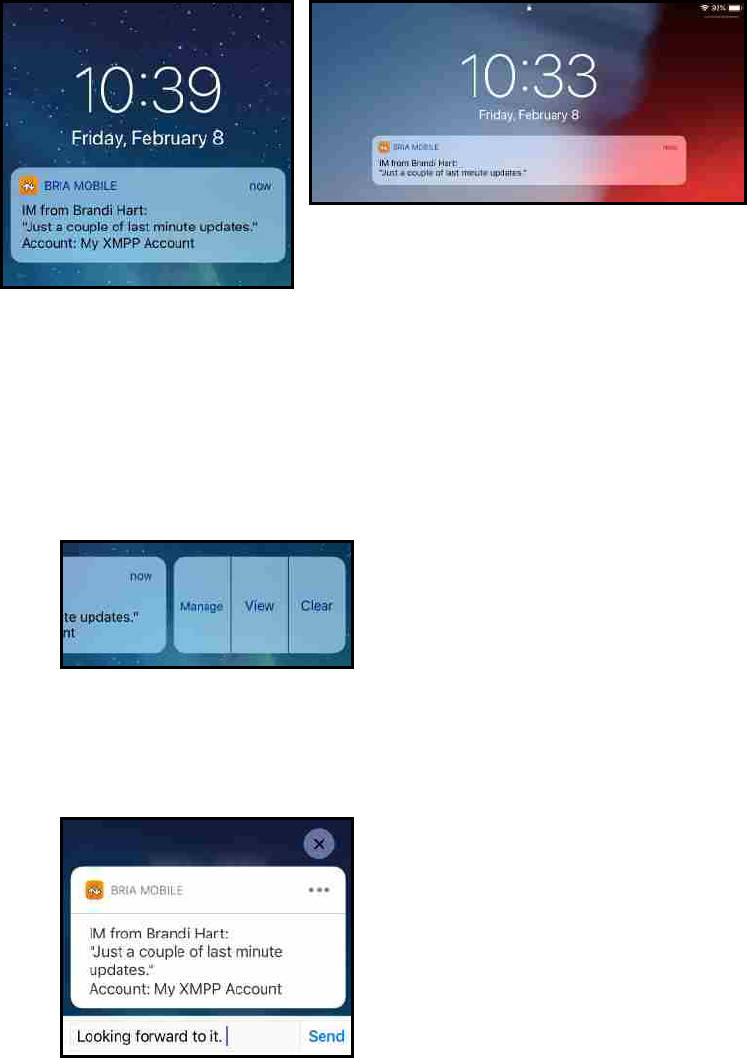
To reply to a message with the device locked
iPhone
1. Slide the notification left to reply on the lock screen. (Sliding the notification to the
right requires your passcode and opens the message in Bria Mobile.)
2. Tap View or Clear . View allows you to respond to the message. Clear hides the
notification.
3. Type your reply and tap Send.
Bria Mobile sends the IM.
CounterPath Corporation 131
Bria Mobile User Guide Messaging
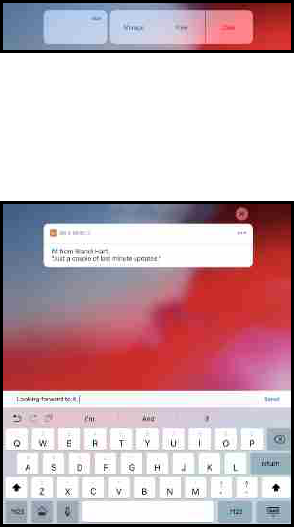
iPad
1. Slide the notification left to reply on the lock screen. (Sliding the notification to the
right requires your passcode and opens the message in Bria Mobile.)
2. Tap Reply or Clear . Reply allows you to respond to the message. Clear hides the
notification.
3. Type your reply and tap Send.
Bria Mobile sends the IM.
Sending an SMS
You can send an SMS from your SIP account to PSTN mobile phone numbers if your
VoIP service provider supports this feature. Before sending an SMS, make sure Settings
> Preferences > Enable SMS and Settings > Accounts (SIP) > Account Specific
Features > Enable SMS are enabled.
Using Messaging
Send an SMS directly from the Messaging tab.
To send an SMS using Messaging
iPhone
CounterPath Corporation 132
Bria Mobile User Guide Messaging
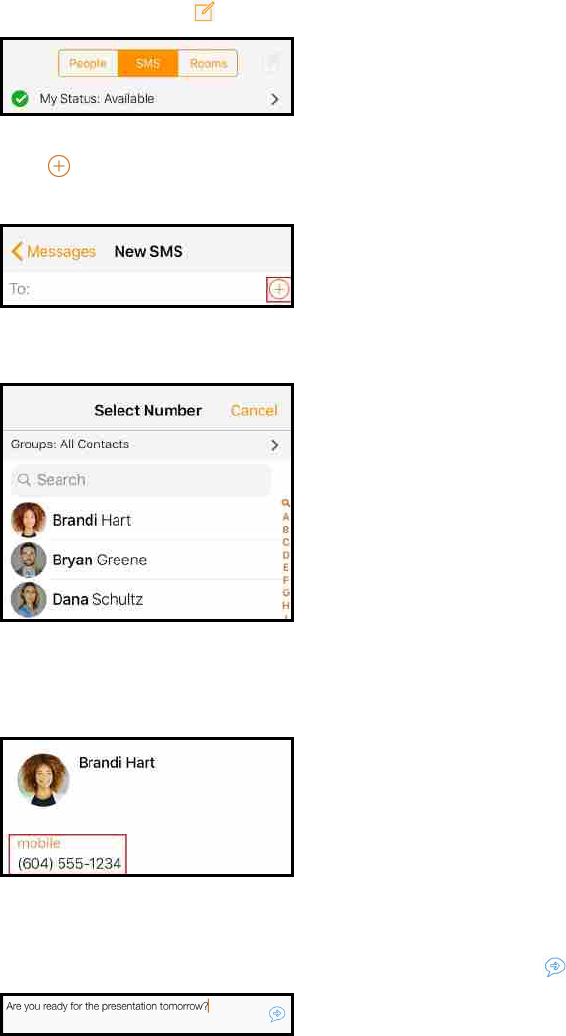
1. Go to the Messaging tab on the resource panel.
2.
Tap SMS and tap Compose.
3.
Tap Add recipient or start typing the name of the contact you want to add to the
SMS.
4. Tap on the contact you want to send the SMS to.
Contact Details opens.
5. Tap the PSTN number you want to send an SMS to.
6. Add more recipients using the above method (optional).
7.
Type your message in Compose Message and tap Send.
Bria Mobile sends the SMS.
CounterPath Corporation 133
Bria Mobile User Guide Messaging
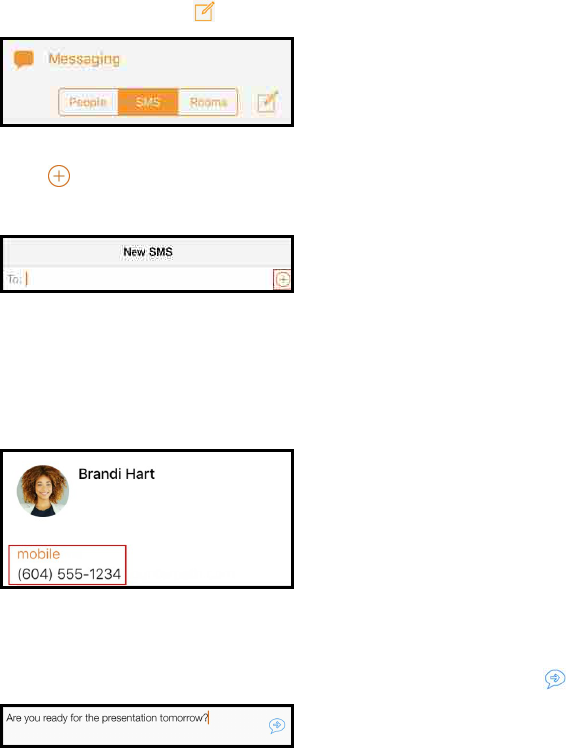
iPad
1. Go to the Messaging tab on the resource panel.
2.
Tap SMS and tap Compose.
3.
Tap Add recipient or start typing the name of the contact you want to add to the
SMS.
4. Tap on the contact you want to send the SMS to.
Contact Details opens.
5. Tap the PSTN number you want to send an SMS to.
6. Add more recipients using the above method (optional).
7.
Type your message in Compose Message and tap Send.
Bria Mobile sends the SMS.
Using Contacts
Send an SMSfrom contact details.
To send an SMSusing contact details
iPhone
CounterPath Corporation 134
Bria Mobile User Guide Messaging
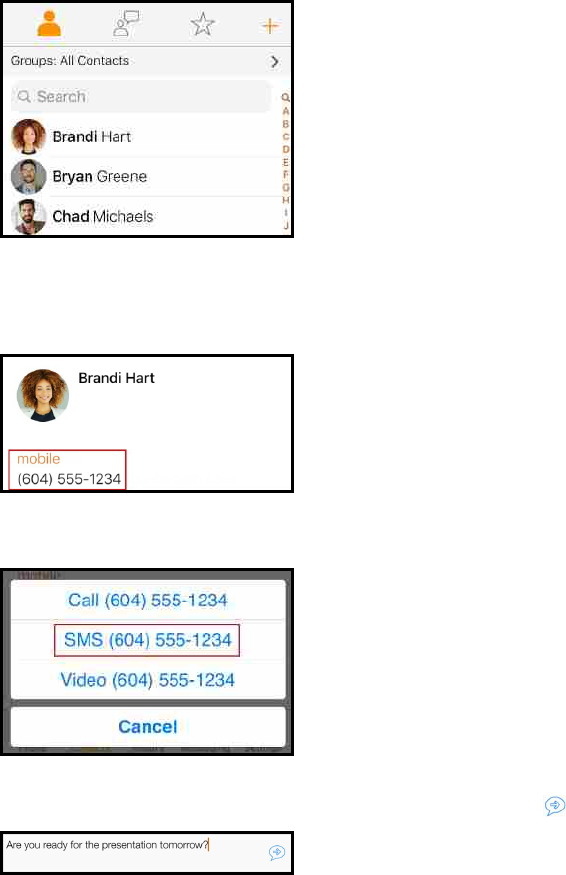
1. Go to the Messaging tab on the resource panel.
2. Select the contact you want to send an SMS to by tapping on the contact or typing
their name in the Search bar and tapping on the contact.
Contact Details opens.
3. Tap the PSTN number you want to send an SMS to.
4. Tap SMS… .
5.
Type your message in Compose Message and tap Send.
Bria Mobile sends the SMS.
CounterPath Corporation 135
Bria Mobile User Guide Messaging
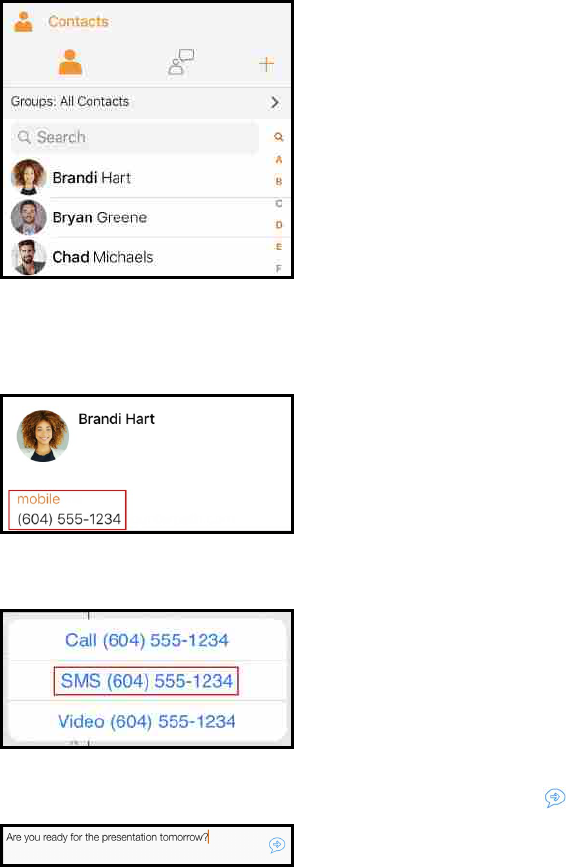
iPad
1. Go to the Messaging tab on the resource panel.
2. Select the contact you want to send an SMS to by tapping on the contact or typing
their name in the Search bar and tapping on the contact.
Contact Details opens.
3. Tap the PSTN number you want to send an SMS to.
4. Tap SMS… .
5.
Type your message in Compose Message and tap Send.
Bria Mobile sends the SMS.
CounterPath Corporation 136
Bria Mobile User Guide Messaging
Using Siri for messaging
You can use Siri to send an IM or SMS text when Bria Mobile is in the foreground,
background, exited, or the iPhone or iPad is locked. You can also use Siri to search your
messages.
The first time you use Siri, you need give permission for Siri to access Bria Mobile’s
data. The person must be in Bria Mobile’s Contacts to send an IM or SMS text using a
name.
Sending messages
Use Siri to place send a message to a contact or send a message to a specific number.
To send a message using Siri
1. Press and hold the Home button on your iPhone or iPad.
2. Ask Siri to “Send text to Joseph Santos using Bria Mobile” or “Text 6045551234
using Bria Mobile".
Ask Siri to “Send message to Joseph Santos using Bria Mobile” or “Text
6045551234 using Bria Mobile”.
Ask Siri to “Send text message to Joseph Santos using Bria Mobile” or “Send text
to 6045551234 using Bria Mobile”.
Bria Mobile sends the IM or SMS text.
Searching messages
Search your messages by sender or recipient name, search for specific text, search by a
date range, and search by message status (old or new). Siri currently does not search for
multiple names, messages for buddies that are not registered, and names in a group
chat.
To search messages using Siri
1. Press and hold the Home button on your iPhone or iPad.
2. Ask Siri to “Find messages from Joseph Santos on Bria Mobile”.
Ask Siri to “Read my Bria Mobile messages from Joseph”.
Bria Mobile searches your IMs and SMS messages.
CounterPath Corporation 137
Bria Mobile User Guide Messaging
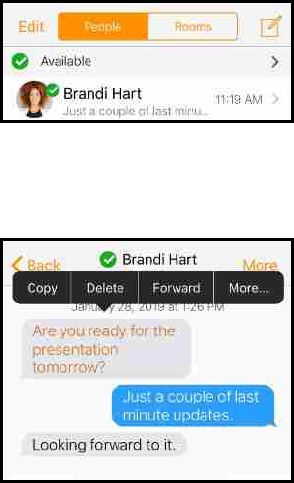
Deleting instant messages
You can delete a single message, multiple messages in a session, or you can delete an
entire session.
Deleting individual and multiple messages
You can delete a single or multiple IM messages without losing the entire IM session.
To delete a single IM message
iPhone
1. Go to the Messaging tab on the resource panel.
2. Tap People and tap the IM session.
3. Press-and-hold on the message you want to delete.
4. Tap Delete.
Bria Mobile deletes the message. There is not warning before Bria Mobile deletes the
message.
iPad
1. Go to the Messaging tab on the resource panel.
CounterPath Corporation 138
Bria Mobile User Guide Messaging
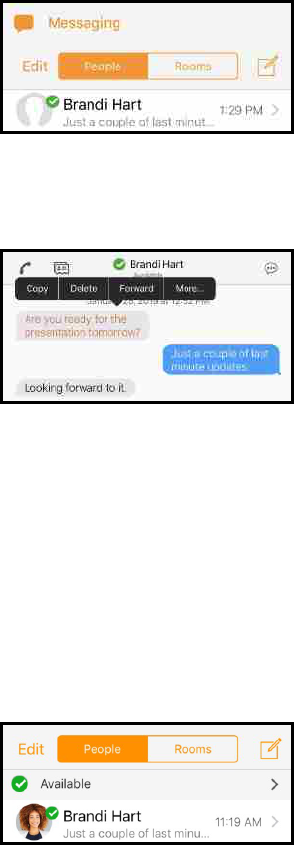
2. Tap People and tap the IMsession.
3. Press-and-hold on the message you want to delete.
4. Tap Delete.
Bria Mobile deletes the message. There is not warning before Bria Mobile deletes the
message.
To delete multiple IM messages
iPhone
1. Go to the Messaging tab on the resource panel.
2. Tap People and tap the IM session.
3. Press-and-hold one of the messages you want to delete.
4. Tap More.
CounterPath Corporation 139
Bria Mobile User Guide Messaging
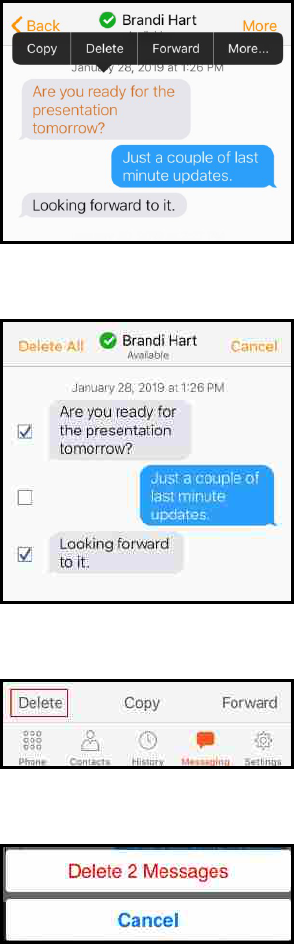
5. Tap all other messages that you want to delete.
6. Tap Delete.
7. Tap Delete # Messages to confirm you want to delete the selected messages.
Bria Mobile deletes the selected messages.
iPad
1. Go to the Messaging tab on the resource panel.
2. Tap People and tap the IMsession.
CounterPath Corporation 140
Bria Mobile User Guide Messaging
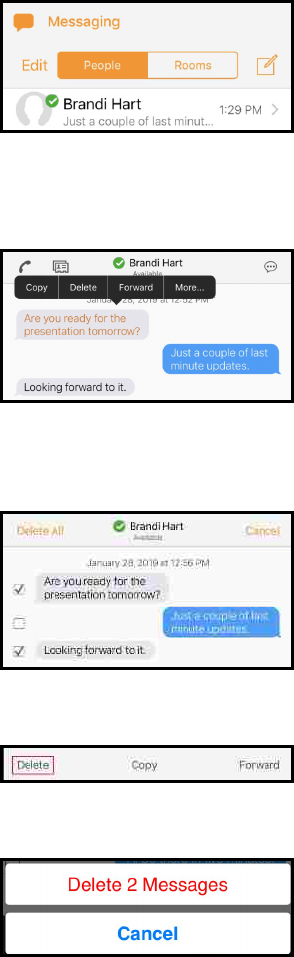
3. Press-and-hold on the message you want to delete.
4. Tap More.
5. Tap the messages you want to delete. A check mark shows up beside each
selected message.
6. Tap Delete.
7. Tap Delete # Messages to confirm you want to delete the selected messages.
Bria Mobile deletes the selected messages.
Deleting an IMsession
You can remove the entire IMsession from your device rather than just deleting
individual messages.
To delete an IM session by swiping left
CounterPath Corporation 141
Bria Mobile User Guide Messaging

iPhone
1. Go to the Messaging tab on the resource panel.
2. Tap People.
3. Swipe left on the session you want to delete and tap Delete.
The IM session is deleted.
iPad
1. Go to the Messaging tab on the resource panel.
2. Tap People.
3. Swipe left on the session you want to delete and tap Delete.
The IM session is deleted.
To delete an IM session using Edit
iPhone
1. Go to the Messaging tab on the resource panel.
2. Tap People and tap Edit.
CounterPath Corporation 142
Bria Mobile User Guide Messaging

3.
Tap Delete.
4. Tap Delete.
The IM session is deleted.
iPad
1. Go to the Messaging tab on the resource panel.
2. Tap People and tap Edit.
3.
Tap Delete.
4. Tap Delete.
CounterPath Corporation 143
Bria Mobile User Guide Messaging
The IM session is deleted.
Chat rooms
Chat rooms are used when sending messages to multiple recipients. Chat rooms can be
private or public. Private rooms can only be joined by invitation. Public rooms can be
joined by anyone in your XMPP group. Chat rooms are only supported with a single
XMPP account.
You can:
l Create chat room.
l Join a chat room.
l Set up the type of notifications you want to receive for each chat room.
l Use mentions to get the attention of a specific chat room member.
l Add and remove members.
l Delete or leave a chat room.
Chat room server requirements
The following requirements must be met to use chat rooms:
l Your XMPP server must support:
l Multi-User Chat as defined in XEP-0045.
l Bookmarks as defined in XEP-0048.
l Private XML Storage as defined in XEP-0049.
l Entity Time as defined in XEP-0202
l Delayed Delivery as defined in XEP-0203
l All the clients must be running version 5.5.3 or higher.
l All the users must connect to the same XMPP server; in other words, their XMPP
accounts must have the same domain.
l Your XMPP account must be registered and enabled.
If your XMPP server does not support XEP-0045, you will not see Rooms in Messaging.
CounterPath Corporation 144
Bria Mobile User Guide Messaging
If your XMPP server does not support XEP-0048, XEP-0049, XEP-0202, and XEP-0203,
chat rooms may not work as designed. Users may see errors in the Rooms list, the time
stamps on messages may be incorrect, and some messages may not be sent to all
users.
If some clients are running versions earlier than 5.5.3, the room members list may not
accurately show who is in the chat rooms and messages may not be sent to all room
members.
Chat room properties
Each chat room has a set of properties. Some are required and some are optional.
Required chat room properties
Room name: Each room must have a unique room name. Up to 40 characters long.
Room Type: A room can be private or public. Private rooms are unlisted and can be
joined by invitation only. Public rooms are displayed in the list of chat rooms that you can
join.
Room owner: The name of the person that created the room.
Optional chat room properties
Members: The people you are inviting to the room or the people already in the room.
Description: Up to 140 characters long that can be edited by the room owner.
Topic: A brief description of what is currently being discussed in the group that can be
edited by anyone. Up to 140 characters long.
Creating a chat room
All Bria Mobile users can create new private or public chat rooms. Private chat rooms
can only be joined by an invitation from the Room Owner. Public chat rooms can be
joined by anyone.
Chat rooms are assigned an avatar using the initials from Room Name. As you type in
Room Name, the color of the avatar changes. The resulting color is assigned to the chat
room. Room Name can be up to 40 characters long and must be unique. Room Name is
case sensitive.
CounterPath Corporation 145
Bria Mobile User Guide Messaging
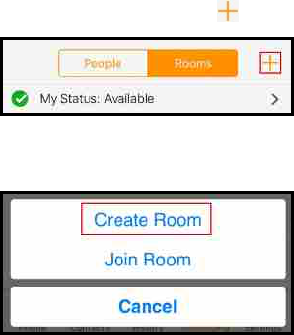
Description is an optional field. Description can be up to 140 characters long.
Topic is an optional field and can be up to 140 characters long. Topic can be changed
by all room members and is used to show what is currently being discussed in the room.
Creating a private chat room
You can create a private chat room from the Messaging tab. When you create a private
chat room, you invite people to join the room.
To create a private chat room
iPhone
1. Go to the Messaging tab on the resource panel.
2.
Tap Rooms and tap Add.
3. Tap Create Room.
4. Type in a Room Name. If desired, type a Description and a Topic.
CounterPath Corporation 146
Bria Mobile User Guide Messaging
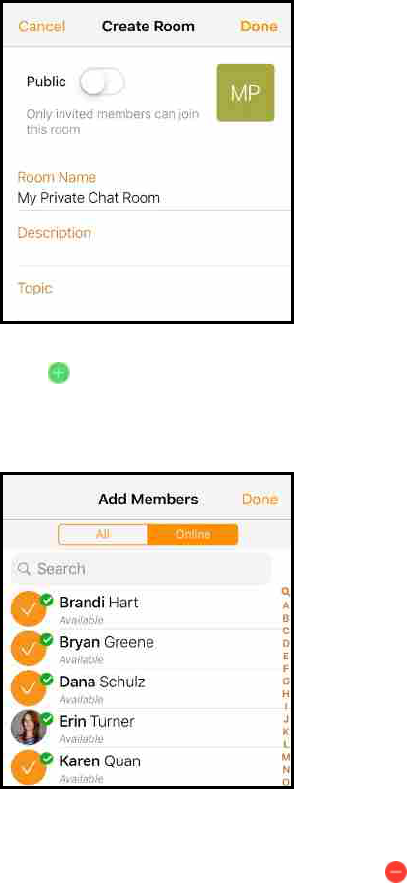
5.
Tap Add Members.
6. Tap on the Buddies you want to add to the chat room. A check mark appears on
top of their avatar. Tap Done when you finish selecting Buddies.
Your Buddies show in Members. If you want to remove someone from Members
before you create the chat room, tap Delete and Delete.
CounterPath Corporation 147
Bria Mobile User Guide Messaging
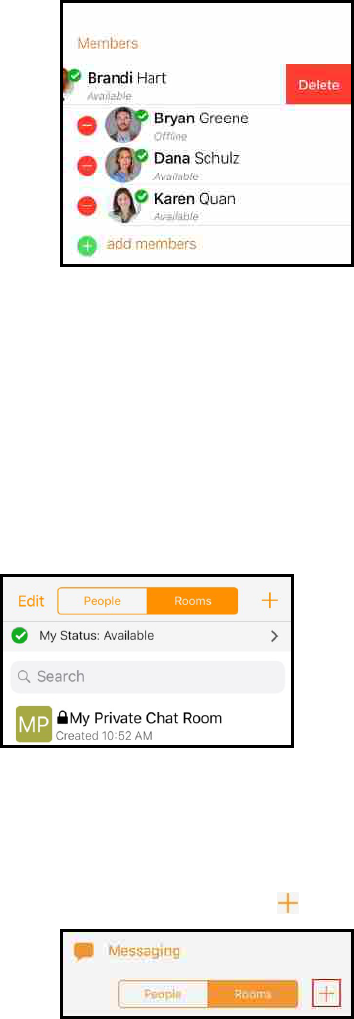
7. If desired, set the Notifications for the chat room. See Chat room notifications for
more information.
8. Tap Done.
Bria Mobile creates the private chat room. The Members you invited are automatically
added to the room. The chat room shows up in the Rooms section of the Messaging.
The room shows when you created it. The lock on the avatar for the room indicates this
is a private chat room.
iPad
1. Go to the Messaging tab on the resource panel.
2.
Tap Rooms and tap Add.
3. Tap Create Room.
CounterPath Corporation 148
Bria Mobile User Guide Messaging
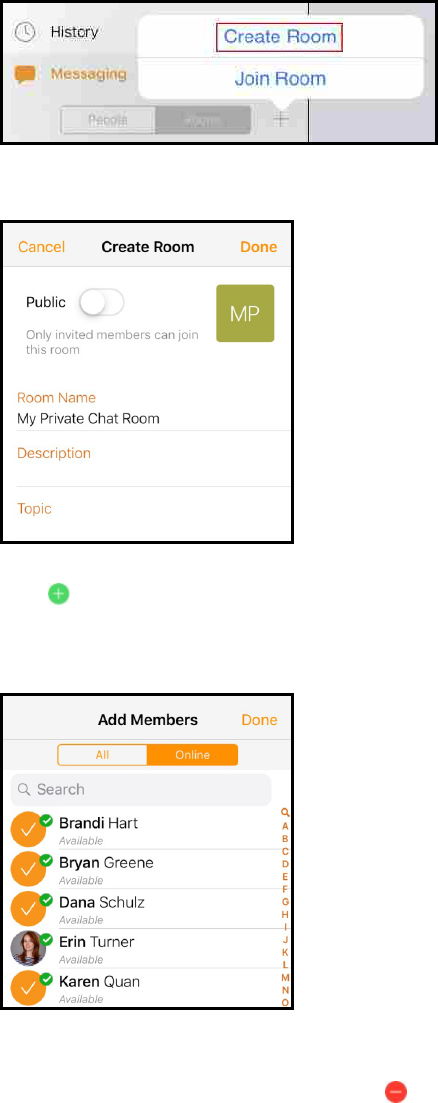
4. Type in a Room Name. If desired, type a Description and a Topic.
5.
Tap Add Members.
6. Tap on the Buddies you want to add to the chat room. A check mark appears on
top of their avatar. Tap Done when you finish selecting Buddies.
Your Buddies show in Members. If you want to remove someone from Members
before you create the chat room, tap Delete and Delete.
CounterPath Corporation 149
Bria Mobile User Guide Messaging

7. If desired, set the Notifications for the chat room. See Chat room notifications for
more information.
8. Tap Done.
Bria Mobile creates the private chat room. The Members you invited are automatically
added to the room. The chat room shows up in the Rooms section of the Messaging.
The room shows when you created it. The lock on the avatar for the room indicates this
is a private chat room.
Creating a public chat room
You can create a public chat room from the Messaging tab.
To create a public chat room
iPhone
1. Go to the Messaging tab on the resource panel.
2.
Tap Rooms and tap Add.
CounterPath Corporation 150
Bria Mobile User Guide Messaging
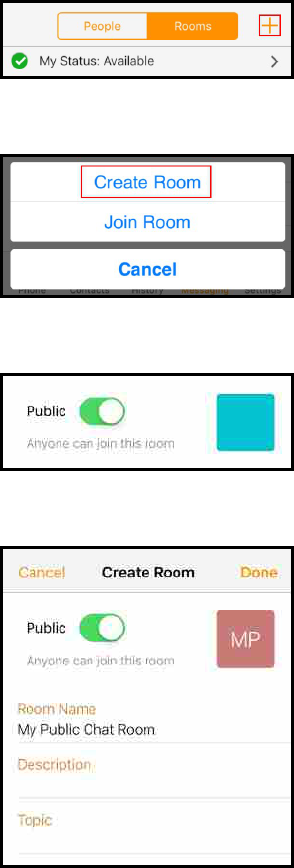
3. Tap Create Room.
4. Toggle Public on.
5. Type in a Room Name. If desired, type a Description and a Topic.
6. If desired, set the Notifications for the chat room. See Chat room notifications for
more information.
7. Tap Done.
Bria Mobile creates the public chat room. The chat room shows up in the Rooms section
of the Messaging. The room shows when you created it.
CounterPath Corporation 151
Bria Mobile User Guide Messaging
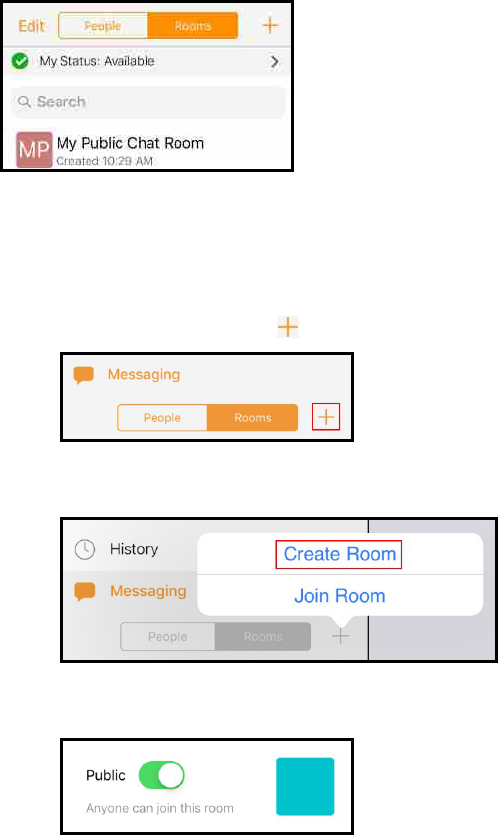
iPad
1. Go to the Messaging tab on the resource panel.
2.
Tap Rooms and tap Add.
3. Tap Create Room.
4. Toggle Public on.
5. Type in a Room Name. If desired, type a Description and a Topic.
CounterPath Corporation 152
Bria Mobile User Guide Messaging

6. If desired, set the Notifications for the chat room. See Chat room notifications for
more information.
7. Tap Done.
Bria Mobile creates the public chat room. The chat room shows up in the Rooms section
of the Messaging. The room shows when you created it.
Joining a chat room
There are two types of chat rooms - public and private. Anyone can join a public chat
room. You must be invited to join a private chat room. Bria Mobile automatically accepts
the invitation to private chat rooms.
When you join a chat room, all the messages from the room are available to you. You
can continue to scroll through and download the message history until you see No more
messages.
CounterPath Corporation 153
Bria Mobile User Guide Messaging
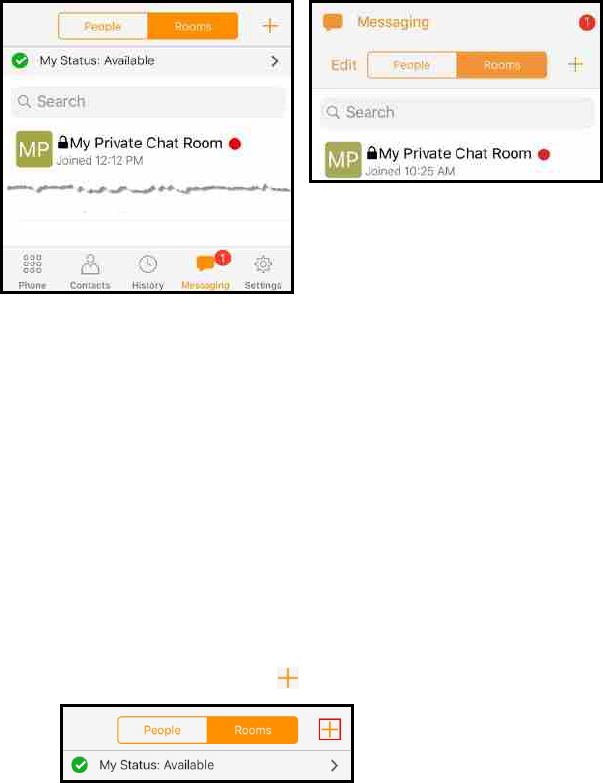
Joining a private chat room
In order to join a private chat room, you have to be added as a member. You
automatically join the room when the Room Owner invites you and the private room
shows in the Rooms section of the Messages tab with a dot to indicate it is new. If you
leave a private chat room and want to rejoin, you need to be invited to the room again.
Joining a public chat room
You can join existing public chat rooms that were created by one of your Buddies.
Anyone in a public chat room can invite people to join the room. The invitation is sent as
an IM to each person invited.
To join a public chat room
iPhone
1. Go to the Messaging tab on the resource panel.
2.
Tap Rooms and tap Add.
3. Tap Join Room.
CounterPath Corporation 154
Bria Mobile User Guide Messaging
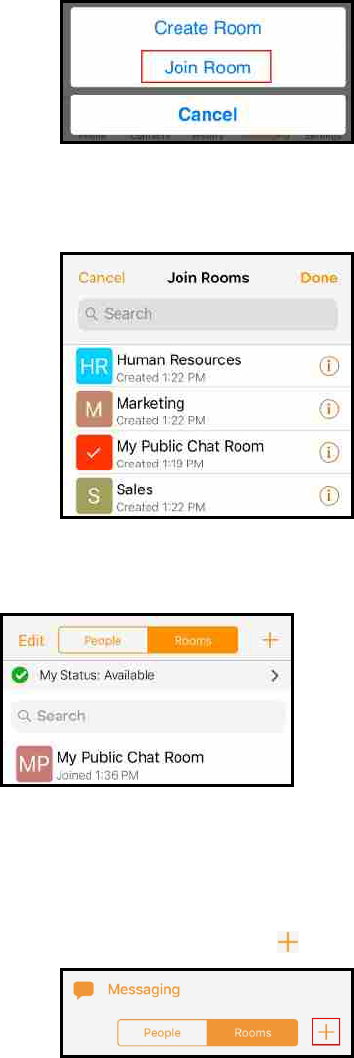
4. Tap the public rooms you want to join and tap Done. You can use search to look
for a specific room.
Bria Mobile adds the public chat room to Rooms in the Messaging tab.
iPad
1. Go to the Messaging tab on the resource panel.
2.
Tap Rooms and tap Add.
3. Tap Join Room.
CounterPath Corporation 155
Bria Mobile User Guide Messaging
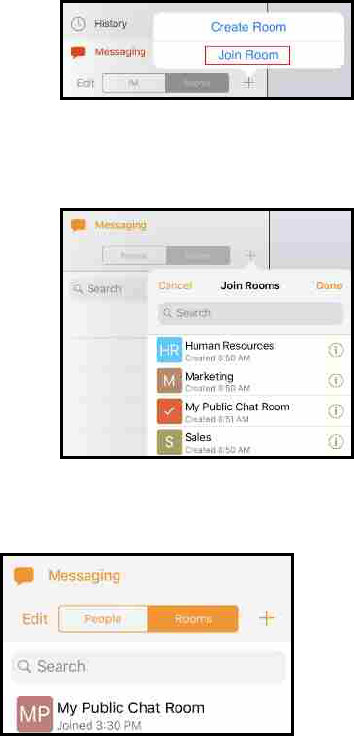
4. Tap the public rooms you want to join and tap Done. You can use search to look
for a specific room.
Bria Mobile adds the public chat room to Rooms in the Messaging tab.
Editing chat rooms
After a room has been created, the Room Owner – the room owner – can change the
Room Name and Description, add new members, and add a Topic to a room.
Members of the room can also change the Topic.
Changing the Room Name and Description
The Room Owner can change the Room Name and Description. The chat rooms you
can edit say Created.
To change the Room Name and Description
iPhone
CounterPath Corporation 156
Bria Mobile User Guide Messaging
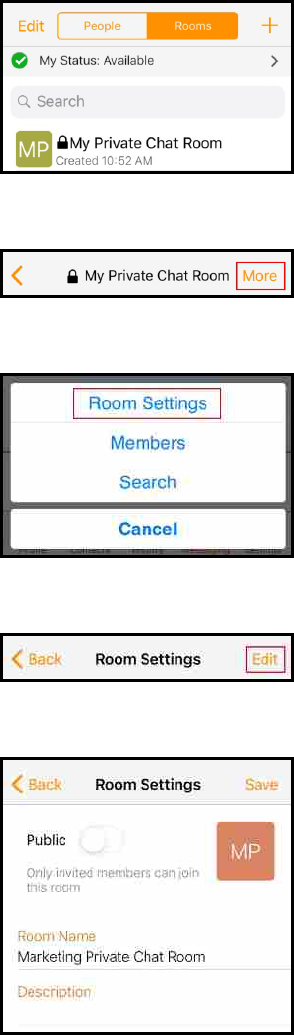
1. Go to the Messaging tab on the resource panel.
2. Tap Rooms and tap the chat room you want to edit.
3. Tap More.
4. Tap Rooms Settings.
5. Tap Edit.
6. Type in a new Room Name or Description.
CounterPath Corporation 157
Bria Mobile User Guide Messaging
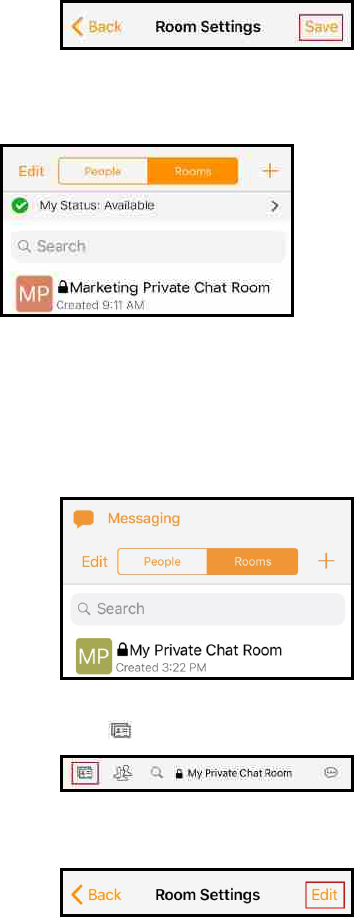
7. Tap Save.
Bria Mobile updates the Room Name and Description.
iPad
1. Go to the Messaging tab on the resource panel.
2. Tap Rooms and tap the chat room you want to edit.
3.
Tap Room Settings.
4. Tap Edit.
5. Type in a new Room Name or Description.
CounterPath Corporation 158
Bria Mobile User Guide Messaging
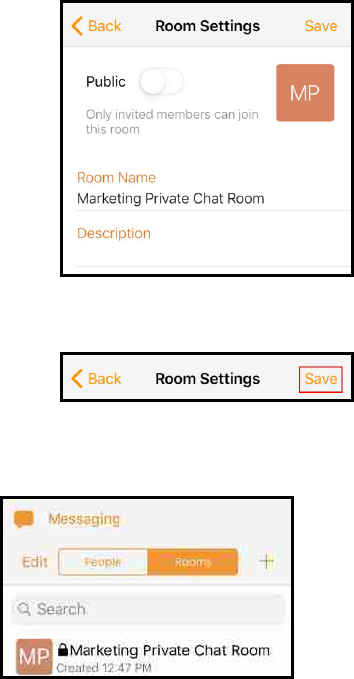
6. Tap Save.
Bria Mobile updates the Room Name and Description.
Adding a topic to a room
Room members can add a topic for both public and private chat rooms. You might want
to add a topic to indicate what the current discussion is about. Topics do not show up in
search results.
To add a Topic
iPhone
1. Go to the Messaging tab on the resource panel.
2. Tap Rooms and tap the chat room you want to edit.
CounterPath Corporation 159
Bria Mobile User Guide Messaging
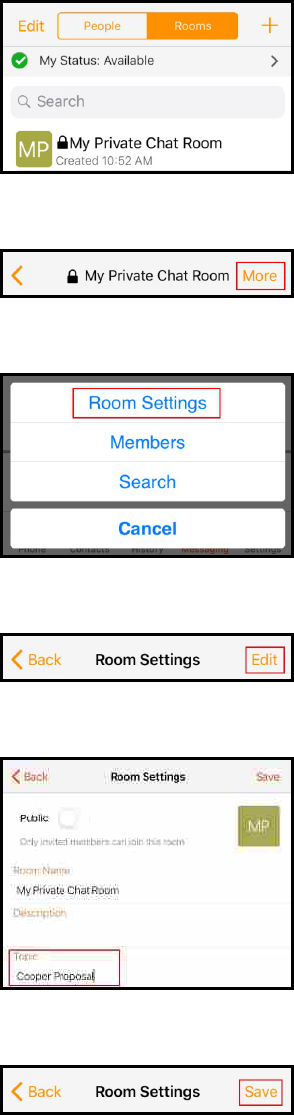
3. Tap More.
4. Tap Rooms Settings.
5. Tap Edit.
6. Type in the Topic.
7. Tap Save.
The Topic displays below the Room Name in the chat room header.
CounterPath Corporation 160
Bria Mobile User Guide Messaging
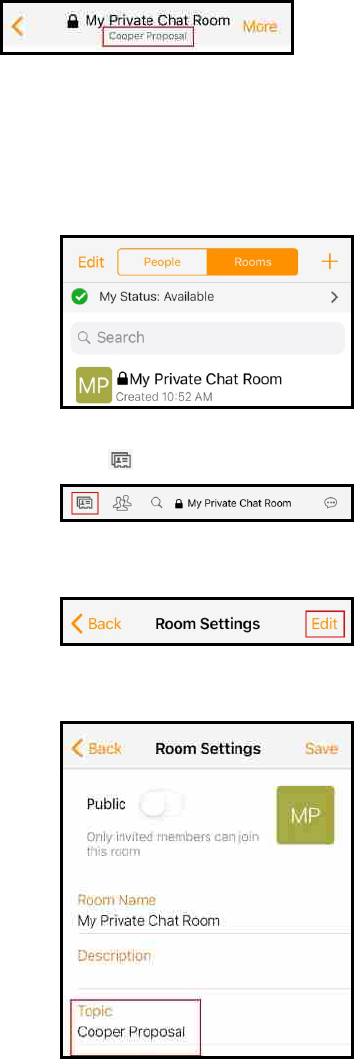
iPad
1. Go to the Messaging tab on the resource panel.
2. Tap Rooms and tap the chat room you want to edit.
3.
Tap Room Settings.
4. Tap Edit.
5. Type in the Topic.
6. Tap Save.
CounterPath Corporation 161
Bria Mobile User Guide Messaging
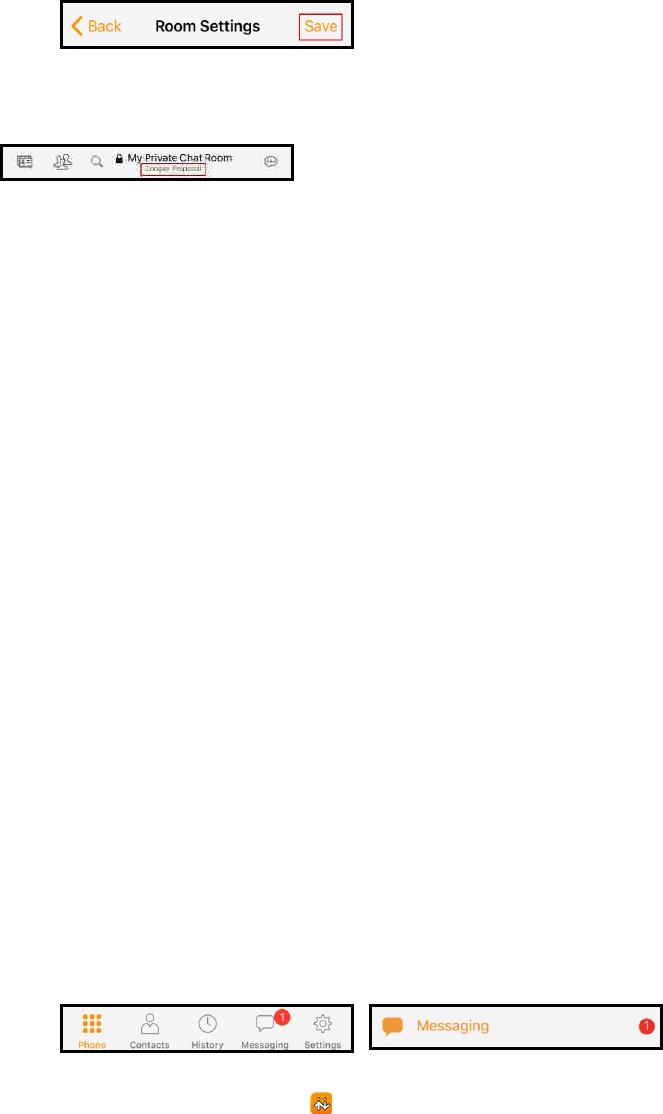
Bria Mobile updates the Room Name and Description.
Chat room notifications
Bria Mobile can notify you when there is a new message or when you have been
mentioned in a chat room. You can change the way you are alerted using a combination
of individual chat room notification settings and the following Preferences:
Preferences – Messages
l Alert Sound can be enabled or disabled.
l Alert Vibration can be enabled or disabled.
l Alert Text Tone lets you choose the sound you want to use for incoming
messages.
Preferences - Mentions
l @mention Sound can be enabled or disabled.
l @mention Text Tone lets you choose the sound you want to use for new
mentions.
Types of notifications
When you have a new message or mention, you may see the following depending on
how you have configured Chat Room Notifications and Preferences:
l A badge notification on Messaging in the resource panel with Bria Mobile in the
foreground.
l
A badge notification on Bria Mobile with Bria Mobile in the background.
CounterPath Corporation 162
Bria Mobile User Guide Messaging
l The device (except iPad) vibrating in the foreground, background, and on the lock
screen.
l The Alert Text Tone is played in the foreground, background, and on the lock
screen.
l The @mention Text Tone is played in the foreground, background, and on the
lock screen.
l A badge notification on the chat room in Rooms.
l A mention badge notification on the chat room in Rooms.
Changing chat room notifications
You can change the notifications you receive for each individual chat room. Choose
from:
l All New Messages: Bria Mobile notifies you if there is a new message or you have
been mentioned in a chat room you are a member of.
l Mention (@): Bria Mobile notifies you if you are mentioned in a chat room you are
a member of.
l Mute Room: Bria Mobile does not notify you that there is a new message or that
you have been mentioned in a chat room you are a member of.
To change room notifications
iPhone
1. Go to the Messaging tab on the resource panel.
CounterPath Corporation 163
Bria Mobile User Guide Messaging
2. Tap Rooms and tap on the chat room.
3. Tap More.
4. Tap Room Settings.
5. Tap Notifications.
6. To stop receiving any notification for the room, toggle Mute Room on. Otherwise,
CounterPath Corporation 164
Bria Mobile User Guide Messaging
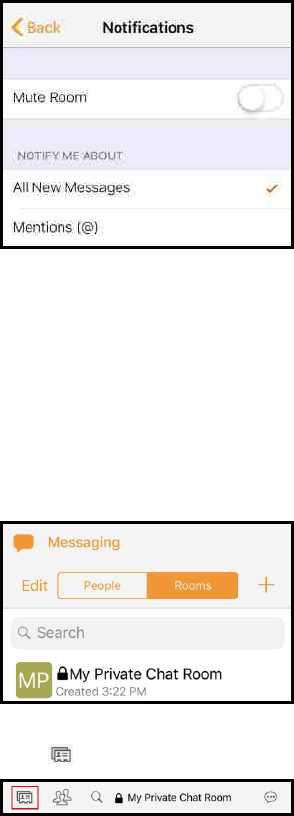
select either All New Messages or Mentions (@).
7. Tap Back.
Bria Mobile updates your notification preferences for the room.
iPad
1. Go to the Messaging tab on the resource panel.
2. Tap Rooms and tap on the chat room.
3.
Tap Room Settings.
4. Tap Notifications.
CounterPath Corporation 165
Bria Mobile User Guide Messaging
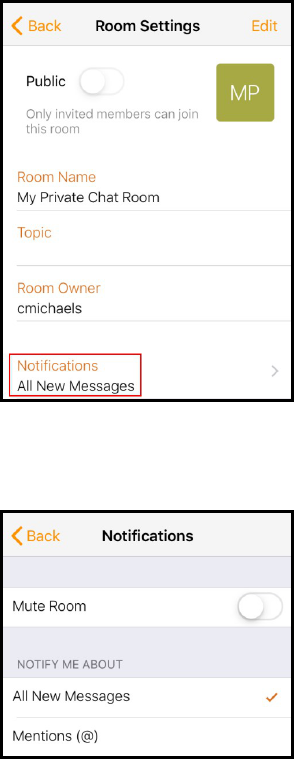
5. To stop receiving any notification for the room, toggle Mute Room on. Otherwise,
select either All New Messages or Mentions (@).
6. Tap Back.
Bria Mobile updates your notification preferences for the room.
Sending and receiving chat room messages
Sending a message
Once you have created or joined a chat room, you can start sending messages.
To send a chat room message
iPhone
CounterPath Corporation 166
Bria Mobile User Guide Messaging
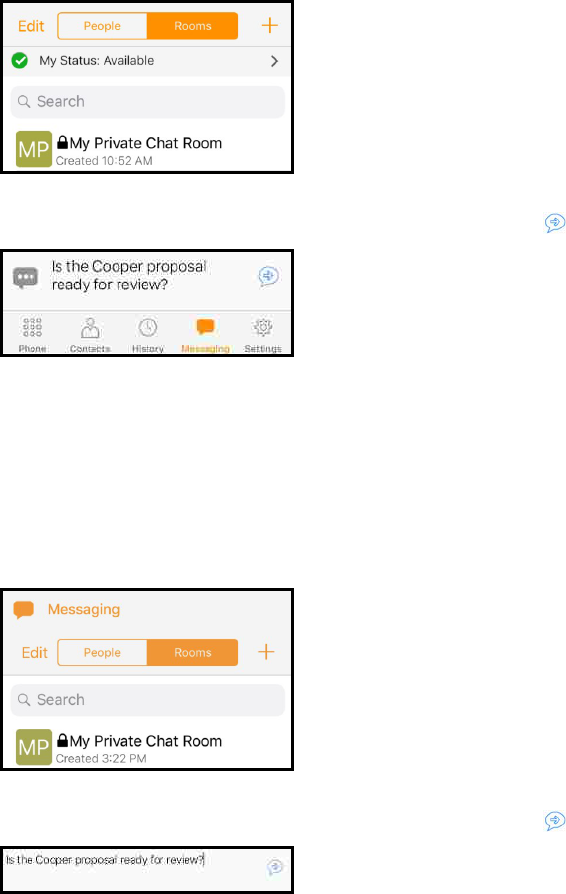
1. Go to the Messaging tab on the resource panel.
2. Tap Rooms and tap on the chat room.
3.
Type your message in Compose Message and tap Send.
Bria Mobile sends the chat room message.
iPad
1. Go to the Messaging tab on the resource panel.
2. Tap Rooms and tap on the chat room.
3.
Type your message in Compose Message and tap Send.
Bria Mobile sends the chat room message.
Receiving a message
Your chat room notification settings determine the type of alert you see when there is a
new message on a chat room.
CounterPath Corporation 167
Bria Mobile User Guide Messaging
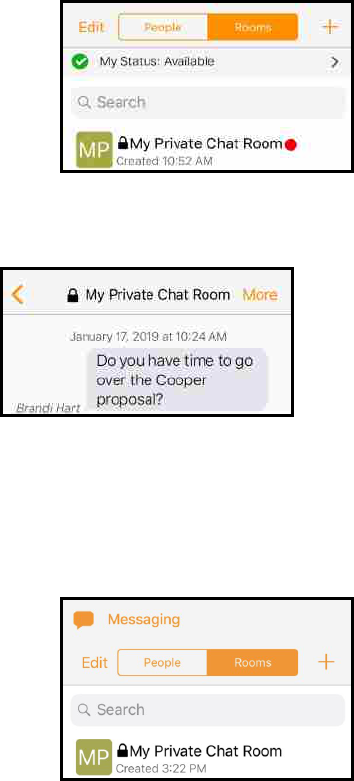
To view an new message
iPhone
1. Go to the Messaging tab on the resource panel.
2. Tap Rooms and tap on the chat room.
Bria Mobile displays the chat room messages.
iPad
1. Go to the Messaging tab on the resource panel.
2. Tap Rooms and tap on the chat room.
Bria Mobile displays the chat room messages.
CounterPath Corporation 168
Bria Mobile User Guide Messaging
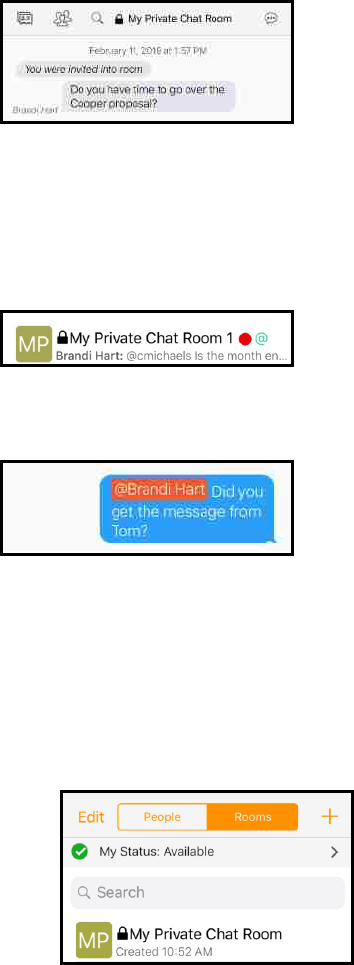
Mentions
If you want to get the attention of a room member, you can use mentions. The person that
is mentioned sees an indicator beside the chat room in Rooms.
The name of the person mentioned in the messages is highlighted.
To mention a person
iPhone
1. Go to the Messaging tab on the resource panel.
2. Tap Rooms and tap on the chat room.
3. Type @ followed by the name of the person you want to mention in Compose
Message. As you type, Bria Mobile offers suggestions. Select the name of the
person from the list of suggestions.
CounterPath Corporation 169
Bria Mobile User Guide Messaging
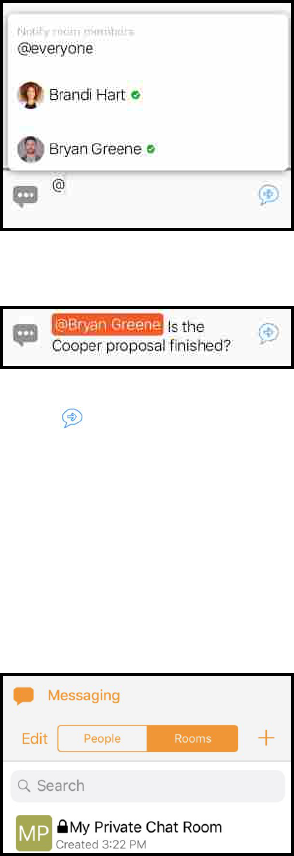
4. Type you message in Compose Message.
5.
Click Send.
Bria Mobile sends the chat room message. The person mentioned in the message sees
an indicator that they have been mentioned.
iPad
1. Go to the Messaging tab on the resource panel.
2. Tap Rooms and tap on the chat room.
3. Type @ followed by the name of the person you want to mention in Compose
Message. As you type, Bria Mobile offers suggestions. Select the name of the
person from the list of suggestions.
CounterPath Corporation 170
Bria Mobile User Guide Messaging
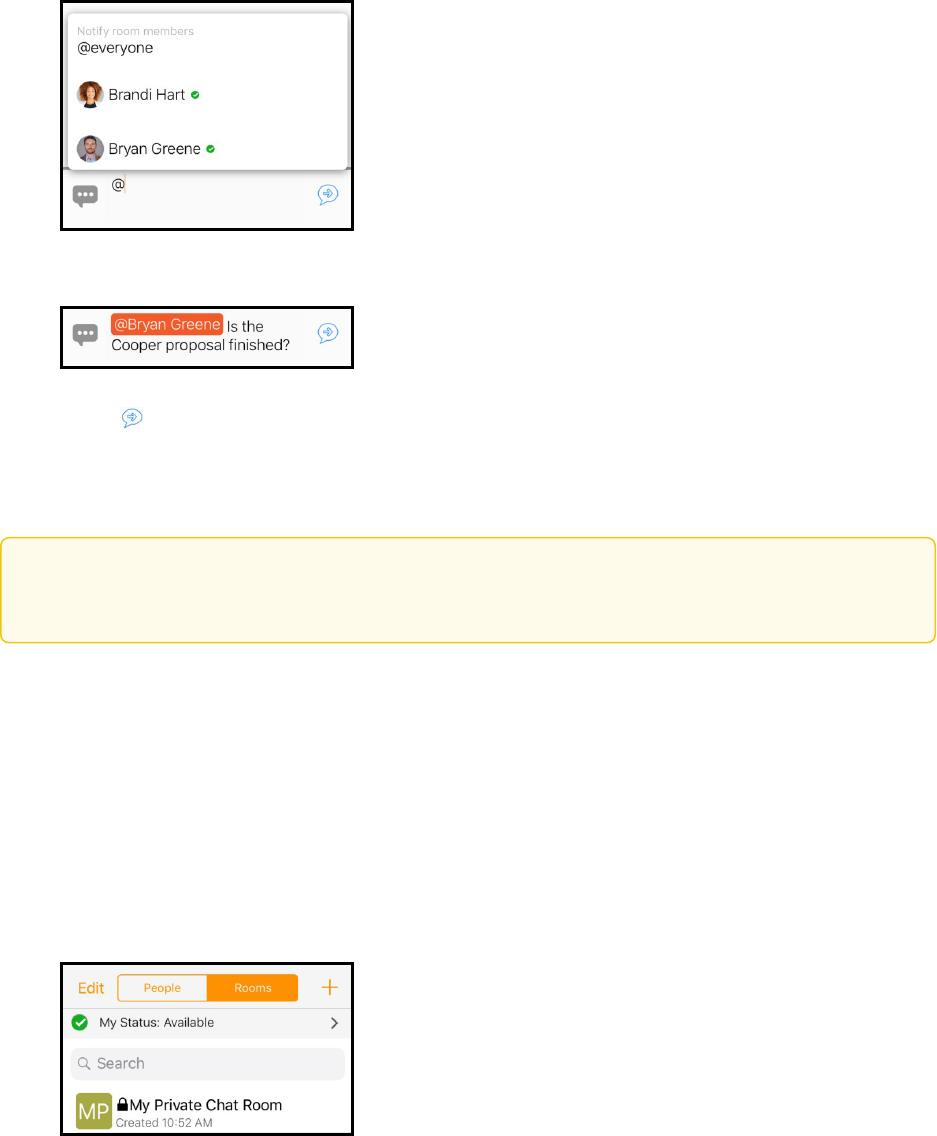
4. Type you message in Compose Message.
5.
Click Send.
Bria Mobile sends the chat room message. The person mentioned in the message sees
an indicator that they have been mentioned.
Tip: You can use @Everyone to send a mention to all members of a private chat room and all
active members of a public chat room.
Using Quick Responses
Quick Responses are pre-defined replies that let you respond quickly to an chat room.
To use Quick Responses
iPhone
1. Go to the Messaging tab on the resource panel.
2. Tap Rooms and tap on the chat room.
CounterPath Corporation 171
Bria Mobile User Guide Messaging
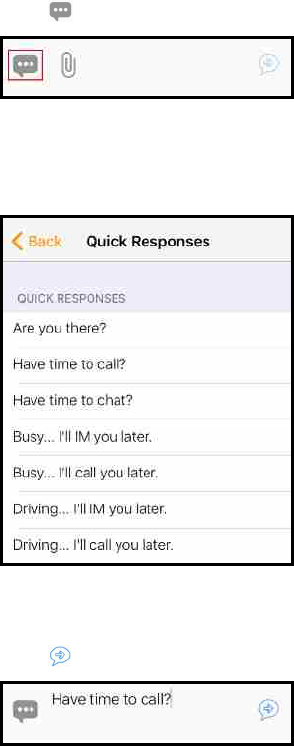
3.
Tap Quick Responses.
Bria Mobile displays the list of Quick Responses.
4. Select the response you want to use from the list.
The Quick Response is added to Compose Message.
5.
Tap Send.
Bria Mobile sends the Quick Reply.
iPad
1. Go to the Messaging tab on the resource panel.
2. Tap Rooms and tap on the chat room.
CounterPath Corporation 172
Bria Mobile User Guide Messaging
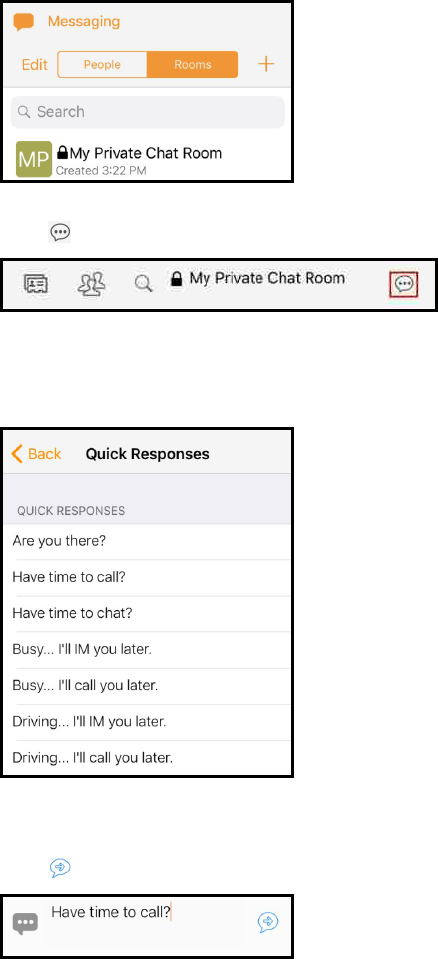
3.
Tap Quick Responses.
Bria Mobile displays the list of Quick Responses.
4. Select the response you want to use from the list.
The Quick Response is added to Compose Message.
5.
Tap Send.
Bria Mobile sends the Quick Response.
Chat room members
Members of a chat room can see who is in the room. Anyone in the chat room can invite
new members to a public chat room. The owner of the chat room can add new members
CounterPath Corporation 173
Bria Mobile User Guide Messaging
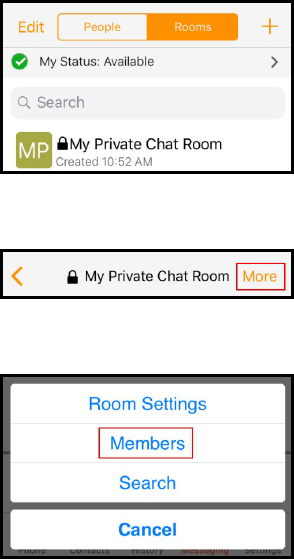
to a private room. The room owner can also re-invite members to a private chat room and
remove private chat room members.
Seeing who is in a room
As a member of a chat room, you can see who is in the room. Private chat rooms display
everyone who is a member of the chat room along with their status. Public chat rooms
display the room members that are currently online.
To see who is in a chat room
iPhone
1. Go to the Messaging tab on the resource panel.
2. Tap Rooms and tap the chat room.
3. Tap More.
4. Tap Members.
The members list opens. Each member of the room is displayed with their status.
CounterPath Corporation 174
Bria Mobile User Guide Messaging
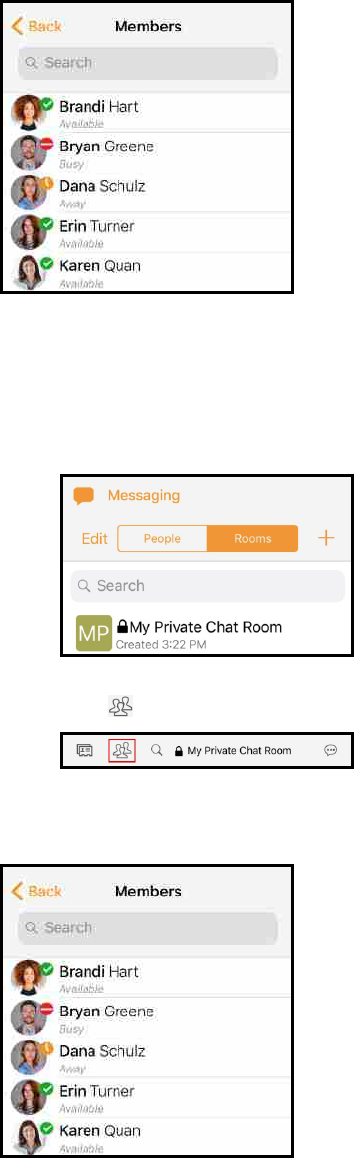
iPad
1. Go to the Messaging tab on the resource panel.
2. Tap Rooms and tap the chat room.
3.
Tap Members.
The Members list opens. Each member of the room is displayed with their status.
CounterPath Corporation 175
Bria Mobile User Guide Messaging
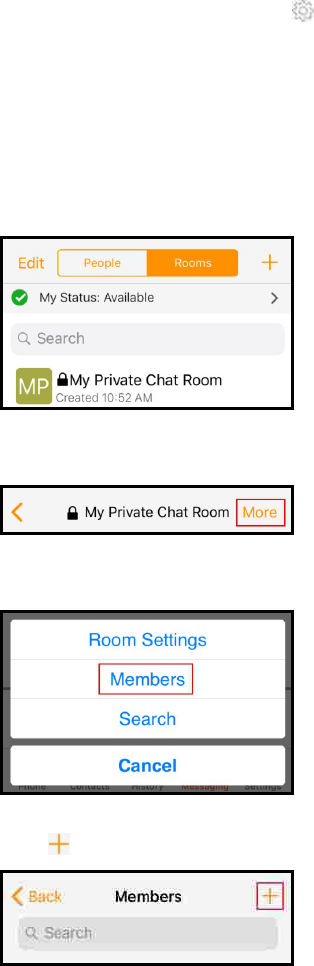
Adding new members to a private chat room
The room owner can add new members to a private chat room from the Members list. If
you are the room owner, you see Settings in the chat room header.
To add new members to a chat room
iPhone
1. Go to the Messaging tab on the resource panel.
2. Tap Rooms and tap the chat room.
3. Tap More.
4. Tap Members.
5.
Tap Add.
6. Tap on the Buddies you want to add to the chat room. A check mark appears on
top of their avatar. Tap Done when you finish selecting Buddies.
CounterPath Corporation 176
Bria Mobile User Guide Messaging
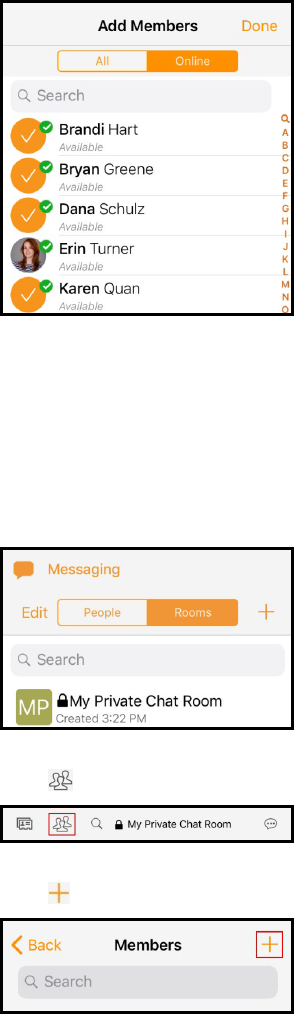
Bria Mobile adds the Buddy to the chat room.
iPad
1. Go to the Messaging tab on the resource panel.
2. Tap Rooms and tap the chat room.
3.
Tap Members.
4.
Tap Add.
5. Tap on the Buddies you want to add to the chat room. A check mark appears on
top of their avatar. Tap Done when you finish selecting Buddies.
CounterPath Corporation 177
Bria Mobile User Guide Messaging
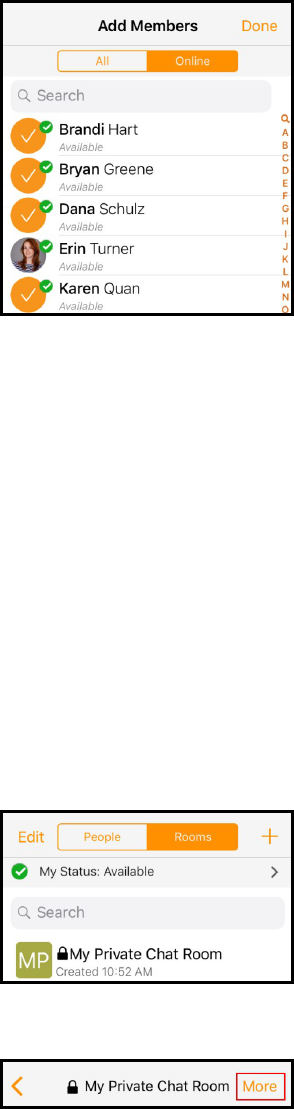
Bria Mobile adds the Buddy to the chat room.
Re-inviting a member
If the owner of the chat room sends an invitation to someone who is using a version of
Bria Mobile that does not support chat rooms, the member may not automatically join the
chat room. Once they have upgraded their version of Bria Mobile, the room owner can
re-invite the member.
To re-invite a member
iPhone
1. Go to the Messaging tab on the resource panel.
2. Tap Rooms and tap the chat room you want to edit.
3. Tap More.
4. Tap Members.
CounterPath Corporation 178
Bria Mobile User Guide Messaging
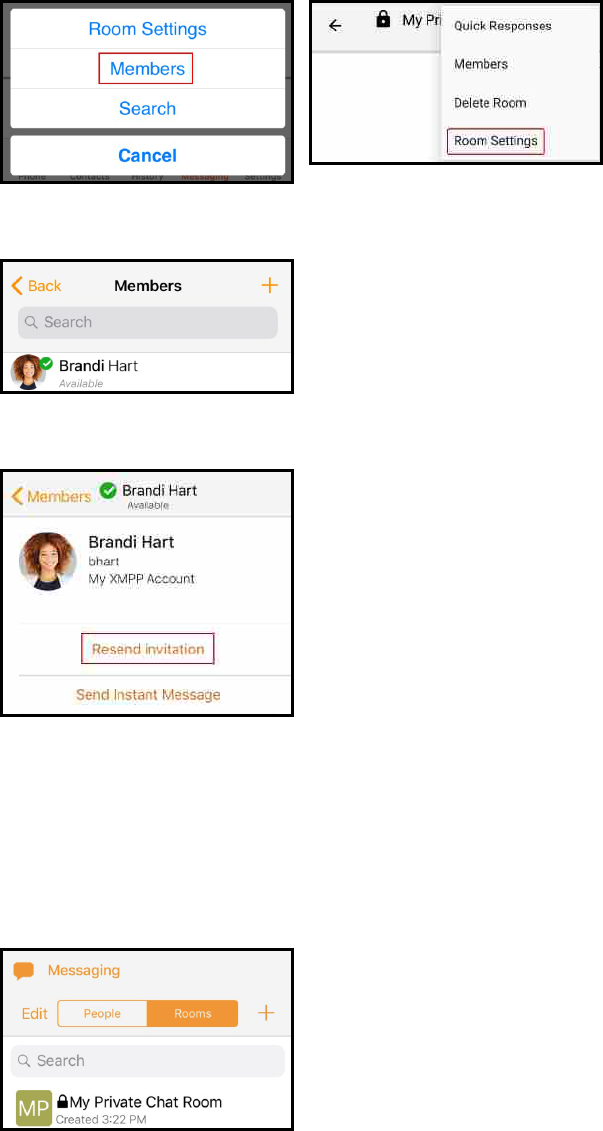
5. Tap the room member you want to re-invite.
6. Tap Resend Invitation.
The member you re-invited is automatically added to the room.
iPad
1. Go to the Messaging tab on the resource panel.
2. Tap Rooms and tap the chat room.
CounterPath Corporation 179
Bria Mobile User Guide Messaging
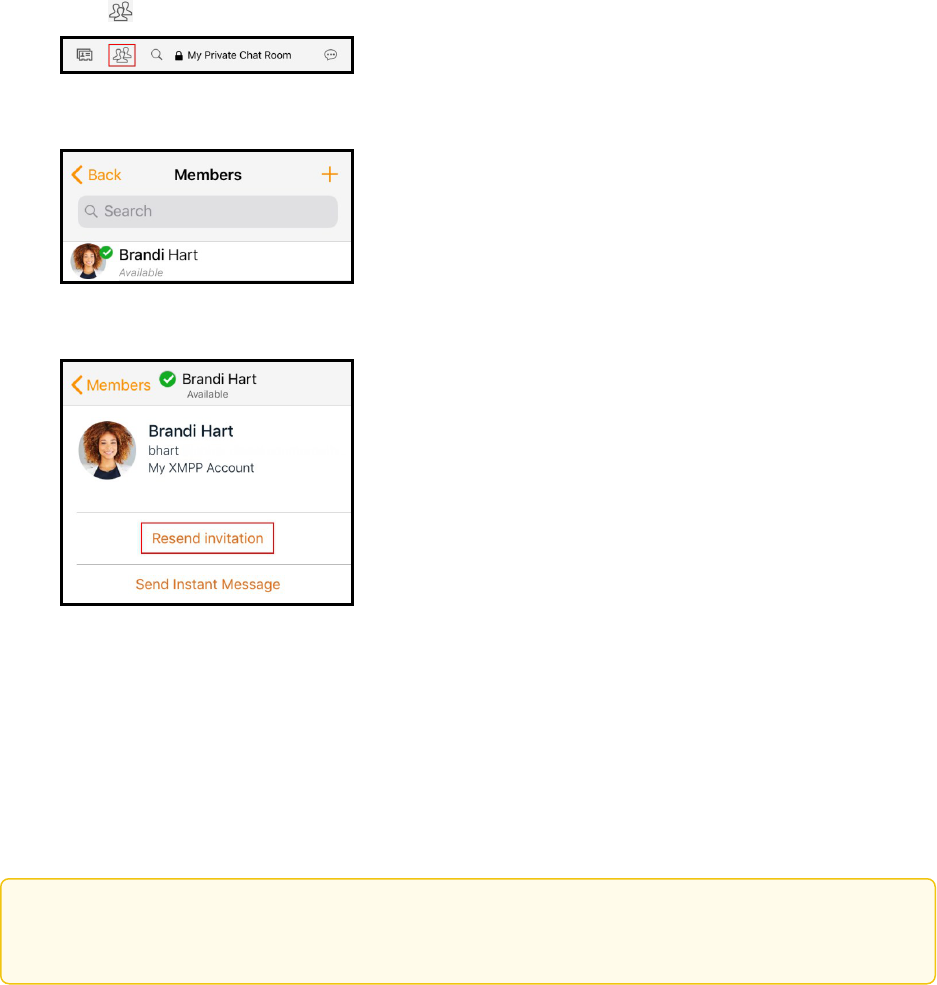
3.
Tap Members.
4. Tap the room member you want to re-invite.
5. Tap Resend invitation.
The member you re-invited is automatically added to the room.
Leaving or deleting a chat room
You can leave a private or public chat room without closing it if you are not the room
owner. You may be removed from a private chat room by the room owner. If you are the
room owner, you can delete a private or a public chat room.
Tip: Before you leave or delete a room, you may want to copy important messages and paste
them in another app.
Leaving a chat room
If you are not the room owner, you can leave a private or public chat room.
To leave a chat room by swiping left
iPhone
CounterPath Corporation 180
Bria Mobile User Guide Messaging
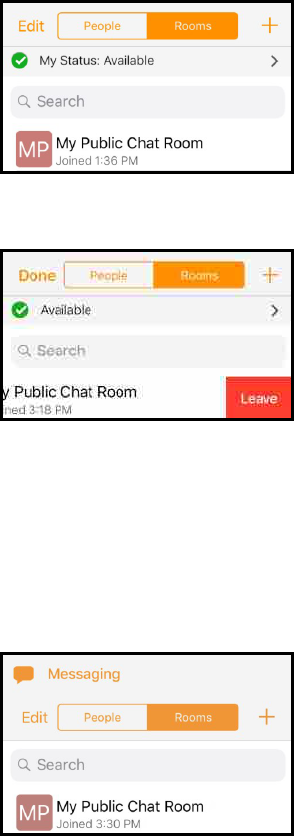
1. Go to the Messaging tab on the resource panel.
2. Tap Rooms.
3. Swipe left on the chat room and tap Leave.
The chat room is removed from Rooms.
iPad
1. Go to the Messaging tab on the resource panel.
2. Tap Rooms.
3. Swipe left on the chat room and tap Leave.
CounterPath Corporation 181
Bria Mobile User Guide Messaging
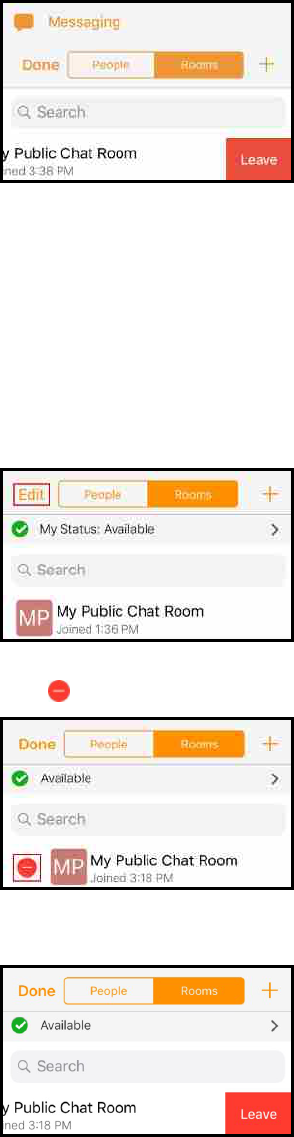
The chat room is removed from Rooms.
To leave a chat room using Edit
iPhone
1. Go to the Messaging tab on the resource panel.
2. Tap Edit.
3.
Tap Delete.
4. Tap Leave.
CounterPath Corporation 182
Bria Mobile User Guide Messaging
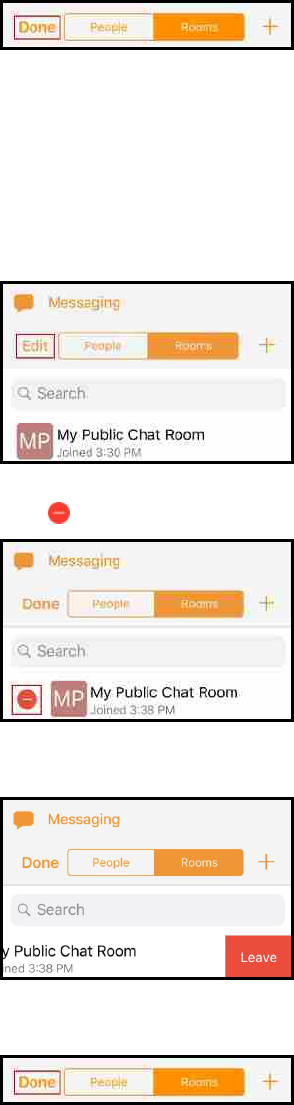
5. Tap Done.
The chat room is removed from Rooms.
iPad
1. Go to the Messaging tab on the resource panel.
2. Tap Edit.
3.
Tap Delete.
4. Tap Leave.
5. Tap Done.
CounterPath Corporation 183
Bria Mobile User Guide Messaging
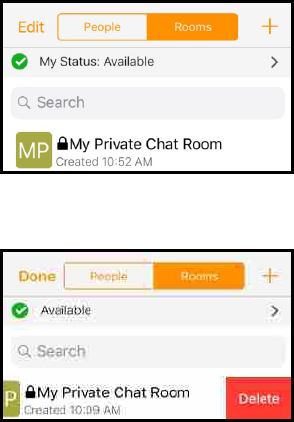
The chat room is removed from Rooms.
Deleting a chat room
If you are a room owner, you can delete both public and private chat rooms. If you delete
the room, it is no longer available for other room members.
To delete a room by swiping left
iPhone
1. Go to the Messaging tab on the resource panel.
2. Tap Rooms.
3. Swipe left on the chat room and tap Delete.
The chat room is removed from Rooms.
iPad
1. Go to the Messaging tab on the resource panel.
2. Tap Rooms.
CounterPath Corporation 184
Bria Mobile User Guide Messaging
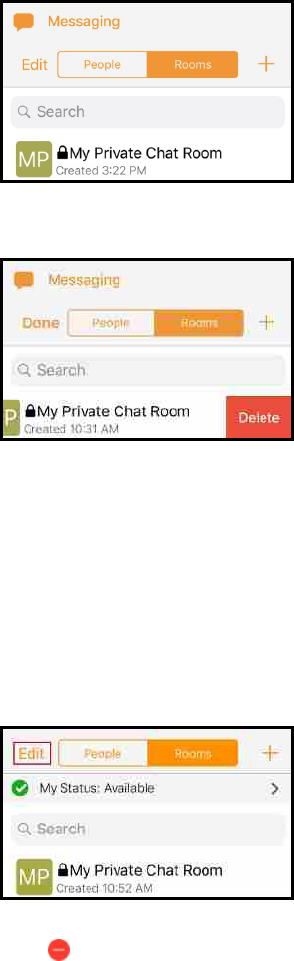
3. Swipe left on the chat room and tap Delete.
The chat room is removed from Rooms.
To delete a room using Edit
iPhone
1. Go to the Messaging tab on the resource panel.
2. Tap Edit.
3.
Tap Delete.
CounterPath Corporation 185
Bria Mobile User Guide Messaging
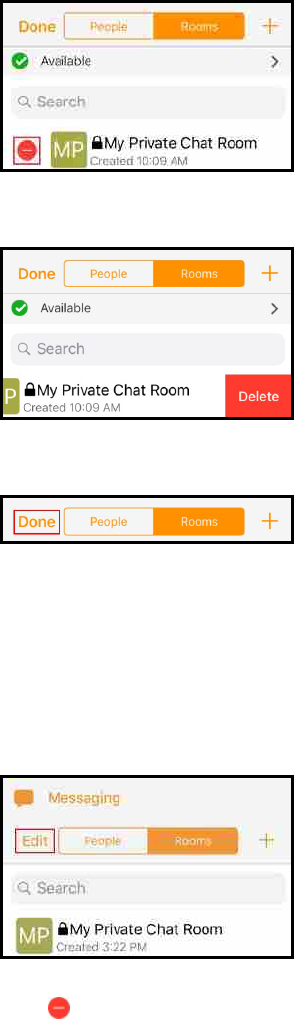
4. Tap Delete.
5. Tap Done.
The chat room is removed from Rooms.
iPad
1. Go to the Messaging tab on the resource panel.
2. Tap Edit.
3.
Tap Delete.
CounterPath Corporation 186
Bria Mobile User Guide Messaging
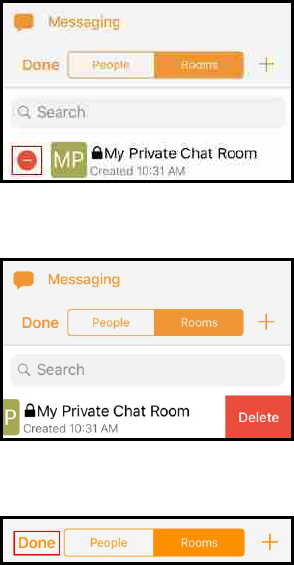
4. Tap Delete.
5. Tap Done.
The chat room is removed from Rooms.
The room owner deletes a chat room
The room owner may delete a chat room that you are a member of. If this happens, the
chat room remains in Rooms but is dimmed and shows a message that the room is
closed when you open the room and shows Room not available in Compose Message.
CounterPath Corporation 187
Bria Mobile User Guide Messaging
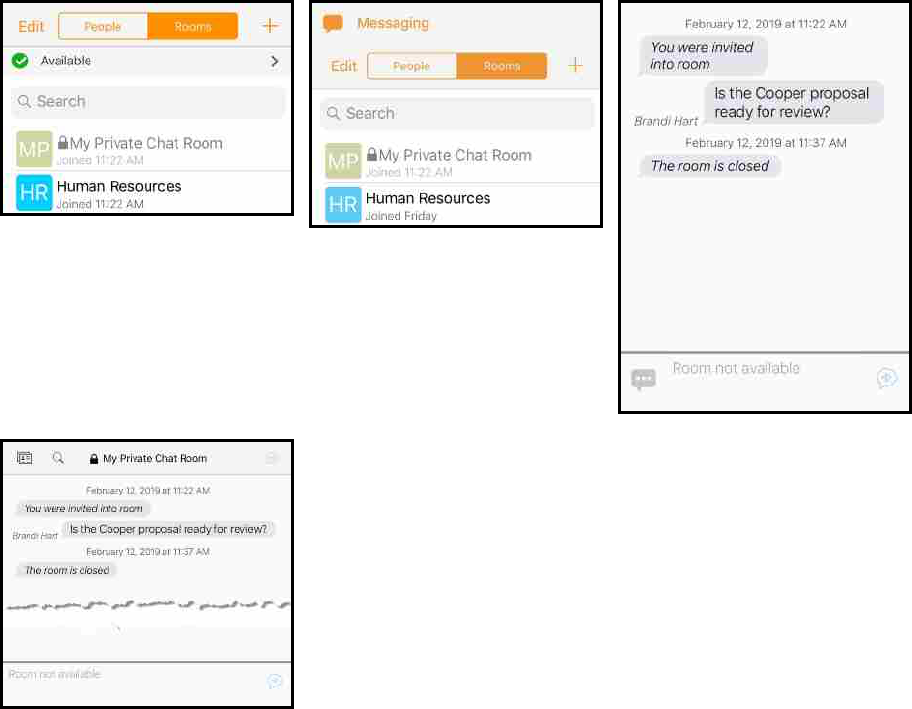
To remove the chat room from Rooms, leave the room using one of the methods above.
If you want to keep the message history, copy the messages and paste them into another
app before you leave the room.
Working with messages
From Messaging, you can resend, copy, delete, and forward messages.
Resending a message
If there is an error sending a message, a red icon appears beside the message.
CounterPath Corporation 188
Bria Mobile User Guide Messaging

To resend a message
l
Tap to resend the message.
Bria Mobile resends the message.
Copying a message
You can copy a single message or multiple messages in an IMor a chat room.
IM messages
To copy a single IM message
iPhone
1. Go to the Messaging tab on the resource panel.
2. Tap People and tap the IMsession.
3. Press-and-hold the message you want to copy.
4. Tap Copy .
CounterPath Corporation 189
Bria Mobile User Guide Messaging
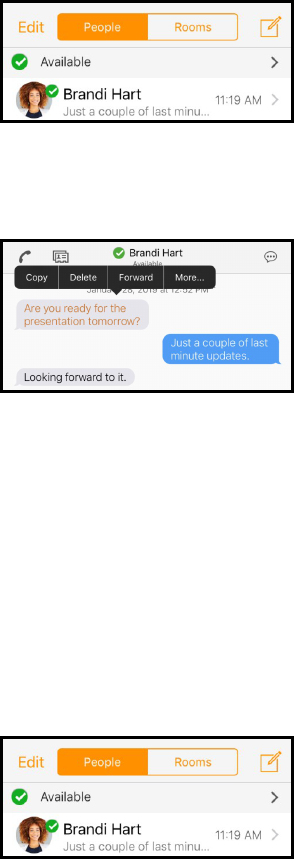
Bria Mobile copies the selected messages to the clipboard. You can paste the
messages within Bria Mobile or in another app.
iPad
1. Go to the Messaging tab on the resource panel.
2. Tap People and tap the IMsession.
3. Press-and-hold the message you want to copy.
4. Tap Copy .
Bria Mobile copies the selected messages to the clipboard. You can paste the
messages within Bria Mobile or in another app.
To copy multiple IM messages
iPhone
1. Go to the Messaging tab on the resource panel.
2. Tap People and tap the IM session.
3. Press-and-hold on of the messages you want to copy.
CounterPath Corporation 190
Bria Mobile User Guide Messaging
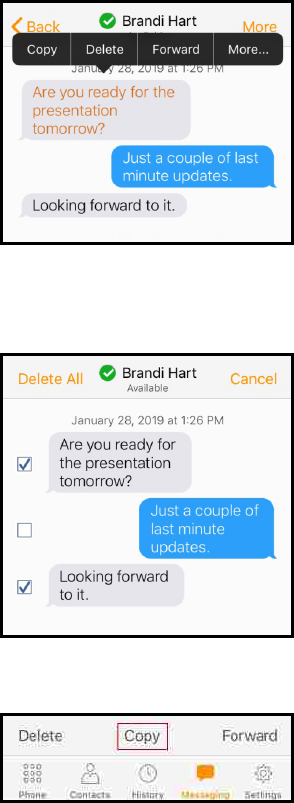
4. Tap More.
5. Tap all other messages that you want to copy. A check mark shows up beside
each selected message.
6. Tap Copy.
Bria Mobile copies the selected messages to the clipboard. You can paste the
messages within Bria Mobile or in another app.
iPad
1. Go to the Messaging tab on the resource panel.
2. Tap People and tap the IM session.
CounterPath Corporation 191
Bria Mobile User Guide Messaging
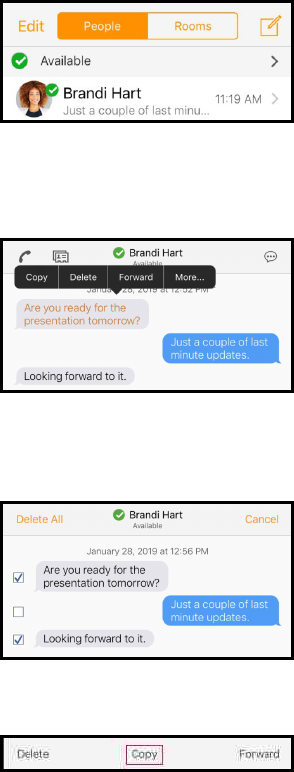
3. Press-and-hold one of the messages you want to copy.
4. Tap More.
5. Tap all other messages you want to copy. A check mark shows up beside each
selected message.
6. Tap Copy.
Bria Mobile copies the selected messages to the clipboard. You can paste the
messages within Bria Mobile or in another app.
Chat room messages
To copy a single chat room message
iPhone
1. Go to the Messaging tab on the resource panel.
2. Tap Rooms and tap the chat .
CounterPath Corporation 192
Bria Mobile User Guide Messaging
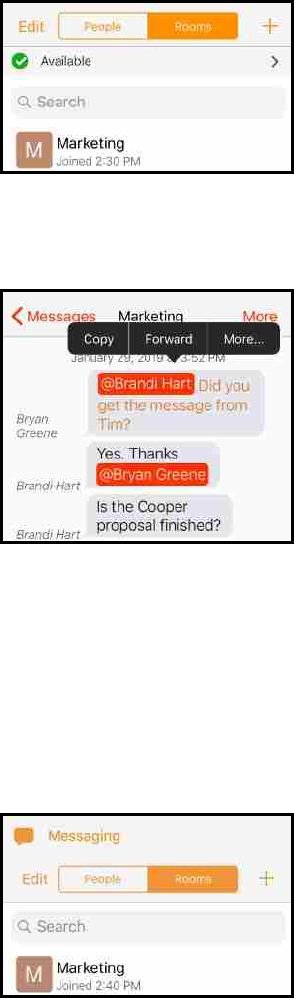
3. Press-and-hold the message you want to copy.
4. Tap Copy .
Bria Mobile copies the selected messages to the clipboard. You can paste the
messages within Bria Mobile or in another app.
iPad
1. Go to the Messaging tab on the resource panel.
2. Tap Rooms and tap the chat room.
3. Press-and-hold the message you want to copy.
4. Tap Copy .
CounterPath Corporation 193
Bria Mobile User Guide Messaging
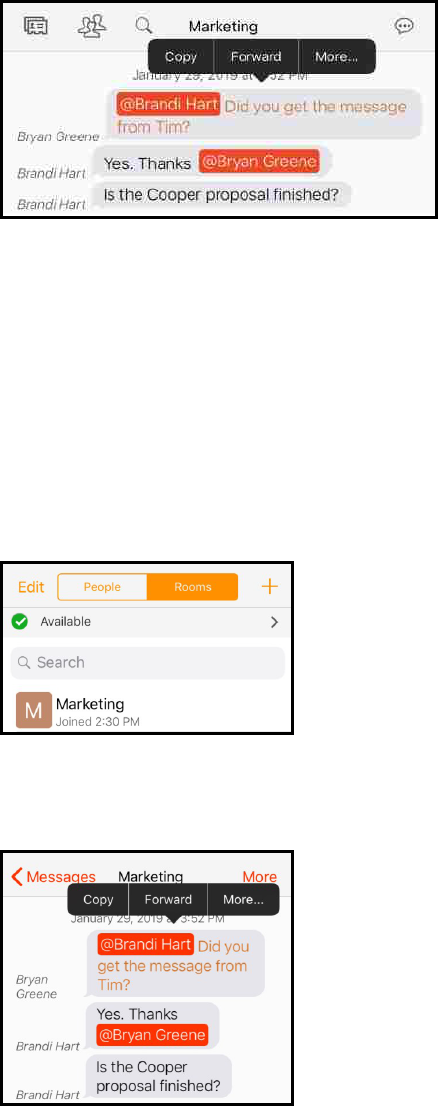
Bria Mobile copies the selected messages to the clipboard. You can paste the
messages within Bria Mobile or in another app.
To copy multiple chat room messages
iPhone
1. Go to the Messaging tab on the resource panel.
2. Tap Rooms and tap the chat room.
3. Press-and-hold one of the messages you want to copy.
4. Tap More.
5. Tap all other messages that you want to copy. A check mark shows up beside
CounterPath Corporation 194
Bria Mobile User Guide Messaging
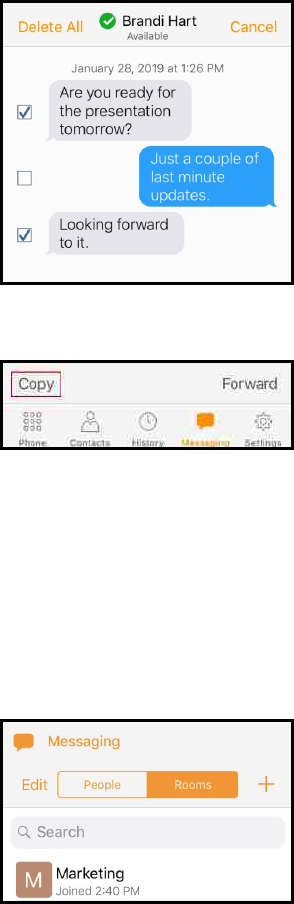
each selected message.
6. Tap Copy.
Bria Mobile copies the selected messages to the clipboard. You can paste the
messages within Bria Mobile or in another app.
iPad
1. Go to the Messaging tab on the resource panel.
2. Tap Rooms and tap the chat room.
3. Press-and-hold on of the messages you want to copy.
4. Tap More.
CounterPath Corporation 195
Bria Mobile User Guide Messaging
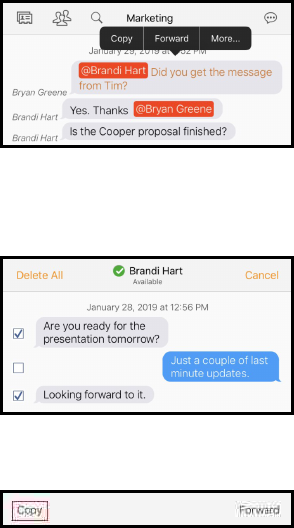
5. Tap all other messages you want to copy. A check mark shows up beside each
selected message.
6. Tap Copy.
Bria Mobile copies the selected messages to the clipboard. You can paste the
messages within Bria Mobile or in another app.
Forwarding a message
You can forward a single message or multiple messages in an IMor a chat room.
IM messages
To forward a single IM message
iPhone
1. Go to the Messaging tab on the resource panel.
2. Tap People and tap the IMsession.
CounterPath Corporation 196
Bria Mobile User Guide Messaging
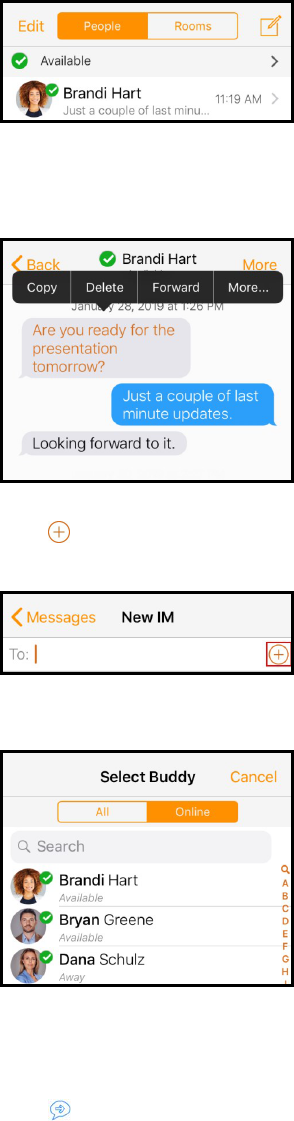
3. Press-and-hold the message you want to forward.
4. Tap Forward.
5.
Tap Add recipient or start typing the name of the contact you want to add to the
IM.
6. Tap a Buddy.
Bria Mobile opens an IM with the Buddy and the message is in Compose
Message.
7.
Tap Send.
Bria Mobile forwards the message.
CounterPath Corporation 197
Bria Mobile User Guide Messaging
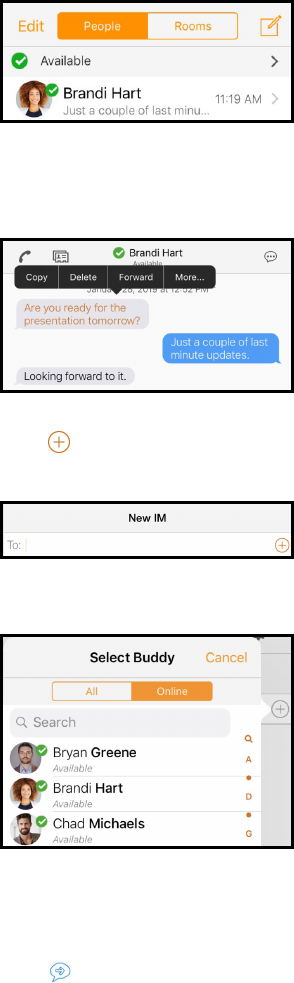
iPad
1. Go to the Messaging tab on the resource panel.
2. Tap People and tap the IMsession.
3. Press-and-hold the message you want to forward.
4. Tap Forward.
5.
Tap Add recipient or start typing the name of the contact you want to add to the
IM.
6. Tap a Buddy.
Bria Mobile opens an IM with the Buddy and the message is in Compose
Message.
7.
Tap Send.
Bria Mobile forwards the message to the selected Buddies.
CounterPath Corporation 198
Bria Mobile User Guide Messaging
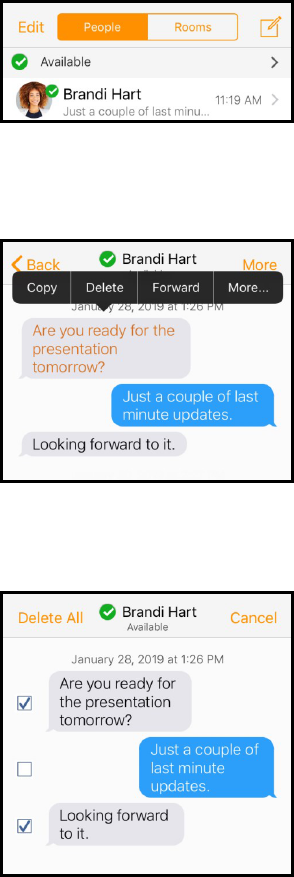
To forward multiple IM messages
iPhone
1. Go to the Messaging tab on the resource panel.
2. Tap People and tap the IM session.
3. Press-and-hold one of the messages you want to forward.
4. Tap More.
5. Tap all other messages that you want to forward. A check mark shows up beside
each selected message.
6. Tap Forward.
CounterPath Corporation 199
Bria Mobile User Guide Messaging
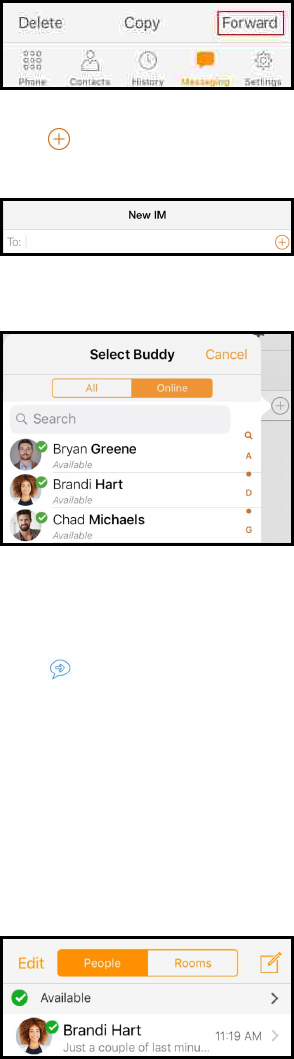
7.
Tap Add recipient or start typing the name of the contact you want to add to the
IM.
8. Tap a Buddy.
Bria Mobile opens an IM with the Buddy and the message is in Compose
Message.
9.
Tap Send.
Bria Mobile forwards the selected messages.
iPad
1. Go to the Messaging tab on the resource panel.
2. Tap People and tap the IMsession.
3. Press-and-hold one of the messages you want to forward.
4. Tap More.
CounterPath Corporation 200
Bria Mobile User Guide Messaging
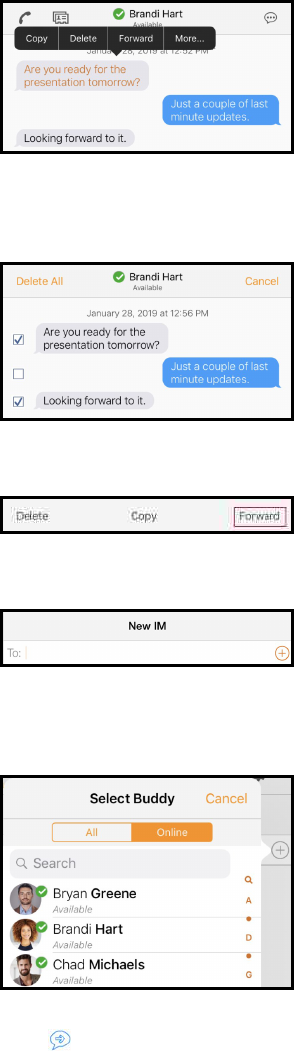
5. Tap all other messages you want to forward. A check mark shows up beside each
selected message.
6. Tap Forward.
7. Tap +.
8. Tap on a contact to select a Buddy and tap Done. (You can select multiple
recipients).
9.
Tap Send.
Bria Mobile forwards the messages to the selected Buddies. Bria Mobile groups multiple
messages into one message.
CounterPath Corporation 201
Bria Mobile User Guide Messaging
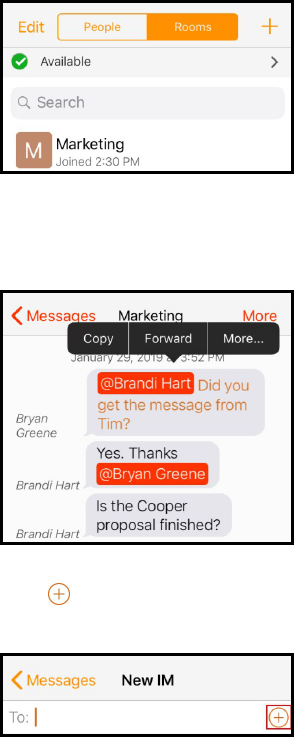
Chat room messages
To forward a single chat room message
iPhone
1. Go to the Messaging tab on the resource panel.
2. Tap Rooms and tap the chat room.
3. Press-and-hold the message you want to forward.
4. Tap Forward.
5.
Tap Add recipient or start typing the name of the contact you want to add to the
IM.
6. Tap a Buddy.
CounterPath Corporation 202
Bria Mobile User Guide Messaging
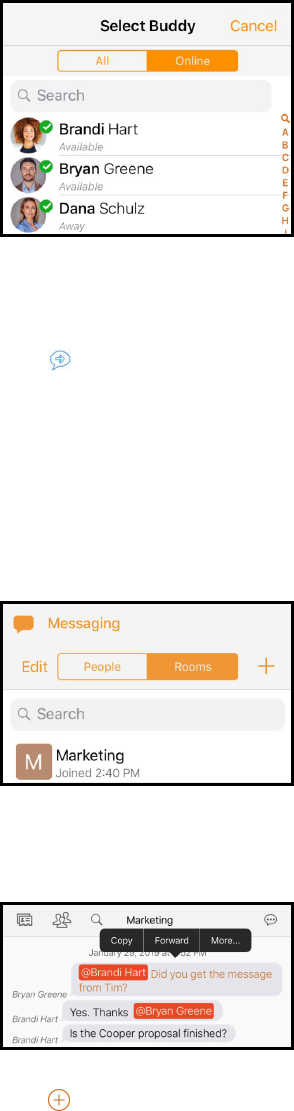
Bria Mobile opens an IM with the Buddy and the message is in Compose
Message.
7.
Tap Send.
Bria Mobile forwards the message.
iPad
1. Go to the Messaging tab on the resource panel.
2. Tap Rooms and tap the chat room.
3. Press-and-hold the message you want to forward.
4. Tap Forward.
5.
Tap Add recipient or start typing the name of the contact you want to add to the
IM.
CounterPath Corporation 203
Bria Mobile User Guide Messaging
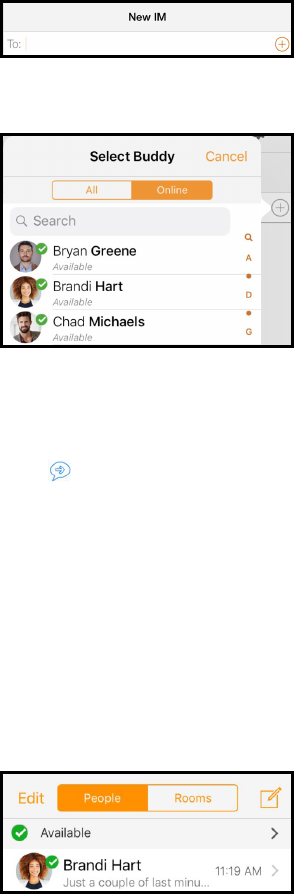
6. Tap a Buddy.
Bria Mobile opens an IM with the Buddy and the message is in Compose
Message.
7.
Tap Send.
Bria Mobile forwards the message to the selected Buddies.
To forward multiple chat room messages
iPhone
1. Go to the Messaging tab on the resource panel.
2. Tap Rooms and tap the chat room.
3. Press-and-hold one of the messages you want to forward.
4. Tap More.
CounterPath Corporation 204
Bria Mobile User Guide Messaging
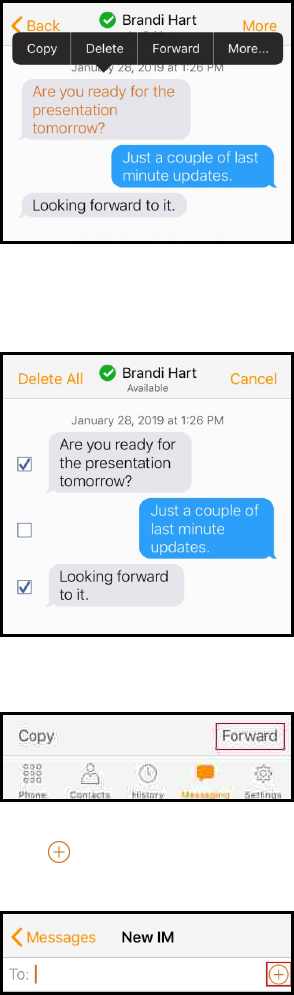
5. Tap all other messages that you want to forward. A check mark shows up beside
each selected message.
6. Tap Forward.
7.
Tap Add recipient or start typing the name of the contact you want to add to the
IM.
8. Tap a Buddy.
CounterPath Corporation 205
Bria Mobile User Guide Messaging
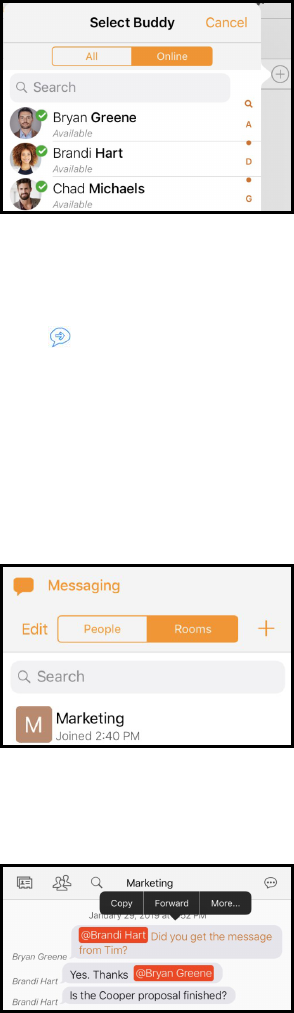
Bria Mobile opens an IM with the Buddy and the message is in Compose
Message.
9.
Tap Send.
Bria Mobile forwards the selected messages.
iPad
1. Go to the Messaging tab on the resource panel.
2. Tap Rooms and tap the chat room.
3. Press-and-hold one of the messages you want to forward.
4. Tap More.
5. Tap all other messages you want to forward. A check mark shows up beside each
selected message.
CounterPath Corporation 206
Bria Mobile User Guide Messaging
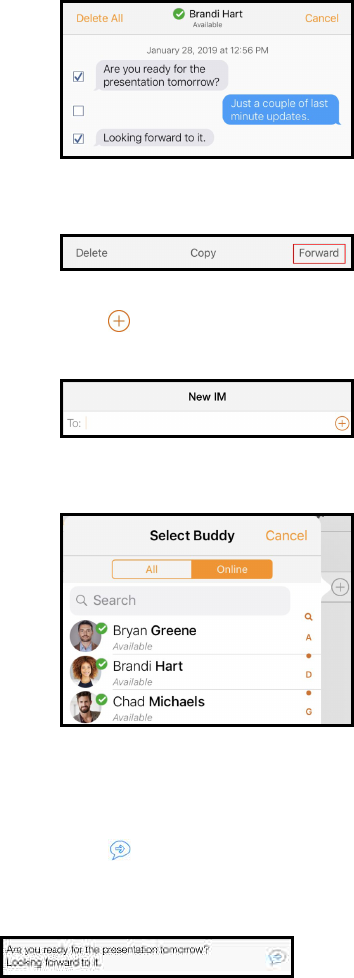
6. Tap Forward.
7.
Tap Add recipient or start typing the name of the contact you want to add to the
IM.
8. Tap a Buddy.
Bria Mobile opens an IM with the Buddy and the message is in Compose
Message.
9.
Tap Send.
Bria Mobile forwards the selected messages.
CounterPath Corporation 207
Bria Mobile User Guide Messaging
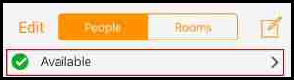
Presence
Bria Mobile allows you to share your online status (your presence) with Buddies. When
you launch Bria Mobile, your online status is Available.
You can view the status of Buddies.
Changing your status
Bria Mobile allows you to share your online status (presence) with Buddies. When you
launch Bria Mobile, your online status in Available.
You can change your status from Available to Away, Busy, On The Phone, Do Not
Disturb, or Appear Offline. When you change your status from Available or specify a
custom status note, your status remains as specified until you update it yourself. Bria
Mobile updates your status to On The Phone when you make or receive a phone call if
your status is Available and you have not entered anything into Custom Note.
To change your presence status
iPhone
1. Go to the Messaging tab on the resource panel.
2. Tap on your status.
The list of available status options appears in Presence Status.
3. Tap the status option you want to use.
CounterPath Corporation 208
Bria Mobile User Guide Presence
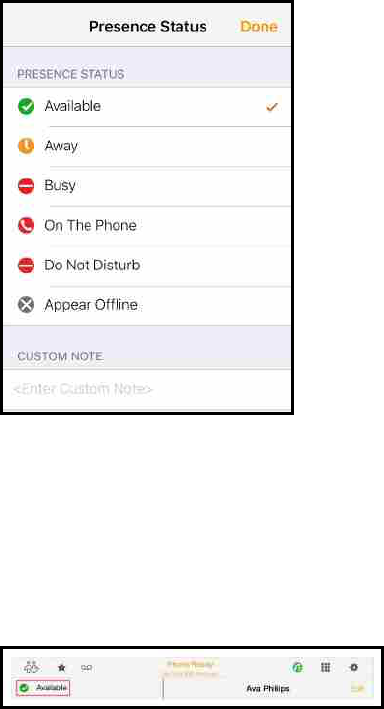
4. Tap Done.
Bria Mobile updates your status.
iPad
1. Tap on your status on the toolbar.
The list of available status options appears in Presence Status.
2. Tap the status option you want to use.
CounterPath Corporation 209
Bria Mobile User Guide Presence
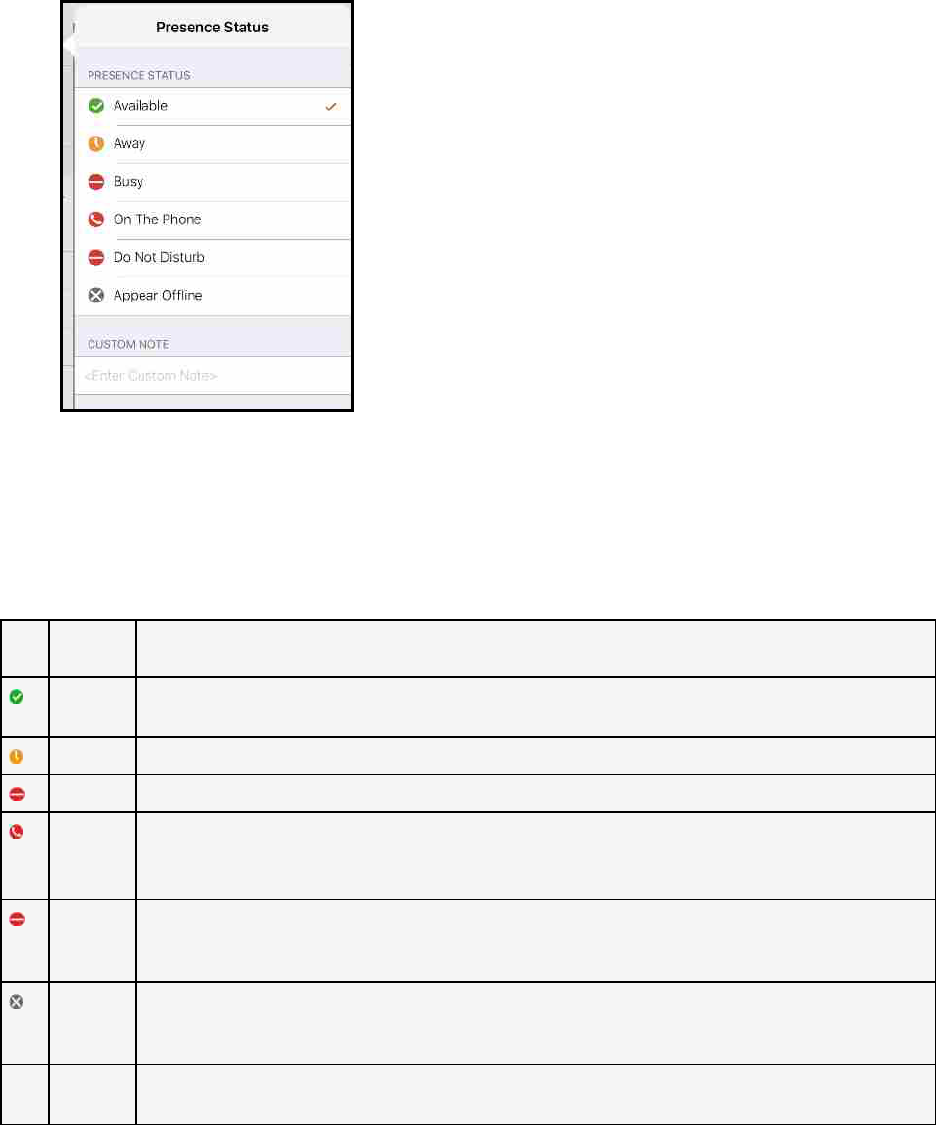
3. Tap outside of Presence Status.
Bria Mobile updates your status.
Status indicators and what they mean
Icon
My
Presence
Mean that …
Available People can call you and send you an IM. If no custom status note is specified, Bria Mobile automatically switches
Available to On The Phone when you make or receive calls.
Away People can call you and send you an IM.
Busy People can call you and send you an IM.
On The
Phone
When you make or receive phone calls, Bria Mobile automatically updates your status to On The Phone if your
status is Available and no custom note is specified. When your call finishes, your status goes back to Available.
While you are on the phone, you can stillsend and receive IMs.
Do Not
Disturb
(DND)
No one can call you; the call fails and your History shows a missed call. Your Buddies can send you IM; an alert
comes up on the Messaging tab without any sound.
Appear
Offline
You can see the presence status of your Buddies but your Buddies see you as offline. You receive phone calls and
IMs if your Buddies do contact you; they are unlikely to do so because your Buddies cannot tellthe difference
between Appear Offline and you really being offline.
Any Custom
Note
You can choose any of the other status options. Your Buddies see the status icon with your custom status note.
CounterPath Corporation 210
Bria Mobile User Guide Presence
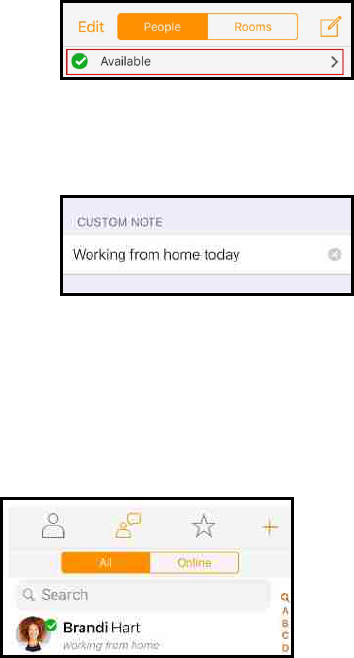
Creating a custom status note
You can create a custom status that appears beside the status icon. When you have a
custom status note, Bria Mobile no longer automatically updates your presence to On
the phone if you have an incoming call.
To create a custom status note
iPhone
1. Go to the Messaging tab on the resource panel.
2. Tap on your status.
The list of available status options appears in Presence Status.
3. Type your custom status in Custom Note.
4. Tap Done.
Bria Mobile updates the text in your status to your Custom Note. You can choose any of
the status options available. Your Buddies see the wording from Custom Note and the
status icon from the status you choose.
CounterPath Corporation 211
Bria Mobile User Guide Presence
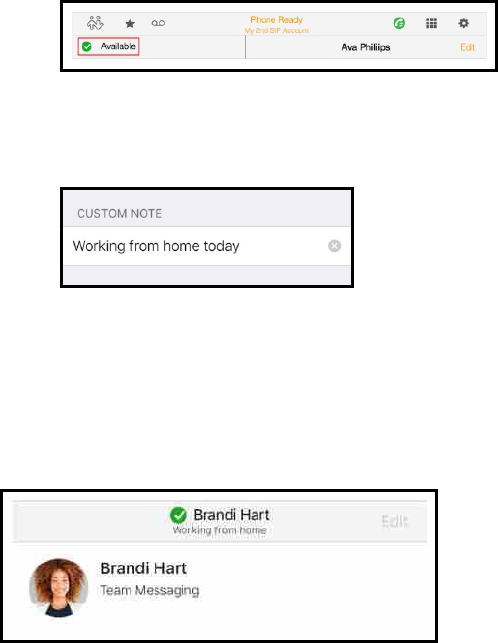
iPad
1. Tap on your status on the toolbar.
The list of available status options appears in Presence Status.
2. Type your custom status in Custom Note.
3. Tap outside of Custom Note.
Bria Mobile updates the text in your status to your Custom Note. You can choose any of
the status options available. Your Buddies see the wording from Custom Note and the
status icon from the status you choose.
Deleting a custom status note
When you delete a custom status note and set your status to Available, Bria Mobile
automatically switches Available to On The Phone when you make or receive calls.
To delete a custom status
iPhone
1. Go to the Messaging tab on the resource panel.
2. Tap on your status.
CounterPath Corporation 212
Bria Mobile User Guide Presence

The list of available options appears in Presence Status.
3.
Tap on Custom Note and tap the Clear Text.
4. Tap Done.
Bria Mobile removes the custom status message. Your Buddies see the wording and the
status symbol from the status you choose.
iPad
1. Tap on your status on the toolbar.
The list of available status options appears in Presence Status.
2.
Tap on Custom Note and tap the Clear Text.
3. Tap outside of My Status.
Bria Mobile removes the custom status message. Your Buddies see the wording and the
status symbol from the status you choose.
CounterPath Corporation 213
Bria Mobile User Guide Presence
File sharing
With Bria Mobile, you can send and receive files from a one-on-one IM using your XMPP
account. The receiver must accept the files for the transfer to start. If you send more than
one file at a time, the receiver must accept or decline all of the files for the transfer to
start.
Prerequisites
l An XMPP account must be enabled
l The XMPP file transfer feature must be enabled
Limitations
The known limitations for file sharing are:
l File sharing does not work on group chats
l You can only send multiple files at the same time if they are located in the same
folder
l If you are using more than one Bria Mobile client with your XMPP account, the files
are not synced between your devices
Sending files
Send single files or files located in the same folder in an IM conversation.
To send a single photo, video, or file
iPhone
1. Create an new IM or open an IMconversation with the person you want to share
the file with.
CounterPath Corporation 214
Bria Mobile User Guide File sharing
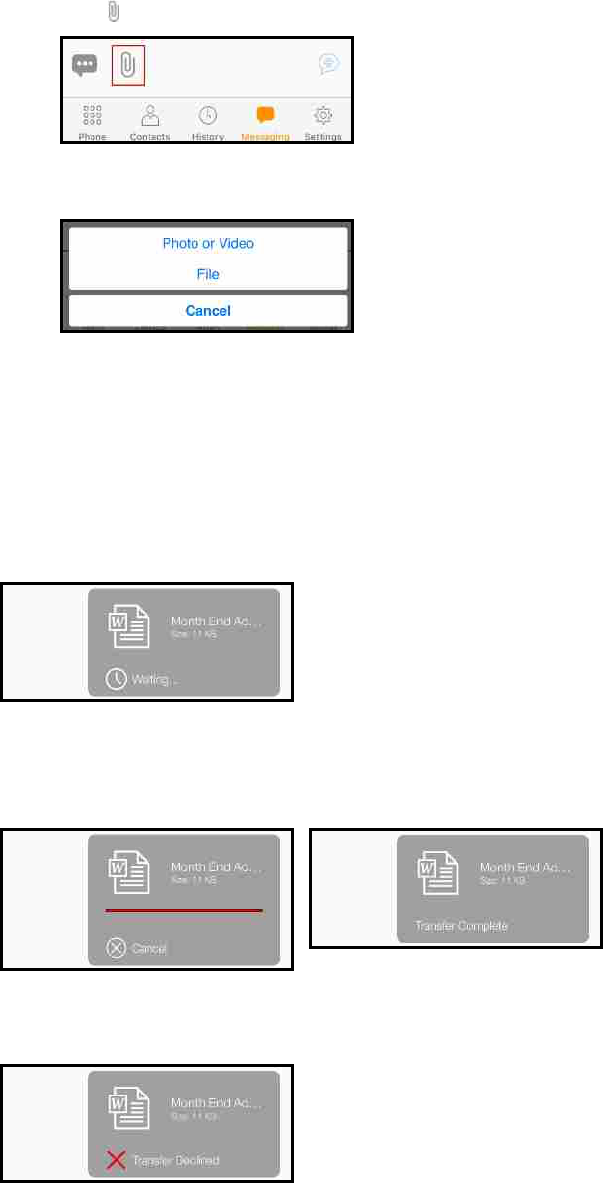
2.
Tap Attach.
3. Tap either Photo or Video or File, depending on the type of file you want to send.
The file manager opens.
4. Locate the folder that contains the files that you want to send.
5. Tap on the file that you want to send.
Bria Mobile sends a file transfer notification to the recipient. Until the recipient responds
to the notifications, the sender sees Waiting as the file transfer status.
Once the recipient accepts the file, Bria Mobile shows the progress of the transfer and
when the transfer is complete.
If the recipient declines the files, the transfer shows as Transfer Declined.
CounterPath Corporation 215
Bria Mobile User Guide File sharing
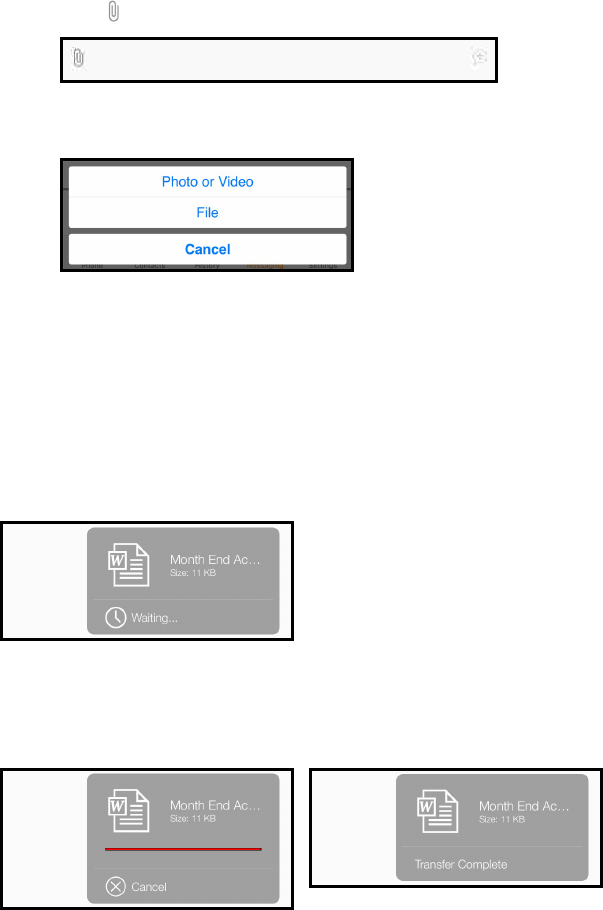
iPad
1. Create an new IM or open an IMconversation with the person you want to share
the file with.
2.
Tap Attach.
3. Tap either Photo or Video or File, depending on the type of file you want to send.
The file manager opens.
4. Locate the folder that contains the files that you want to send.
5. Tap on the file that you want to send.
Bria Mobile sends a file transfer notification to the recipient. Until the recipient responds
to the notifications, the sender sees Waiting as the file transfer status.
Once the recipient accepts the file, Bria Mobile shows the progress of the transfer and
when the transfer is complete.
If the recipient declines the files, the transfer shows as Transfer Declined.
CounterPath Corporation 216
Bria Mobile User Guide File sharing

To send multiple images
iPhone
1. Create an new IM or open an IMconversation with the person you want to share
the file with.
2.
Tap Attach.
3. Tap Photo or Video.
The file manager opens.
4. Locate the folder that contains the files that you want to send. You can only send
multiple files at one time if they are located in the same folder.
5. Tap the photos and videos you want to send. Tap Done when you have selected
all the photos and videos.
CounterPath Corporation 217
Bria Mobile User Guide File sharing
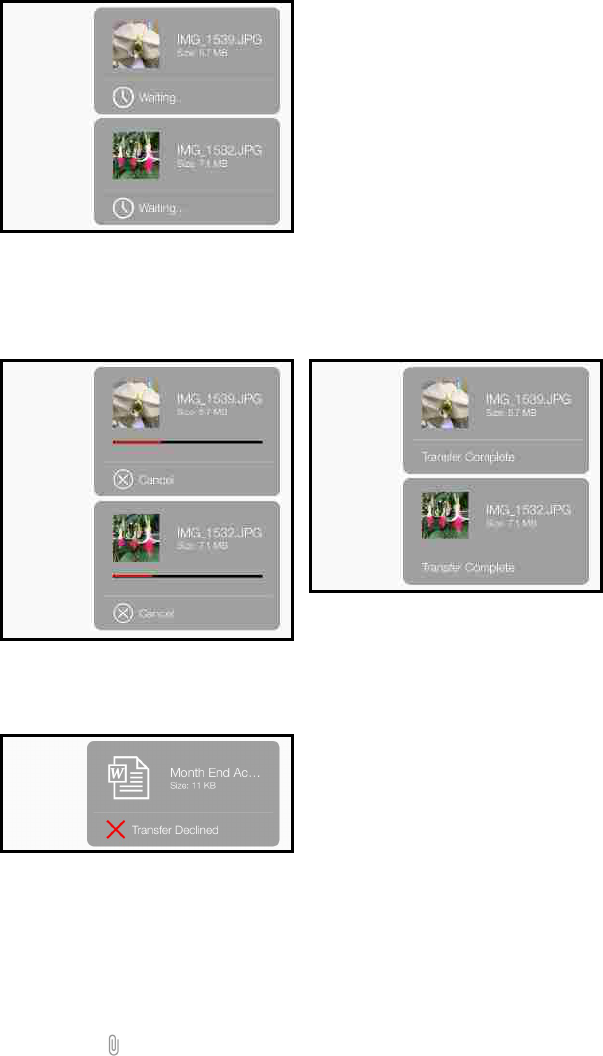
Bria Mobile sends a file transfer notification to the recipient. Until the recipient responds
to the notifications, the sender sees Waiting as the file transfer status.
Once the recipient accepts the file, Bria Mobile shows the progress of the transfer and
when the transfer is complete.
If the recipient declines the files, the transfer shows as Transfer Declined.
iPad
1. Create an new IM or open an IMconversation with the person you want to share
the file with.
2.
Tap Attach.
CounterPath Corporation 218
Bria Mobile User Guide File sharing
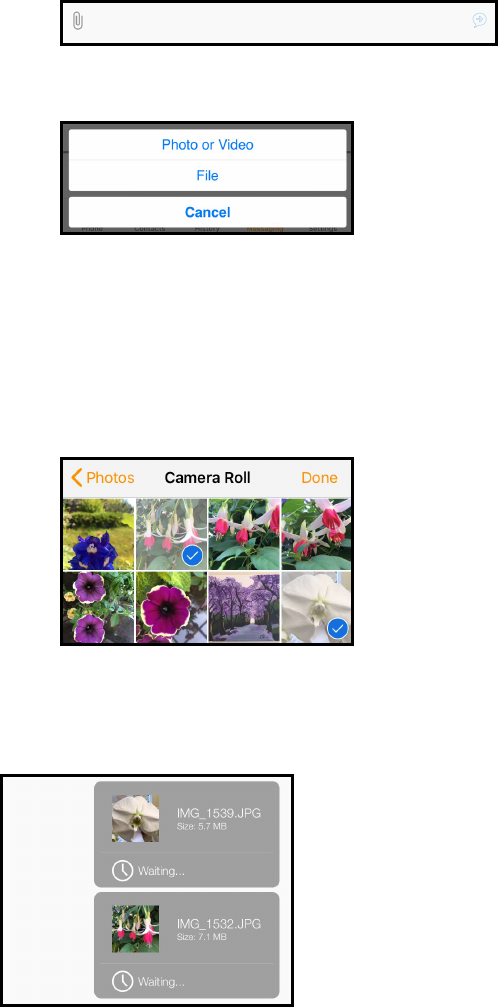
3. Tap Photo or Video.
The file manager opens.
4. Locate the folder that contains the files that you want to send. You can only send
multiple files at one time if they are located in the same folder.
5. Tap the photos and videos you want to send. Tap Done when you have selected
all the photos and videos.
Bria Mobile sends a file transfer notification to the recipient. Until the recipient responds
to the notifications, the sender sees Waiting as the file transfer status.
Once the recipient accepts the file, Bria Mobile shows the progress of the transfer and
when the transfer is complete.
CounterPath Corporation 219
Bria Mobile User Guide File sharing
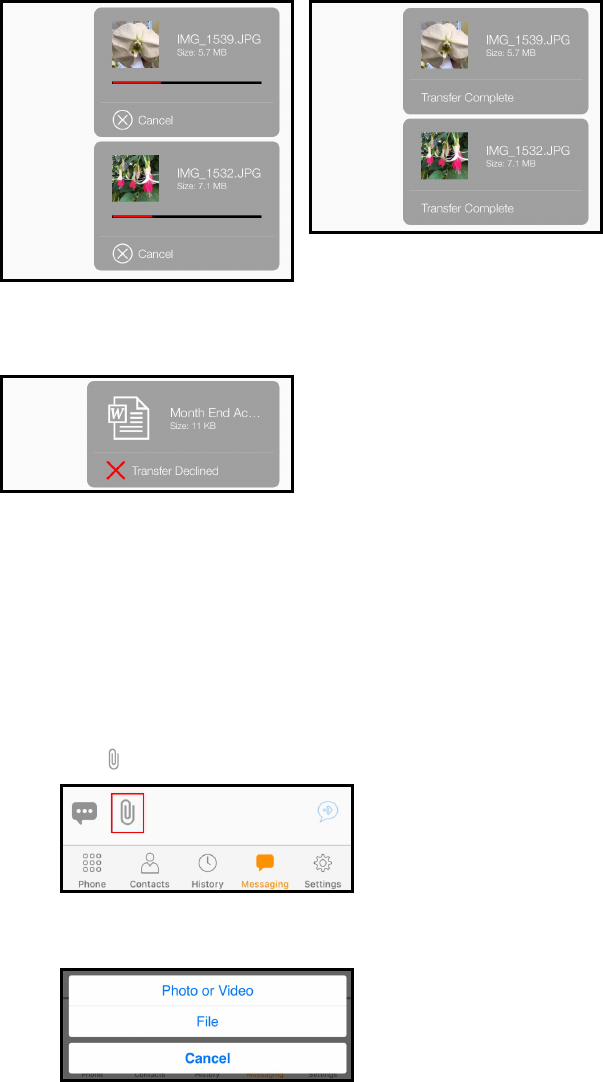
If the recipient declines the files, the transfer shows as Transfer Declined.
To send multiple files
iPhone
1. Create an new IM or open an IMconversation with the person you want to share
the file with.
2.
Tap Attach.
3. Tap File.
The file manager opens.
CounterPath Corporation 220
Bria Mobile User Guide File sharing
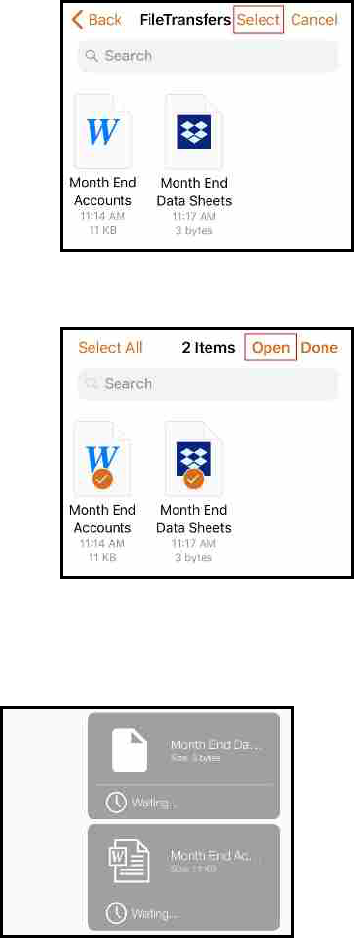
4. Locate the folder that contains the files that you want to send. You can only send
multiple files at one time if they are located in the same folder.
5. Tap Select and tap the files you want to send.
6. Tap Open when you have selected all the files.
Bria Mobile sends a file transfer notification to the recipient. Until the recipient responds
to the notifications, the sender sees Waiting as the file transfer status.
Once the recipient accepts the file, Bria Mobile shows the progress of the transfer and
when the transfer is complete.
CounterPath Corporation 221
Bria Mobile User Guide File sharing
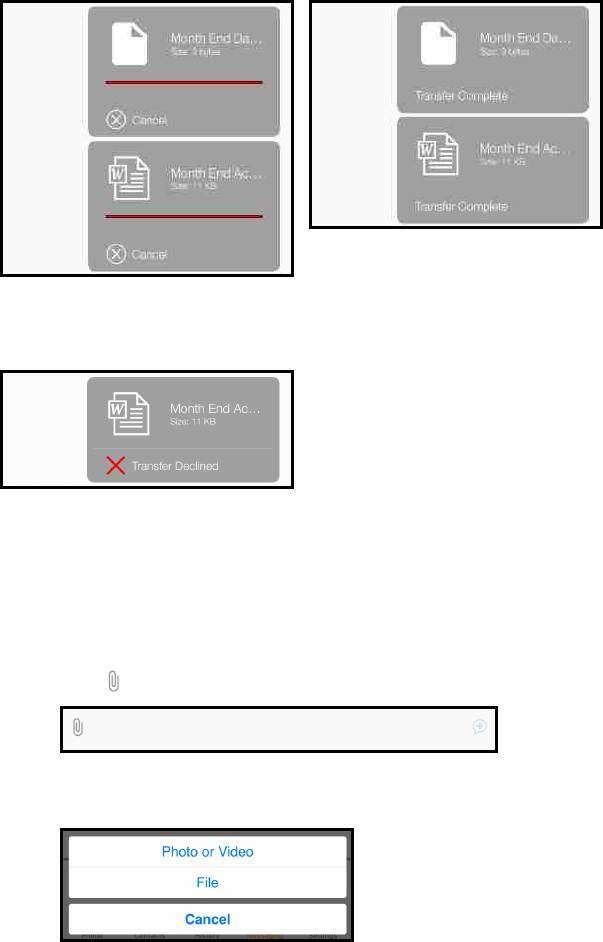
If the recipient declines the files, the transfer shows as Transfer Declined.
iPad
1. Create an new IM or open an IMconversation with the person you want to share
the file with.
2.
Tap Attach.
3. Tap File.
The file manager opens.
4. Locate the folder that contains the files that you want to send. You can only send
multiple files at one time if they are located in the same folder.
5. Tap Select and tap the files you want to send.
CounterPath Corporation 222
Bria Mobile User Guide File sharing
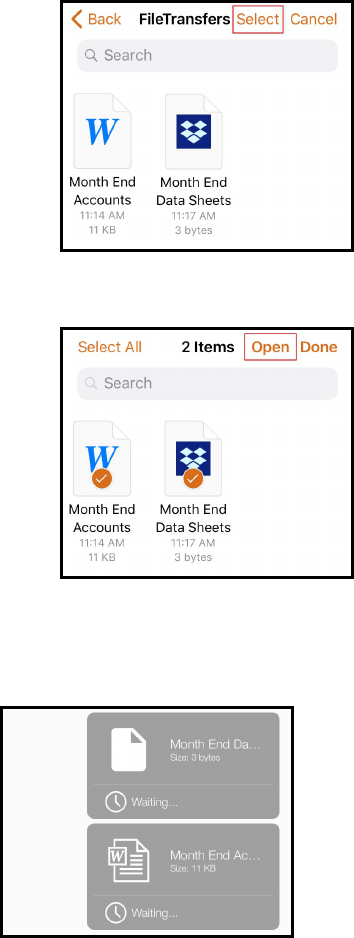
6. Tap Open when you have selected all the files.
Bria Mobile sends a file transfer notification to the recipient. Until the recipient responds
to the notifications, the sender sees Waiting as the file transfer status.
Once the recipient accepts the file, Bria Mobile shows the progress of the transfer and
when the transfer is complete.
CounterPath Corporation 223
Bria Mobile User Guide File sharing
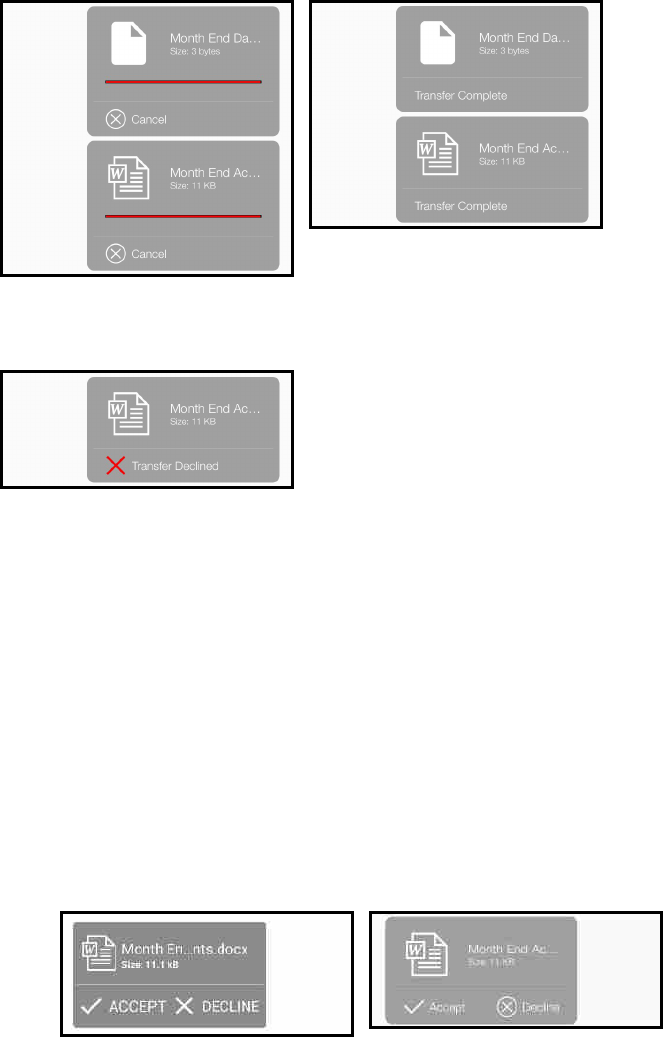
If the recipient declines the files, the transfer shows as Transfer Declined.
Receiving files
If you have an XMPP account enabled, another person with an XMPP account can send
you files. The file transfer notification shows in the Messaging tab with Bria Mobile in the
foreground, and in a notification if Bria Mobile is in the background.
To receive a file transfer with Bria Mobile in the foreground
1. Open the IM conversation in the Messaging tab.
2. Tap Accept or Decline on the files. The file transfer does not begin until you have
clicked Accept.
If you accept the file, Bria Mobile begins the transfer. Bria Mobile displays the progress
of the transfer and when the transfer is complete in the IM.
CounterPath Corporation 224
Bria Mobile User Guide File sharing
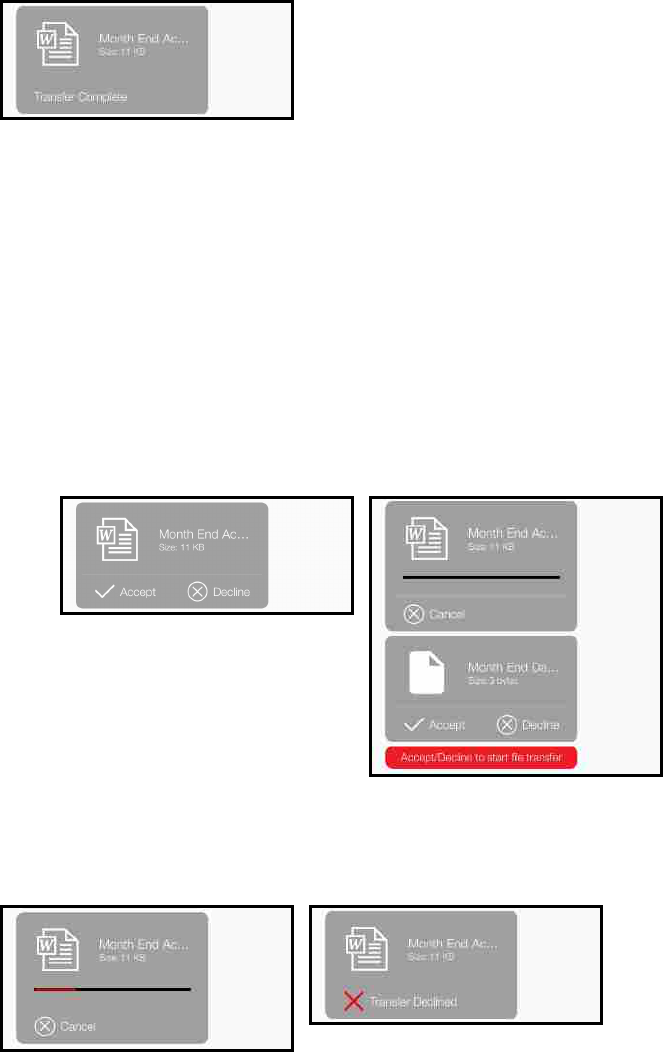
If you decline the transfer, both the recipient and the sender see the file transfer status as
Declined.
To receive a file transfer with Bria Mobile in the background
1. Tap on the notification.
Bria Mobile opens in the Messaging tab.
2. Tap on the IM with the new message indicator.
3. Tap Accept or Decline. If there are multiple files, the file transfer does not begin
until you Accept or Decline all of the files.
If you tap Accept, Bria Mobile begins the file transfer. If you tap Decline, both the sender
and the receiver see the transfer progress as Declined.
CounterPath Corporation 225
Bria Mobile User Guide File sharing
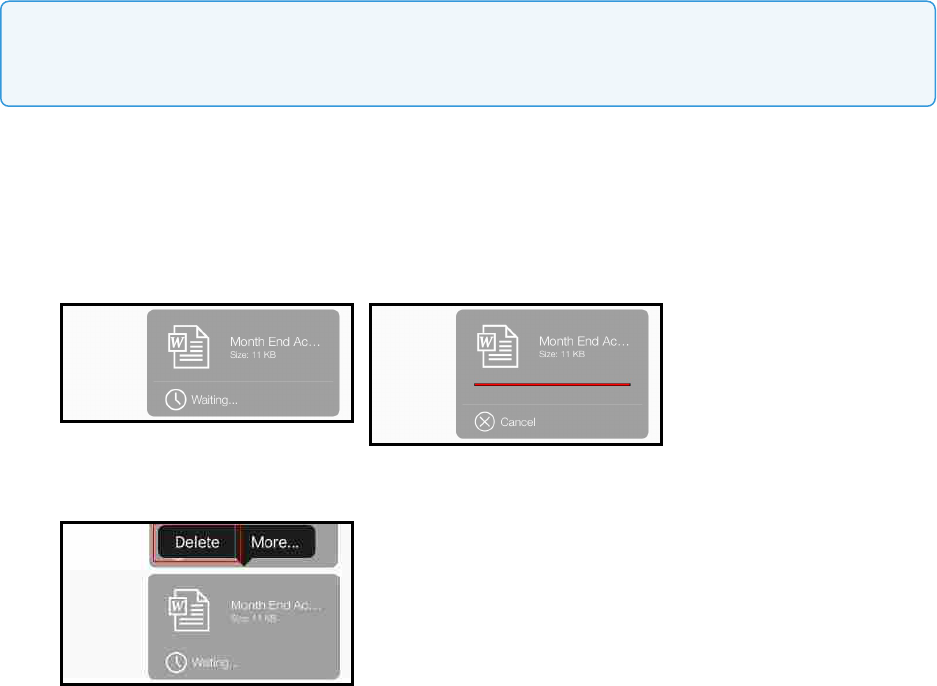
Canceling a file transfer
You can cancel a file transfer as either the sender or the receiver. As the sender, you can
cancel the transfer before the receiver accepts the transfer (your screen shows Waiting)
or while the transfer has been accepted but before the transfer is complete.
Note: Once the file transfer has been accepted by the recipient, the progress screen may be
too quick to actually see the progress.
can be canceled after the recipient accepts the transfer but before the transfer is
complete.
To cancel an outgoing transfer using press-and-hold
1. Press-and-hold on the file while it is in the waiting stage or while it is in progress.
2. Tap Delete.
Cancel.
The file transfer is canceled. The file transfer it deleted from the sender's IM.
To cancel an outgoing transfer using Cancel
1. While the IM displays the progress bar, tap Cancel.
CounterPath Corporation 226
Bria Mobile User Guide File sharing
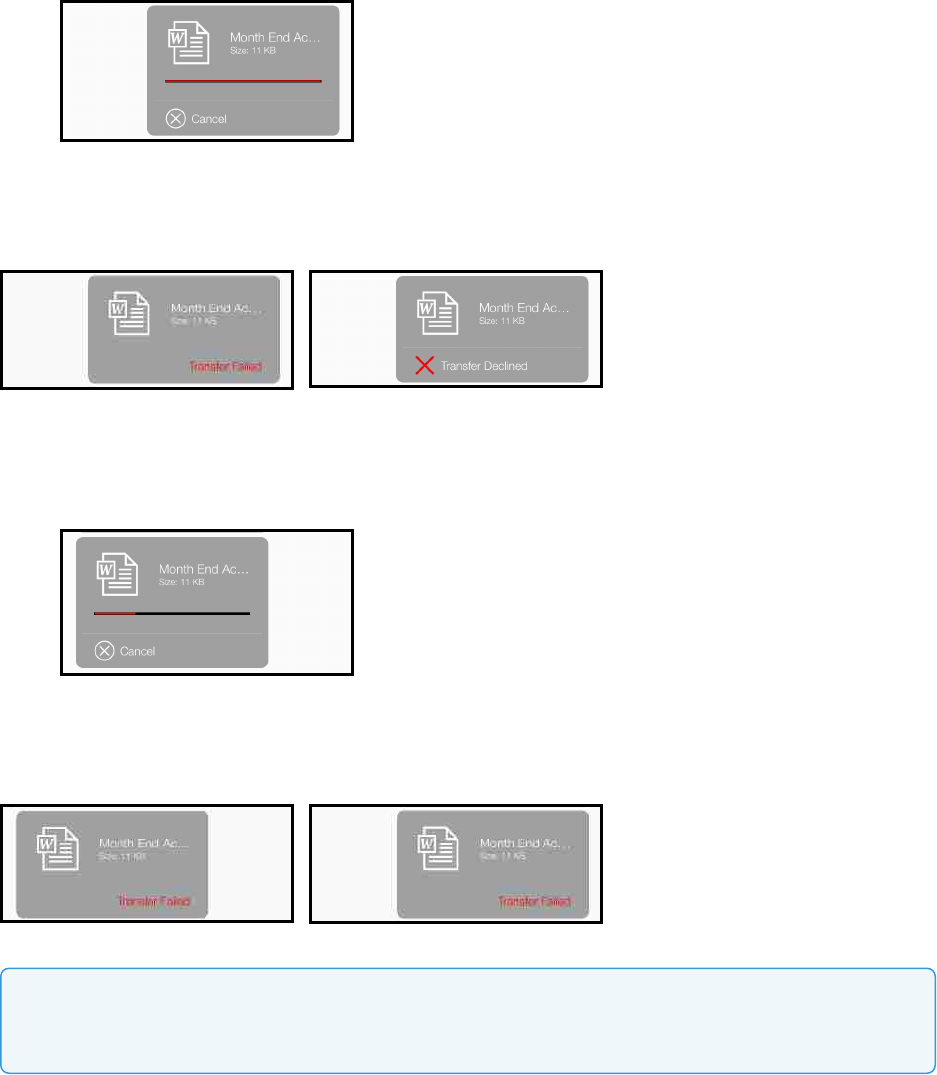
The file transfer is canceled. The sender sees Transfer Failed and the recipient sees
Transfer Declined as the transfer status.
To cancel an incoming file transfer
1. Tap Cancel on a file transfer that is in progress.
The file transfer is canceled. The recipient and the sender see Transfer Failed as the
transfer status.
Note: If you put Bria Mobile in the background during a file transfer, the transfer is paused until
you bring Bria Mobile back to the foreground.
CounterPath Corporation 227
Bria Mobile User Guide File sharing
Contacts
Bria Mobile stores your contacts for you. These contacts may be contacts you have
added using Bria Mobile, they can be contacts that are saved to your device, or they can
be special Bria Mobile contacts known as Buddies.
Bria Mobile uses contacts saved on your device. Bria Mobile’s Contacts are continually
synchronized with your native contacts. Adding, modifying or deleting a contact from one
list updates the other list. You must enable iCloud contact syncing by setting iOS
Settings > Contacts > Default Account to iCloud for this feature to work properly.
When multiple entries are merged as one entry on iOS, modifying a contact within Bria
Mobile updates all the contact sources. For example, if you have set up the contacts from
iCloud and Exchange and link the three entries as one entry on iOS, you see one single
contact on Bria Mobile with unified information from the three sources. Editing this
contact on Bria Mobile also updates contacts on iCloud and Exchange. Use the native
contacts app to update only one source, such as iCloud.
Buddies are contacts that share their online status with you using an XMPP address or a
softphone number. You can also exchange instant messages (IMs) with your Buddies.
If you have contacts that you use frequently, you can add these contacts as Favorites for
easier access.
Managing contacts
Add, edit, and remove contacts in Bria Mobile.
Adding contacts
In addition to seeing your device contacts in Bria Mobile, you can add additional
contacts. These contacts are also added to your external contact sources. You can add
contacts in the Contacts tab or add a contact directly from History.
CounterPath Corporation 228
Bria Mobile User Guide Contacts
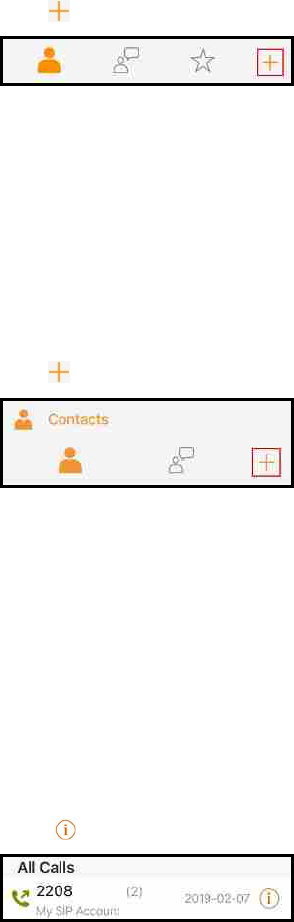
To add a contact in the Contacts tab
iPhone
1. Go to the Contacts tab on the resource panel.
2.
Tap Add.
3. Complete the contact details you want to include.
4. Tap Save.
The contact is added to Bria Mobile’s Contacts and to the device's native contacts.
iPad
1. Go to the Contacts tab on the resource panel.
2.
Tap Add.
3. Complete the contact details you want to include.
4. Tap Save.
The contact is added to Bria Mobile’s Contacts and to the device's native contacts.
To create a new contact from History
iPhone
1. Go to the History tab on the resource panel.
2.
Tap More Info beside the entry you want to add to Contacts.
3. Tap Create New Contact.
CounterPath Corporation 229
Bria Mobile User Guide Contacts
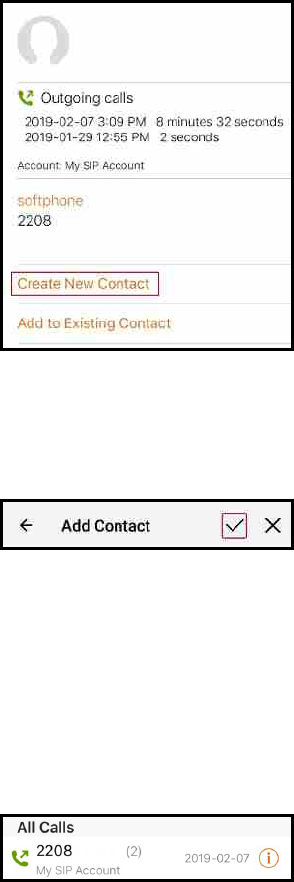
4. Complete the contact details. Bria Mobile populates the phone number
automatically.
5. Tap Save.
The contact appears in Bria Mobile’s Contacts and in the native iOS contacts and in the
device's contacts.
iPad
1. Go to the History tab on the resource panel.
2. Tap the entry you want to add to Contacts.
3. Tap Create New Contact.
CounterPath Corporation 230
Bria Mobile User Guide Contacts
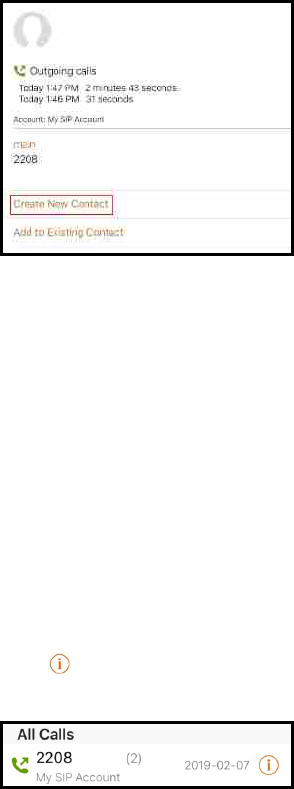
4. Complete the contact details. Bria Mobile populates the phone number
automatically.
5. Tap Save.
The contact appears in Bria Mobile’s Contacts and in the native iOS contacts and in the
device's contacts.
To add to an existing contact from History
iPhone
1. Go to the History tab on the resource panel.
2.
Tap More Info beside the entry with the information you want to add to an
existing contact.
3. Tap Add to Existing Contact.
CounterPath Corporation 231
Bria Mobile User Guide Contacts
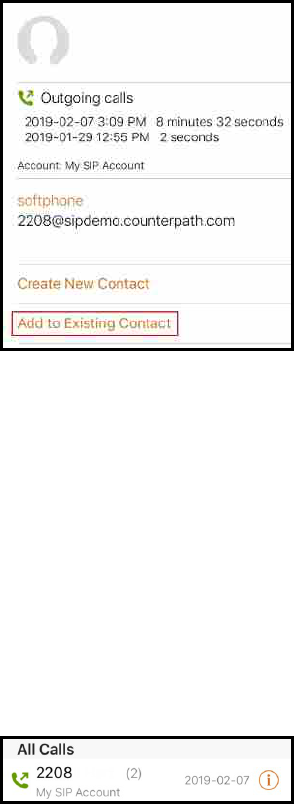
4. Select the contact you want to add the phone number to. Contact Details opens.
5. Edit any contact details you want to change. The number automatically populates
in the contact.
6. Tap Save.
The contact is updated in Bria Mobile’s Contacts and in the device's native contacts.
iPad
1. Go to the History tab on the resource panel.
2. Tap the entry with the information you want to add to an existing contact.
3. Tap Add to Existing Contact.
CounterPath Corporation 232
Bria Mobile User Guide Contacts
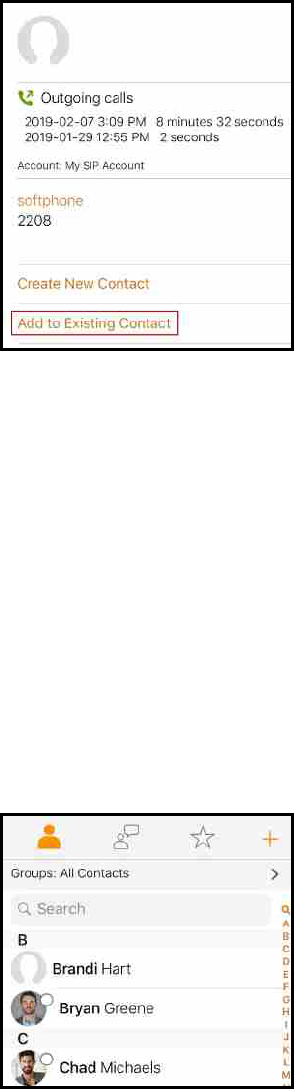
4. Select the contact you want to add the phone number to. Contact Details opens.
The contact is updated in Bria Mobile’s Contacts and in the device's native contacts.
Adding or editing avatars
If the contact does not contain an avatar, you can add an image to the contact. You
cannot add an avatar to XMPP Buddies.
To add or edit an avatar
iPhone
1. Select the contact you want to edit by tapping on the contact or typing their name in
the Search bar and tapping on the contact.
Contact Details opens.
CounterPath Corporation 233
Bria Mobile User Guide Contacts
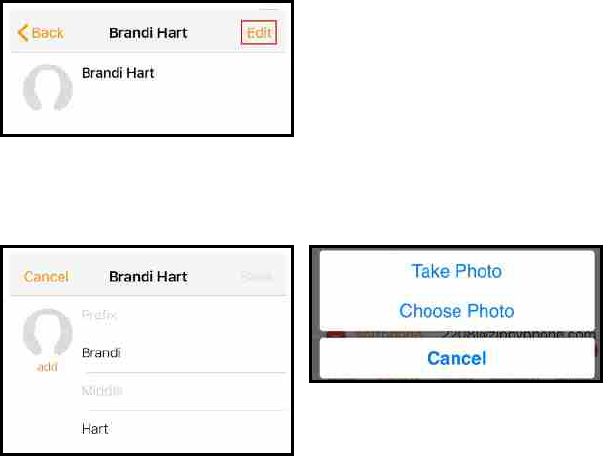
2. Tap Edit.
3. Tap on the empty avatar or tap the avatar you want to replace and select Take
Photo or Choose Photo.
If you tap Take Photo, take a picture to use as the avatar. Crop the image if
desired. Tap Use Photo when the image is ready.
If you tap Choose Photo, select an image on your device. Crop the image if
desired. Tap Choose when the image is ready.
4. Tap Save.
The avatar is added to the contact.
iPad
1. Select the contact you want to edit by tapping on the contact or typing their name in
the Search bar and tapping on the contact.
CounterPath Corporation 234
Bria Mobile User Guide Contacts

Contact Details opens.
2. Tap Edit.
3. Tap on the empty avatar or tap the avatar you want to replace and select Take
Photo or Choose Photo.
If you tap Take Photo, take a picture to use as the avatar. Crop the image if
desired. Tap Use Photo when the image is ready.
If you tap Choose Photo, select an image on your device. Crop the image if
desired. Tap Choose when the image is ready.
4. Tap Save.
CounterPath Corporation 235
Bria Mobile User Guide Contacts
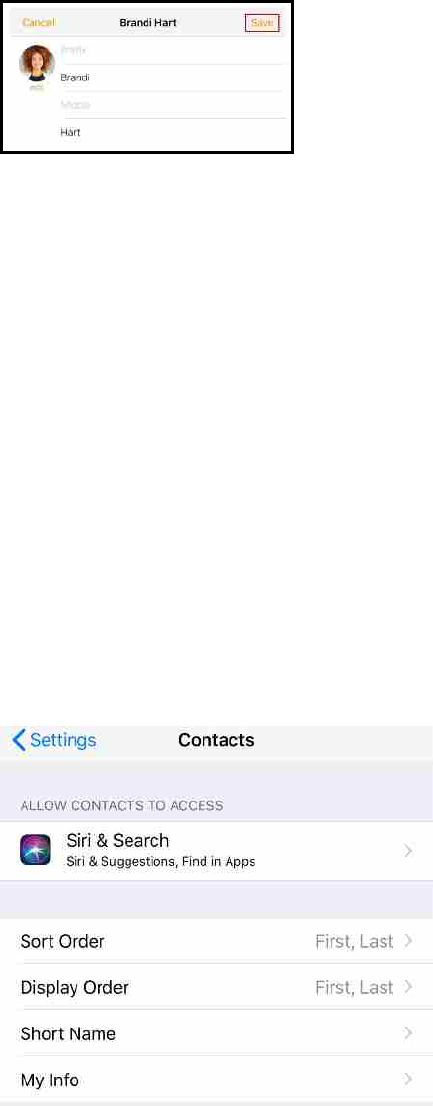
The avatar is added to the contact.
Changing sort order or display order
You can customize the way contacts are displayed in Bria Mobile. For example, you can
sort contacts by first name or last name, or change how names are shown.
Bria Mobile uses the iOS preferences that you set on your device.
To change the sort order of your contacts
1. Go to iOS device Settings > Contacts.
2. Select the order you want to use.
Sort order controls the order of your contact list. First, Last sorts the list in
alphabetical order of their first names.
Display order controls each person's name. First, Last displays a name as James
Smith while Last, First displays Smith James.
CounterPath Corporation 236
Bria Mobile User Guide Contacts
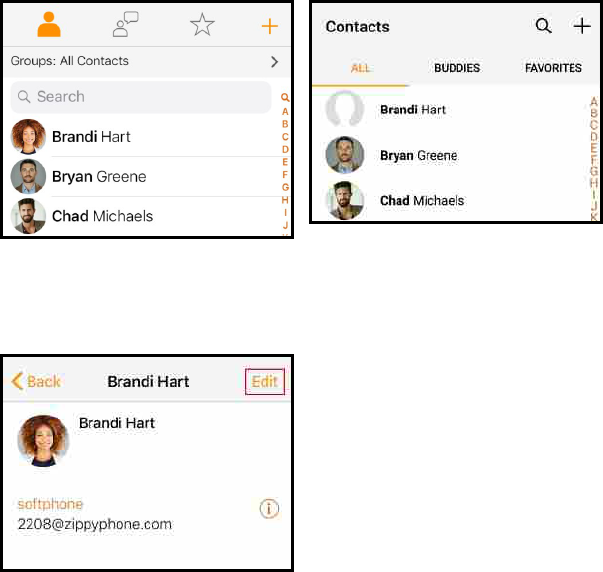
Editing contacts
You can update Bria Mobile contacts in the Contacts tab . The updates are also applied
to your device contacts.
To update a contact using Contact details
iPhone
1. Go to the Contacts tab on the resource panel.
2. Select the contact you want to edit by tapping on the contact or typing their name in
the Search bar and tapping on the contact.
Contact Details opens.
3. Tap Edit.
4. Complete the contact details.
5. Tap Save.
The contact is updated in the Bria Mobile’s Contacts and in the device's native contacts.
CounterPath Corporation 237
Bria Mobile User Guide Contacts
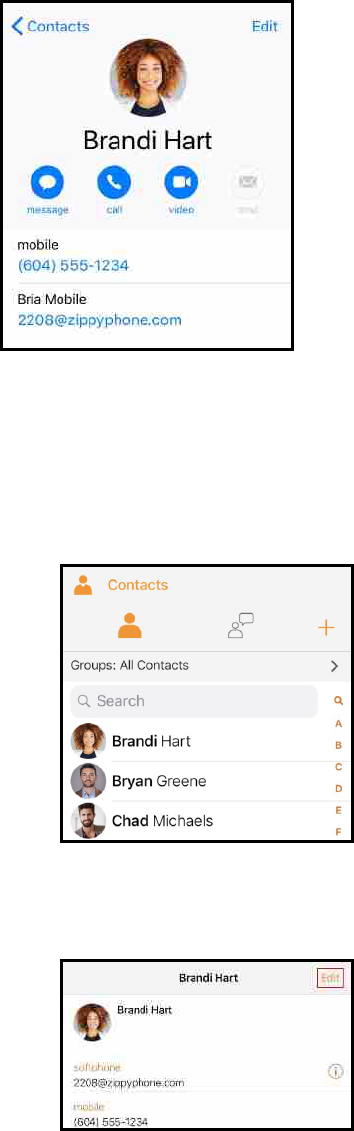
iPad
1. Go to the Contacts tab on the resource panel.
2. Select the contact you want to edit by tapping on the contact or typing their name in
the Search bar and tapping on the contact.
Contact Details opens.
3. Tap Edit.
CounterPath Corporation 238
Bria Mobile User Guide Contacts
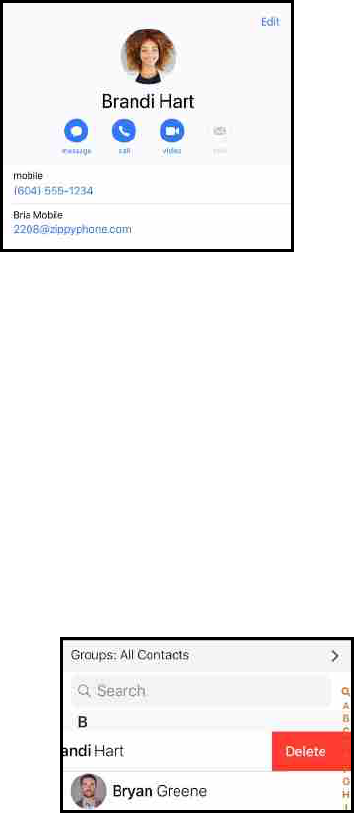
4. Complete the contact details.
5. Tap Save.
The contact is updated in the Bria Mobile’s Contacts and in the device's native contacts.
The softphone number will show beside Bria Mobile in the native iOS contacts.
Deleting a contact
Delete your Bria Mobile contacts. This also deletes the contact in your device contacts.
To delete a contact
iPhone
1. Go to the Contacts tab on the resource panel.
2. Swipe the contact to be deleted to the left.
3. Tap Delete.
4. Tap Delete Contact.
CounterPath Corporation 239
Bria Mobile User Guide Contacts
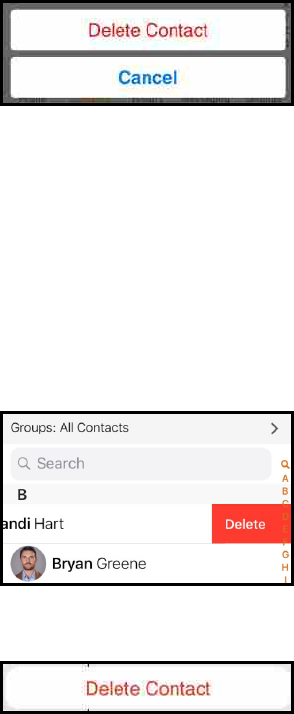
The contact is deleted and no longer shows in Bria Mobile's Contacts or in the device's
native contacts.
iPad
1. Go to the Contacts tab on the resource panel.
2. Swipe the contact to be deleted to the left.
3. Tap Delete.
4. Tap Delete Contact.
The contact is deleted and no longer shows in Bria Mobile's Contacts or the device's
native contacts.
Buddies
Buddies are contacts that share their online status with you.
To view someone’s online status, you need to add the person as a Buddy. A Buddy must
have an XMPP address or a softphone number. An XMPP address and a softphone
number are typically a username.
When you add a SIP Buddy, you see your Buddy’s presence as soon as you register
your Buddy’s softphone number on the client. Your Buddy will see your presence as
soon as they register your softphone number on their client.
CounterPath Corporation 240
Bria Mobile User Guide Contacts
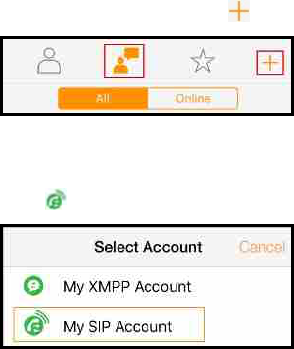
When you add an XMPP Buddy, Bria Mobile sends a Buddy request. When your Buddy
request is accepted, you see your Buddy’s status. If your Buddy request is denied, the
person remains in your Buddies list with Blocked status. Your Buddy does not see your
status until you accept their Buddy request. You can resend your Buddy request by
tapping Re-request Presence Authorization on the Buddy profile screen.
Adding a Buddy
When you use SIP SIMPLE for presence and messaging, your Buddies are stored
locally as an IM URI address. You need to manually add Buddies to the Buddies list.
These Buddies appear in your Contacts and in your Buddies on Bria Mobile and in the
device's native contacts.
For XMPP accounts, your Buddies are stored in an XMPP server. The name and
presence of your Buddies appear in your Buddies list when your XMPP account is
connected. Buddies do not show up in your Bria MobileContacts or your device's native
contacts.
To create a new SIP Simple Buddy
iPhone
1. Go to the Contacts tab on the resource panel.
2.
Tap Buddies and tap Add.
3. Select your SIP account if both SIP and XMPP accounts appear. The SIP account
has beside it.
4. Complete any contact fields you want.
5. Enter the Buddy’s softphone address in the softphonefield. The address is
CounterPath Corporation 241
Bria Mobile User Guide Contacts
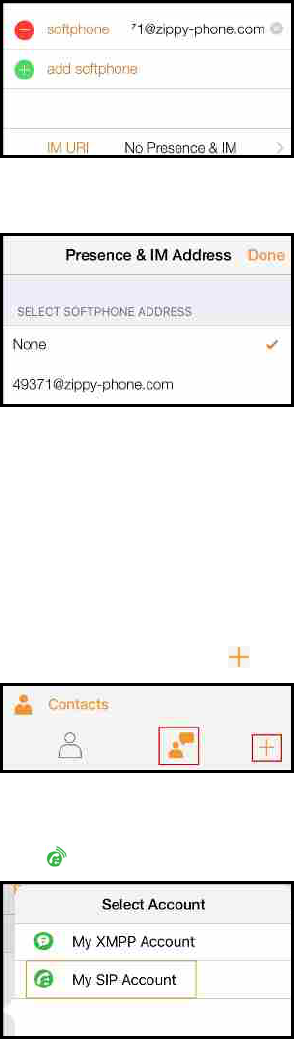
typically the username of the Buddy.
6. Tap IM URIand select the softphone address.
7. Tap Save.
The Buddy’s presence appears in Bria Mobile’s Contacts and Bria Mobile’s Buddies list.
iPad
1. Go to the Contacts tab on the resource panel.
2.
Tap Buddies and tap Add.
3. Select your SIP account if both SIP and XMPP accounts appear. The SIP account
has beside it.
4. Complete any contact fields you want.
CounterPath Corporation 242
Bria Mobile User Guide Contacts
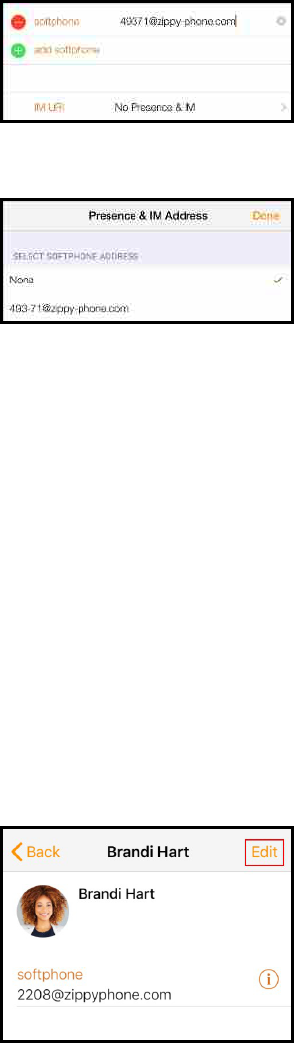
5. Enter the Buddy’s softphone address in the softphonefield. The address is
typically the username of the Buddy.
6. Tap IM URIand select the softphone address.
7. Tap Save.
The Buddy’s presence appears in Bria Mobile’s Contacts and Bria Mobile’s Buddies list.
Adding an existing contact as a Buddy
You can add an existing contact to your Buddies.
To add a contact as a Buddy
iPhone
1. Go to the Contacts tab on the resource panel.
2. Tap the contact you want to add as a Buddy. Contact Details opens.
3. Tap Edit.
4. Tap add softphone.
CounterPath Corporation 243
Bria Mobile User Guide Contacts
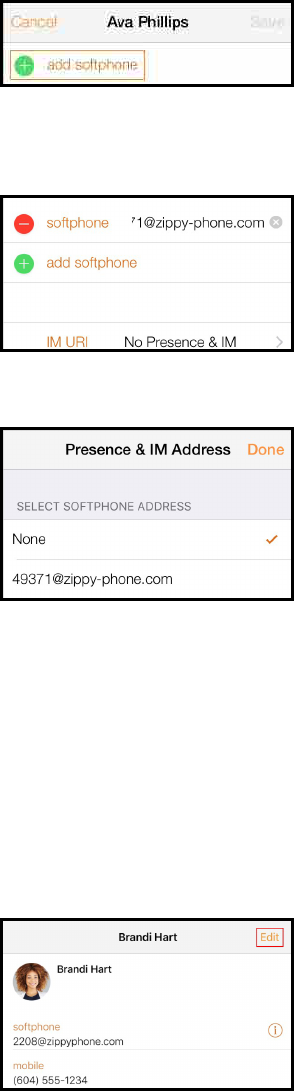
5. Enter the Buddy’s softphone address in the softphone field. The address is
typically the username of the Buddy.
6. Tap IM URIand select the softphone address.
7. Tap Save.
The Buddy’s presence appears in Bria Mobile’s Contacts and Bria Mobile’s Buddies list.
iPad
1. Go to the Contacts tab on the resource panel.
2. Tap the contact you want to add as a Buddy. Contact Details opens.
3. Tap Edit.
4. Tap add softphone.
CounterPath Corporation 244
Bria Mobile User Guide Contacts
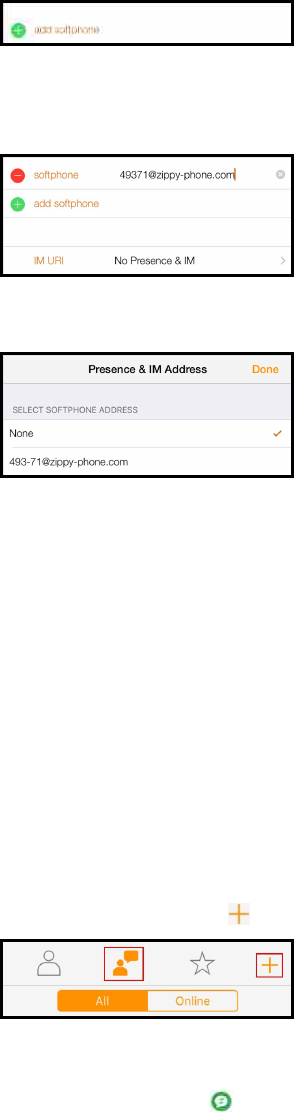
5. Enter the Buddy’s softphone address in the softphone field. The address is
typically the username of the Buddy.
6. Tap IM URIand select the softphone address.
7. Tap Save.
The Buddy’s presence appears in Bria Mobile’s Contacts and Bria Mobile’s Buddies list.
Adding an XMPP Buddy
Make sure your XMPP account is connected to the XMPP server.
To add an XMPPBuddy
iPhone
1. Go to the Contacts tab on the resource panel.
2.
Tap Buddies and tap Add.
3. If prompted, select the XMPP account to which the Buddy should belong. The
XMPP account has beside it.
CounterPath Corporation 245
Bria Mobile User Guide Contacts
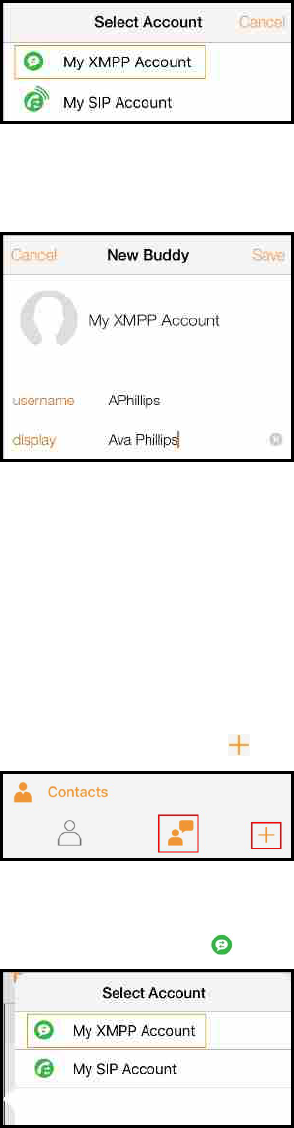
4. Type the user portion of the Jabber JID in username and the display name in
display (optional).
5. Tap Save.
The Buddy appears in Bria Mobile’s Buddies list only. Once the Buddy accepts your
request, you see the Buddy’s presence.
iPad
1. Go to the Contacts tab on the resource panel.
2.
Tap Buddies and tap Add.
3. If prompted, select the XMPP account to which the Buddy should belong. The
XMPP account has beside it.
CounterPath Corporation 246
Bria Mobile User Guide Contacts
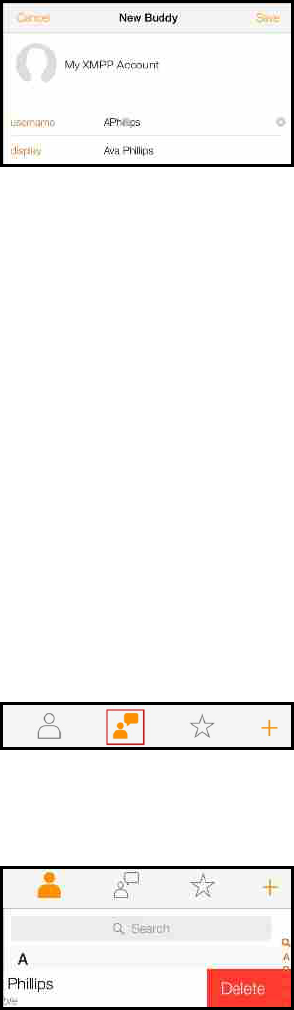
4. Type the user portion of the Jabber JID in username and the display name in
display(optional).
5. Tap Save.
The Buddy appears in Bria Mobile’s Buddies list only. Once the Buddy accepts your
request, you see the Buddy’s presence.
Deleting a Buddy
For XMPP, make sure your XMPP account is connected to the XMPP server.
SIP and XMPP Buddies are deleted using the standard Apple action for revealing the
Delete button.
To delete a Buddy
iPhone
1. Go to the Contacts tab on the resource panel and tap Buddies.
2. Swipe the entry you want to delete to the left.
3. Tap Delete.
Bria Mobile removes the SIP SIMPLE Buddy from your Buddies but leaves the person in
your Contacts in Bria Mobile and the native iOS contacts without presence.
CounterPath Corporation 247
Bria Mobile User Guide Contacts
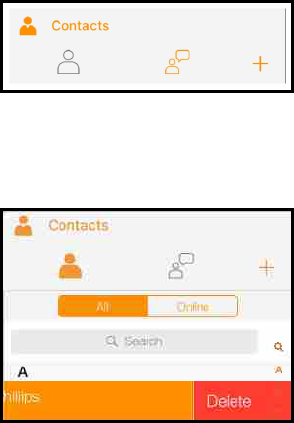
Bria Mobile completely removes the XMPP Buddy from Bria Mobile’s Buddies list and
from the XMPP server.
iPad
1. Go to the Contacts tab on the resource panel and tap Buddies.
2. Swipe the entry you want to delete to the left.
3. Tap Delete.
Bria Mobile removes the SIP SIMPLE Buddy from your Buddies but leaves the person in
your Contacts in Bria Mobile and the native iOS contacts without presence.
Bria Mobile completely removes the XMPP Buddy from Bria Mobile’s Buddies list and
from the XMPP server.
Buddy requests
When using SIP SIMPLE for presence, you do not send and receive a Buddy requests.
As soon as the person on the other end registers your softphone number on the client,
the person sees your presence without your acceptance. Similarly, you see someone’s
presence right away without having to wait for the person’s response.
When using XMPP for presence, your Buddy must accept the Buddy request before you
can see their status. You also have to accept their Buddy request before they can see
your status.
CounterPath Corporation 248
Bria Mobile User Guide Contacts
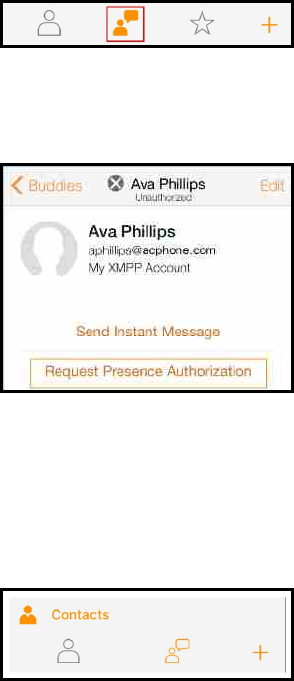
Sending a Buddy request
Sending an XMPP Buddy request
iPhone
1. Go to the Contacts tab on the resource panel and tap Buddies.
2. Tap the contact you want to request presence information from.
3. Tap Request Presence Authorization.
Bria Mobile sends a Buddy request to the contact.
iPad
1. Go to the Contacts tab on the resource panel and tap Buddies.
2. Tap the contact you want to request presence information from.
3. Tap Request Presence Authorization.
CounterPath Corporation 249
Bria Mobile User Guide Contacts
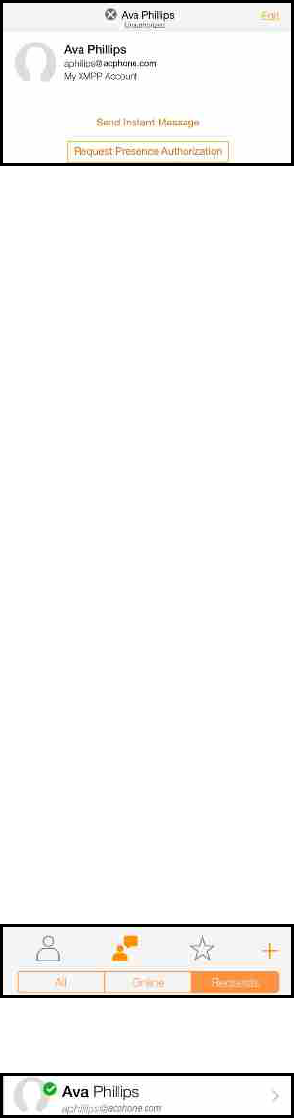
Bria Mobile sends a Buddy request to the contact.
Responding to an XMPP Buddy request
When you have a new Buddy request, you see a notification. On iPhone, it appears on
the resource panel. On iPad, it appears in the toolbar.
You can respond to the request in one of three ways:
l Accept: Let the other person see your online status. At the same time, a Buddy
request is automatically sent from Bria Mobile to this person, and you see this
person’s status in Bria Mobile’s Buddies list.
l Decline: The person does not see your online status. You do not see this person
on Bria Mobile’s Buddies list.
l Ignore: The person does not see your online status. The Buddy request may
appear in this session or in a future session.
To respond to a Buddy request
iPhone
1. Go to the Contacts tab on the resource panel. Tap Buddies and tap Requests. The
Requests tab only appears when you have a Buddy request.
2. Tap on the Buddy Request.
CounterPath Corporation 250
Bria Mobile User Guide Contacts
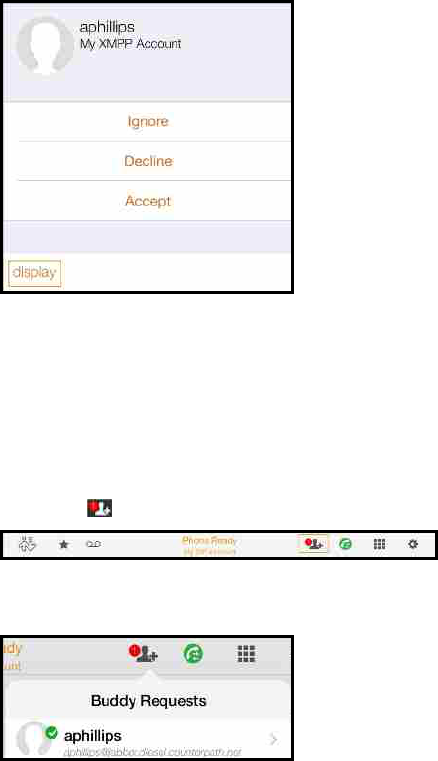
3. Tap display and enter a display name for the Buddy (optional).
4. Tap Ignore, Decline, or Accept.
Bria Mobile sends your status to the remote party if you accept the request.
iPad
1. Tap the Buddy Request Notification.
2. Tap on the Buddy Request.
3. Tap display and enter a display name for the Buddy (optional).
CounterPath Corporation 251
Bria Mobile User Guide Contacts
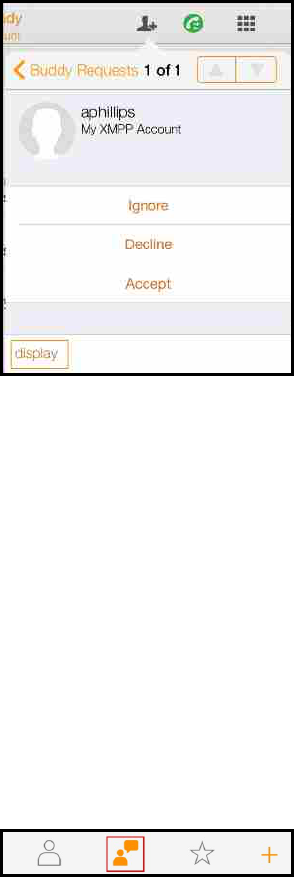
4. Tap Ignore, Decline, or Accept.
Bria Mobile sends your status to the remote party if you accept the request.
Stop sending presence
If you do not want a Buddy to be able to see your presence, you can stop sending your
presence information.
To stop sending your presence
iPhone
1. Go to the Contacts tab on the resource panel and tap Buddies.
2. Tap the Buddy you want to stop sharing presence with. Buddy Details opens.
3. Tap Stop Sharing Presence.
CounterPath Corporation 252
Bria Mobile User Guide Contacts
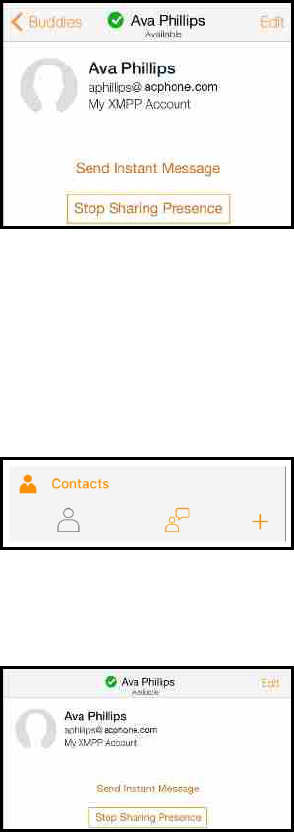
Bria Mobile stops sending your presence information to the contact. If you want to share
your presence with them again, they must send a Buddy request to you.
iPad
1. Go to the Contacts tab on the resource panel and tap Buddies.
2. Tap the Buddy you want to stop sharing presence with. Buddy Details opens.
3. Tap Stop Sharing Presence.
Bria Mobile stops sending your presence information to the contact. If you want to share
your presence with them again, they must send a Buddy request to you.
Contact Favorites
Favorites allow you easy, one-touch access to contacts you use frequently. Choose a
contact’s phone number as a favorite for quick access to dial and to send IMs.
CounterPath Corporation 253
Bria Mobile User Guide Contacts

Adding a Favorite
Add one of your contacts as a Favorite for quicker access.
To add a Favorite
iPhone
1. Go to the Contacts tab on the resource panel.
2.
Tap Favorites and tap Add.
3. Select the contact you want to add to your Favorites.
4. Tap the phone number you want to add to your Favorites. If you want to add more
than one number for the contact, repeat the process and select the next number.
Bria Mobile adds the number to your Favorites list. In contact details, you can identify
numbers that have been added to your Favorites by the icon.
iPad
1.
Tap Favorites in the toolbar and tap Add.
2. Select the contact you want to add to your Favorites.
3. Tap the phone number you want to add to your Favorites. If you want to add more
than one number for the contact, repeat the process and select the next number.
Bria Mobile adds the number to your Favorites list. In contact details, you can identify
numbers that have been added to your Favorites by the icon.
CounterPath Corporation 254
Bria Mobile User Guide Contacts
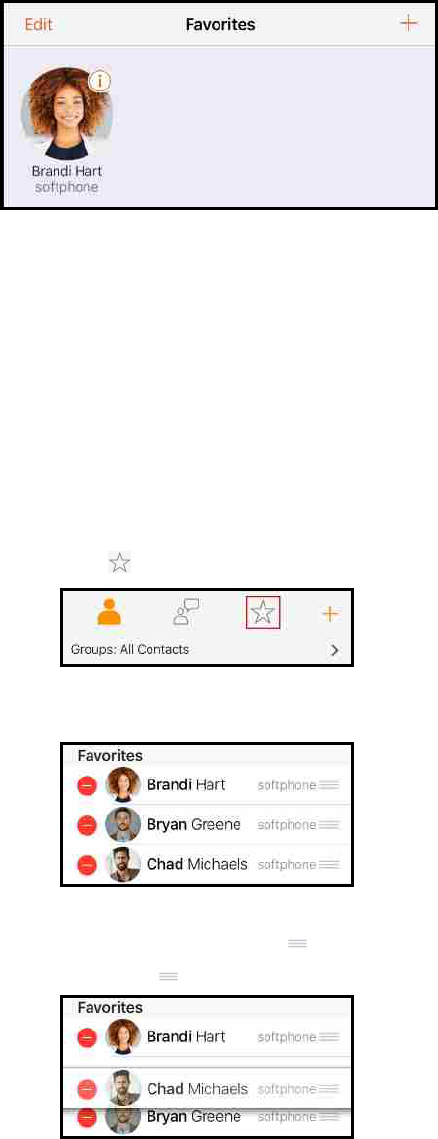
Reordering Favorites
Favorites initially appear in the order that you add them. You can rearrange them in the
order you want them to appear.
To reorder favorites
iPhone
1. Go to the Contacts tab on the resource panel.
2.
Tap Favorites.
3. Swipe right on the screen. The edit screen opens.
4. Long press and drag Row reorder to move the favorite up or down in the list.
Release Row reorder when the favorite is where you want it.
CounterPath Corporation 255
Bria Mobile User Guide Contacts
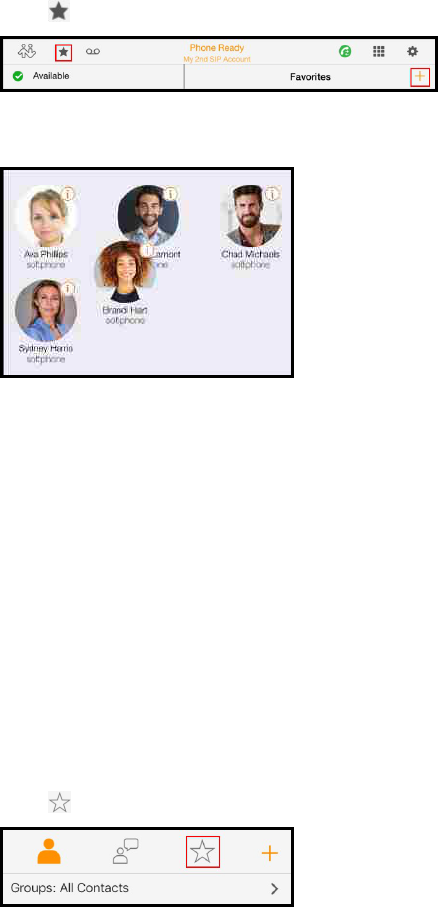
5. Swipe left when you are finished.
Bria Mobile reorders your Favorites.
iPad
1.
Tap Favorites in the toolbar.
2. Long press and drag the favorite to the position you want to move it to.
Bria Mobile reorders your Favorites.
Deleting a favorite
If you have a contact that you no longer want in your Favorites, you can remove the
contact from Favorites and it remains in Contacts.
To remove a Favorite
iPhone
1. Go to the Contacts tab on the resource panel
2.
Tap Favorites.
3. Swipe the favorite to be deleted to the left.
CounterPath Corporation 256
Bria Mobile User Guide Contacts
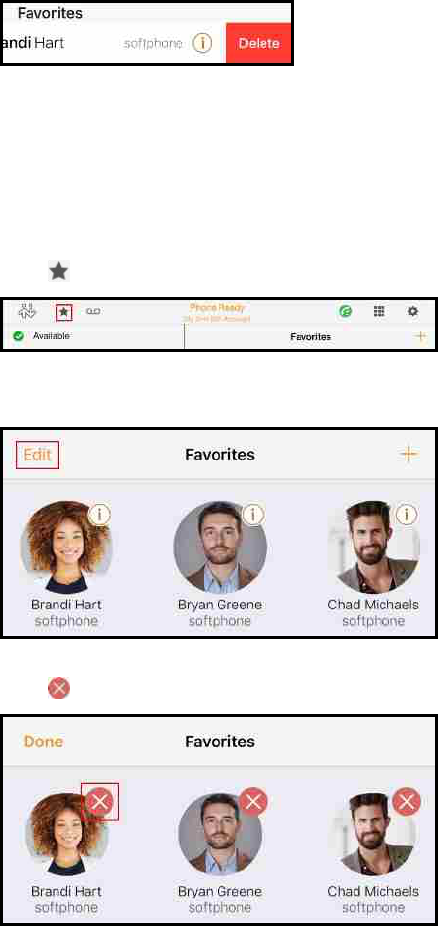
4. Tap Delete.
Bria Mobile removes the number from your Favorites list.
iPad
1.
Tap Favorites in the toolbar.
2. Tap Edit.
3.
Tap Remove Favorite on the avatar.
4. Tap Done.
Bria Mobile removes the number from your Favorites list.
CounterPath Corporation 257
Bria Mobile User Guide Contacts
Fields that must be updated in iOS
There are some contact fields that can only be updated through the native contacts
application. These fields include:
l Instant Message
l Ringtone: Personalized vibration and ringtone for the contact
l Text Tone: Personalized vibration and alert tone for the contact
l Address
l Date: Important dates associated with the contact
l Related name: Other contacts that are related to the current contact
l Social Profile
l Notes
All other fields can be updated in either Bria Mobile or the native contacts application.
CounterPath Corporation 258
Bria Mobile User Guide Contacts

History
All calls are captured in Bria Mobile’s call History. Calls are also captured on iPhone’s
call history when Settings > Preferences > Native Integration is on.
Call type icons
Incoming call
Outgoing call
Incoming call recorded on this device
Outgoing call recorded on this device
Blocked call - Appears when Call Blocking is enabled.
Missed call
Viewing call information
History provides a basic list of calls which can be filtered by All or Missed. You can also
view more detailed information for an individual call.
CounterPath Corporation 259
Bria Mobile User Guide History
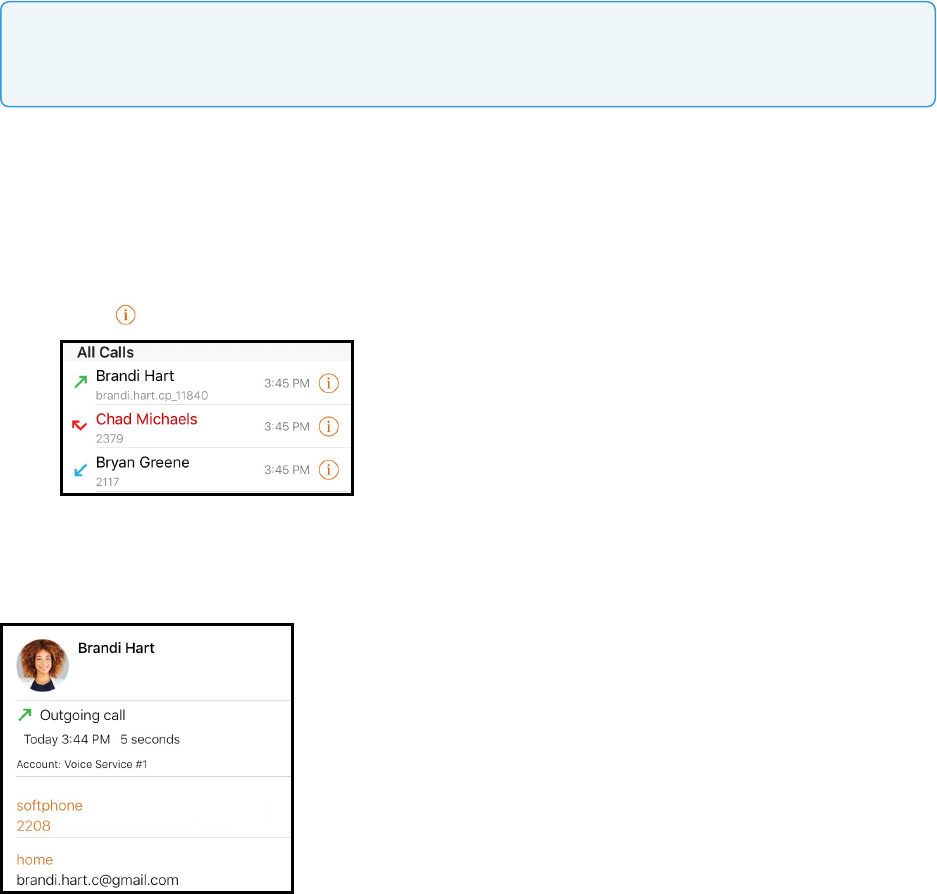
Note: If your call was transferred, you see the Caller ID information for the last person you
talked to, not the person you initially dialed.
To view History details
iPhone
1. Go to the History tab on the resource panel.
2.
Tap on the entry to view more information about the call.
Bria Mobile displays the type of call, the date and time of the call, the length of the call,
the account used for the call, and contact information about the caller.
iPad
1. Go to the History tab on the resource panel.
2. Tap the entry to view more information about the call.
CounterPath Corporation 260
Bria Mobile User Guide History
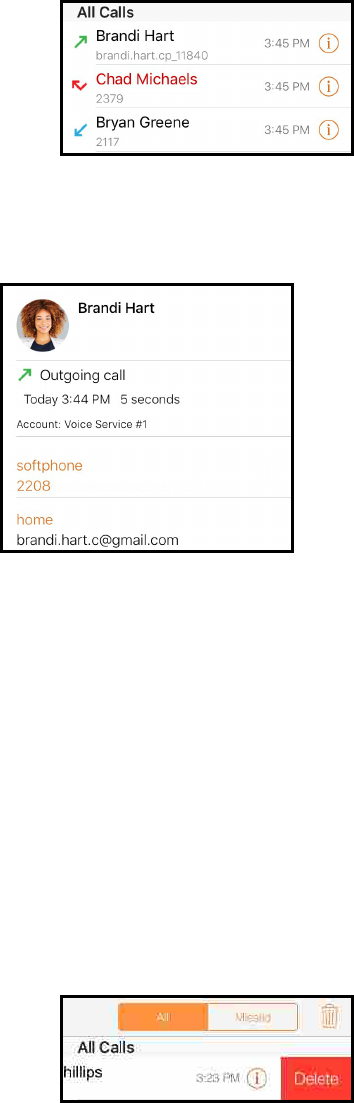
Bria Mobile displays the type of call, the date and time of the call, the length of the call,
the account used for the call, and contact information about the caller.
Deleting calls from History
You can delete a single call or all calls from History.
To delete a single call using History details
iPhone
1. Go to the History tab on the resource panel.
2. Swipe the call to be deleted to the left.
3. Tap Delete.
Bria Mobile deletes the call from the History.
CounterPath Corporation 261
Bria Mobile User Guide History

iPad
1. Go to the History tab on the resource panel.
2. Swipe the call to be deleted to the left.
3. Tap Delete.
Bria Mobile deletes the call from the History.
To delete missed calls
iPhone
1. Go to the History tab on the resource panel.
2.
Tap Missed and tap Delete.
3. Tap Clear Missed Entries.
Bria Mobile deletes all missed calls from the History.
iPad
1. Go to the History tab on the resource panel.
CounterPath Corporation 262
Bria Mobile User Guide History
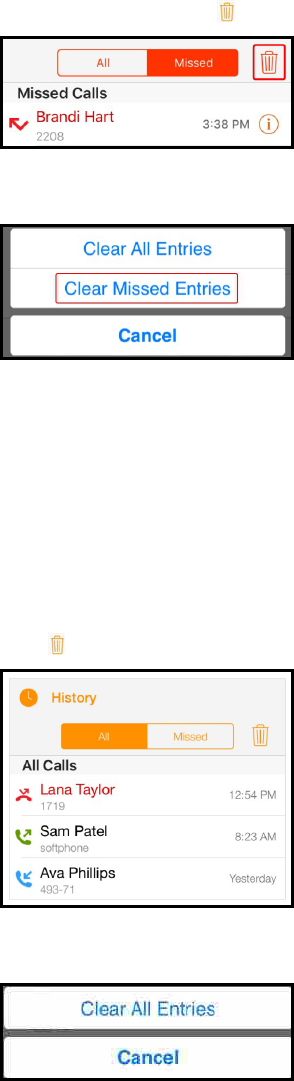
2.
Tap Missed and tap Delete.
3. Tap Clear Missed Entries.
Bria Mobile deletes all missed calls from the History.
To delete all calls
iPhone
1. Go to the History tab on the resource panel.
2.
Tap Delete.
3. Tap Clear All Entries.
Bria Mobile deletes all the calls from the History.
CounterPath Corporation 263
Bria Mobile User Guide History
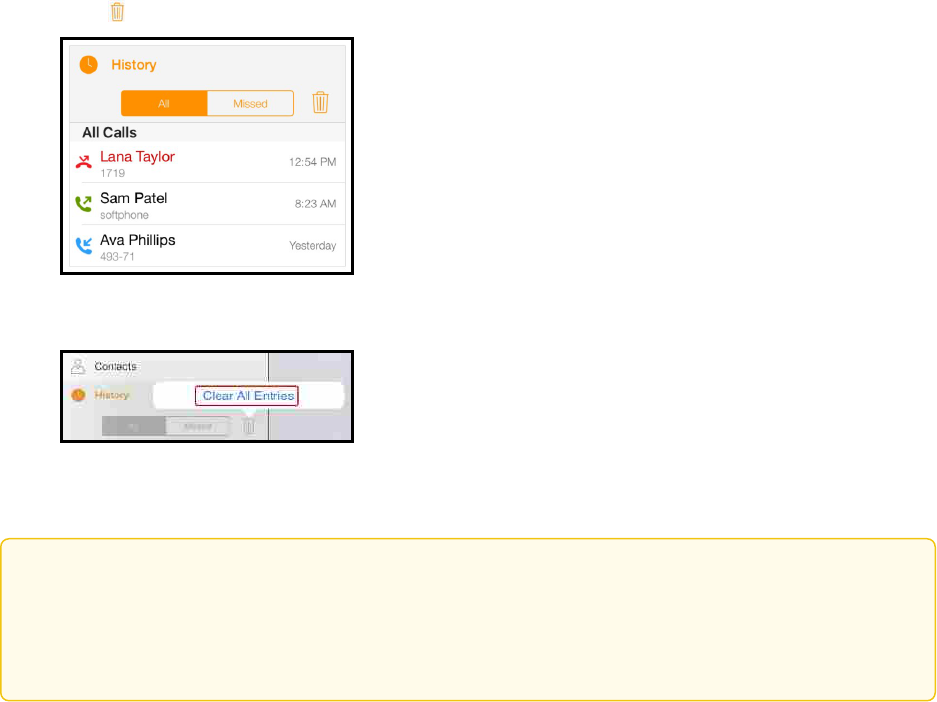
iPad
1. Go to the History tab on the resource panel.
2.
Tap Delete.
3. Tap Clear All Entries.
Bria Mobile deletes all the calls from the History.
Tip: iPhone native history: When you have Settings > Preferences > Native Integration
turned on, you can view and place Bria Mobile calls from the iPhone’s native call history. To
place a Bria Mobile call from the iPhone’s native call history, tap on a Bria Mobile entry. Bria
Mobile opens and Bria Mobile places the call.
CounterPath Corporation 264
Bria Mobile User Guide History
Settings
On the Settings tab of the resource panel, you can find:
l Accounts: Used to set up your SIPand XMPPaccounts, and for settings that are
specific to each individual account.
l Preferences: User defined preferences for how the end user wants Bria Mobile to
work.
l Advanced Settings: Settings that apply to Bria Mobile overall, rather than just to
individual SIP and XMPPaccount.
l Subscription: Review subscription information, change subscription plans
l Help: Opens simplified web
l About: Information about Bria Mobile, such as the version number and third party
credits
l Share: Use Twitter or Email to share Bria Mobile with others.
Accounts
Bria Mobile can use both SIP and XMPP accounts. For voice and video calling, a SIP
account is required. For messaging you can use either SIP if your service provider
supports SIP SIMPLE or XMPP.
The credentials are added to Bria Mobile in Settings > Accounts. Choose the account
type – SIPor XMPP – and enter the information supplied by your service provider.
l SIP account settings
l Accounts (XMPP)
Within the SIP account, there are additional settings that can be accessed at the bottom
of the account information:
CounterPath Corporation 265
Bria Mobile User Guide Settings

l Dial Plan (Number Prefixes)
l Account Specific Features (SIP)
l Call forwarding (SIP)
l Account Advanced (SIP)
Within the XMPP account, there are additional settings that can be accessed a the
bottom of the account information:
l Account Specific Features (XMPP)
l Account Advanced (XMPP)
SIP account settings
Before you make changes to an existing account in Settings > Account (SIP), turn
Enabled off for the account. Turn Enabled on when you have finished making changes.
Field Description
Account Name Enter a name for each account to identify different accounts when you have multiple accounts.
Enabled On: Sets the account as active.
Off: You are not using this account so you do not want the account register automatically.
Account details
Field Description
Display as Your name. This is your Caller ID, if supported or just your phone number.
Username User portion of your SIP Address of Record (AOR). For example, if your account is
6045551234@myVoIPProvider.com, the username is 6045551234
Password The password for your SIP account.
Provided by your VoIP service provider.
Domain If your account is 6045551234@myVoIPProvider.com, the domain is myVoIPProvider.
Provided by your VoIP service provider.
User Details
CounterPath Corporation 266
Bria Mobile User Guide Settings

Field Description
Use Push
Notifications
For SIP accounts using UDP transport only.
Bria Mobile uses the Bria Push Service to support inbound calls when Bria Mobile is in the background or when Bria
Mobile is exited.
Note: When you use the Bria Push Service, your account configuration is stored on
CounterPath’s push notification server. The data is securely transmitted in accordance to our
Privacy Policy. In order to use the Bria Push Service, you must accept the Bria Push Service
agreement.
l
On: Default. Bria Mobile uses the Bria Push Service for inbound calls when Bria Mobile is in the background or
when Bria Mobile is exited.
l
Off: Bria Mobile does not use the Bria Push Service for inbound calls.
Registration
Mode
Change this setting from Standard to Single Device Emulation if your VoIP service provider does not support dual or
multiple registrations. Most service providers support dual or multiple registrations.
l
Continuous: Your VoIP service provider supports multiple registrations. The Bria Push server is always
connected to the SIP server. Bria Mobile is only connected to the SIP server when Bria Mobile is in the
foreground. When Bria Mobile is in the foreground, Bria Mobile ignores push notifications so that you do not
receive duplicate notifications.
l
Single Device Takeover: Your VoIP service provider does not support multiple registrations. This settings
allowsBria Mobile and the Bria Push server to take over the registration from each other.
l
Standard: Your VoIP service provider supports multiple registrations. Both Bria Mobile and the Bria Push
server can be registered with the SIP server at the same time. If you are already using this setting and you
have no problems receiving push notifications, leave Registration Mode as Standard. Otherwise, use
Continuous if your VoIP service provider supports multiple registrations.
l
Single Device Emulation: Your VoIP service provider does not support multiple registrations. Both Bria
Mobile and the Bria Push server must unregister before the other one can register. If you are already using
this setting and you have not problems receiving push notifications, you can leave Registration Mode as
Single Device Emulation. Otherwise, use Single Device Takeover if your VoIP server provider does not
support multiple registrations.
NAT
Emulation
Use this setting if your VoIP service provider uses a session border controller (SBC).
l
On: The Bria Push Service will act as if it is behind a NAT by using a private IP address.
l
Off: Default
SIP Proxy Enter your outbound proxy if your VoIP service provider requires you to use different SIP proxies for Bria Mobile and
for the Bria Push Service to communicate with the PBX.
Advanced
Settings
These settings are used for VoIP service providers that do not follow the SIP RFC specifications.
l
Insert R Instance: When enabled, the hash token is used as the rinstance in the contact header of SIP
register.
Bria Push Service
CounterPath Corporation 267
Bria Mobile User Guide Settings

Field Description
l
Disable Hash Token: When enabled, the uri.user does not contain the hash token in the contact header of
SIP register.
l
Auto Send 180: When enabled, SIP 180 (Ringing) response code is sent out as soon as the push notification
is received.
l
Disable Override Domain: When enabled, the domain from the to header of the INVITE will not be
overridden.
l
Server Refresh Interval: The Push Server SIP registration time refresh in seconds. The default is 3600
seconds.
Field Description
Dial Plan (Number Prefixes) Opens the settings screen for dial plans. Optional.
See Configuring mobile dial plans.
Account Specific Features Opens the settings screen for features that apply to individual SIP accounts.
See Account Specific Features (SIP).
Call forwarding Opens the settings screen for call forwarding for this particular SIP account.
See Call forwarding (SIP).
Account Advanced Opens the settings screen for advanced settings that apply to individual SIP accounts.
See Account Advanced (SIP).
Other SIP account settings
Dial Plan (Number Prefixes)
In Bria Mobile, a dial plan can be used to modify how your calls are placed. For
example, a dial plan can be created to change any number that starts with “+1613” to
“613”. A dial plan is used for any combination of the following reasons:
l To modify (transform) the input (the number to be dialed), such as to add the “9”
required to obtain an outside line from a PBX.
l To select the account to use to place a call, if users have more than one account.
l To prevent unresolvable calls from being placed. For example, to prevent using
network bandwidth on a call that will certainly fail. You define patterns that you
know will work, and only place a call if it matches one of these patterns.
A dial plan belongs to a SIP account. You can create as many dial plans for an account
as you need. If you want to use the same dial plan on more than one SIP account, you
need to add it to each account. Bria Mobile goes through the dial plans in the order in
CounterPath Corporation 268
Bria Mobile User Guide Settings
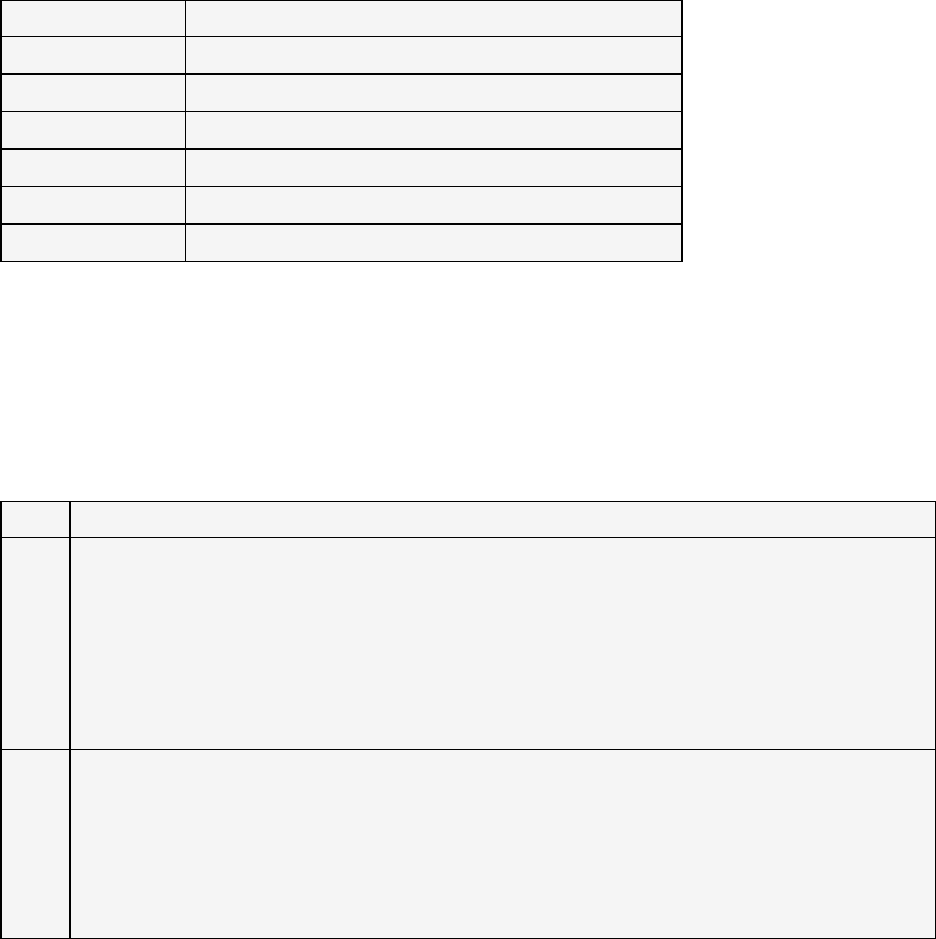
which they appear on the screen. Dial plans can be reordered after they have been
created.
Also see Configuring mobile dial plans.
Field Description
Name The name of the dial plan rule.
Match Number The pattern to be matched.
Remove Prefix The prefix to remove if the number matches the rule.
Add Prefix The prefix to add if the number matches the rule.
Number To Test Enter a test number that starts with the Match Number.
Resulting number to dial Displays the number that will be dialed after applying the dial plan rule.
Account Specific Features (SIP)
Before you make changes to an existing account in Settings > Account (SIP), turn
Enabled off for the account. Turn Enabled on when you have finished making changes.
Field Description
Disable
Mobile
Data
Appears on iPhones, and appears on iPads with mobile data connectivity when Settings > Preferences > Use When
Available is on.
l
On: This account does not use mobile data to register for SIP service when a Wi-Fi network is not available and
Bria Mobile is on a mobile network. You cannot receive any messages or notifications on this SIP account when Wi-
Fi is not available, and you cannot place or receive calls without Wi-Fi.
l
Off: Bria Mobile attempts to place and receive calls on this account when a Wi-Fi network is not available.
Data charges with your mobile carrier may apply.
Disable
VoIP
Calls
Appears on iPhones, and appears on iPads with mobile data connectivity only when Settings > Preferences > Allow VoIP
Calls is on and Settings > Accounts > Account Specific Features > Disable Mobile Data is off.
l
On: No VoIP calls can be made on this SIP account when a Wi-Fi network is not available and Bria Mobile is on a
mobile network.
l
Off: Bria Mobile attempts to place and receive calls on this SIP account when a Wi-Fi network is not available.
Data charges with your mobile carrier may apply.
Mobile Data Network
CounterPath Corporation 269
Bria Mobile User Guide Settings

Field Description
Enable
Video
Available when Settings > Preferences > Enable Video is on.
l
On: Make and receive video calls on this SIP account.
l
Off: You cannot make and receive video calls on this SIP account.
Always
Offer
Video
Appears when Settings > Accounts (SIP) > Account Specific Features > Enable Video is on.
l
On: Always offer video to the remote party whether you use the dial pad, the Contacts tab, or the History tab.
l
Off (default): Dial a number with audio offer.
Auto
Send
Video
Appears when Settings > Accounts (SIP) > Account Specific Features > Enable Video is on.
l
On:Bria Mobile automatically starts sending video when you receive video calls.
l
Off (default): Video does not start until you tap Send on the video screen.
Auto
Speaker
On —
iPhone
Appears when Settings > Accounts (SIP) > Account Specific Features > Enable Video is on. This setting is ignored if
Preferences > Native Integration is on. If you answer the call using the iPhone, audio is sent through the iPhone. If you
answer the call using a Bluetooth device, audio is sent through the Bluetooth device.
This setting could solve a problem where audio calls are treated as video calls (thus the speaker comes on automatically).
l
On: Applies to iPhone only. While wired and Bluetooth headsets are connected to Bria Mobile, the sound always
comes from the headset regardless of this setting.
l
Off: Allows you to hear the sound from the earpiece.
Video Calls
Field Description
Enable IM & Presence Available when Settings > Preferences > Enable IM & Presence is on.
l
On: Share your online status with and send instant messages to your Buddies.
l
Off: Do not share you online status and send IMs with your Buddies.
Presence Agent Appears when Settings > Accounts (SIP) > Account Specific Features > Enable IM & Messaging is on.
l
On: Enable this setting if the SIP server supports Presence Agent for SIP SIMPLE.
l
Off: Default
Publish Refresh Appears when Settings > Accounts (SIP) > Account Specific Features > Enable IM & Messaging is on.
Interval for publishing your status over SIP SIMPLE.
l
Minimum: 30 seconds
l
Default: 900 seconds
Subscribe Refresh Appears whenSettings > Accounts (SIP) > Account Specific Features > Enable IM & Messaging is on.
IM and Presence
CounterPath Corporation 270
Bria Mobile User Guide Settings

Field Description
Interval for subscribing your Buddy’s status over SIP SIMPLE.
l
Minimum: 30 seconds
l
Default: 900 seconds.
Field Description
Enable
SMS
Available when Settings > Accounts (SIP) > Account Specific Features > Enable IM & Messaging is on.
l
On: Send an SMS to PSTN cell phone numbers by using the SIP SIMPLE protocol. Turn on if your VoIP
service provider supports this feature.
Split Longer
Messages
Appears when Settings > Accounts (SIP) > Account Specific Features > Enable SMS is on.
Controls how a long SMS is split - either the client side or the server side. You can type a long message on Bria Mobile
regardless of this setting. Turn this on if your SIP server does not accept/split long SMS.
l
On: Bria Mobile splits a long message to multiple SMS messages and sends them to the SIP server.
l
Off (default on the server side): Bria Mobile sends a long message to the server and lets the server split it into
multiple SMS.
SMS Messaging
Call forwarding (SIP)
Field Description
Forward
Always
l
On: Bria Mobile immediately forwards all incoming calls to a number specified in the To Number field.
l
Off: Bria Mobile behaves according to the Forward Busy setting and the Forward No Answer setting below.
Forward
Busy
l
On: Bria Mobile immediately forwards the incoming call to a number specified in the To Number field if it already
has an ongoing call. If there is no active call, Bria Mobile behaves according to the Forward No Answer setting.
Note: If Forward Busy and Disable call waiting are enabled at the same time, Forward Busy takes effect; the
incoming call is forwarded to the To Number field, rather than playing a busy tone back to the caller (or going
straight to a voicemail if configured).
l
Off: Bria Mobile behaves according to the Disable call waiting setting, which means it either displays an
incoming call notification to the end user to respond while they are on a call, or plays a busy tone to the incoming
call (or sends the incoming call to voicemailif configured).
Forward
No
Answer
l
On: Bria Mobile forwards the incoming call to a number specified in the To Number field after an interval specified
in the Delay field (in seconds). If the Delay field has 0, Bria Mobile forwards the incoming call immediately and the
end user will not see any incoming call notification.
l
Off: Bria Mobile does not forward the incoming calls. It displays an incoming call to the end user to respond.
Client-side call forwarding per account
CounterPath Corporation 271
Bria Mobile User Guide Settings

Field Description
To
Number
Appears when Forward Alwaysor Forward Busy or Forward No Answer is enabled.
Enter a number to forward incoming calls to.
Delay Appears when Forward No Answer is enabled.
Enter an interval to ring before forwarding incoming calls. Value in seconds. 0 to forward calls immediately.
Incoming call handling priority
When multiple call handling features are enabled, Bria Mobile uses the enabled features
in the following order.
1. Call Blocking
2. DND
3. Call Forwarding - Global (in Preferences)
4. Call Forwarding - per account (in SIP account)
Account Advanced (SIP)
Before you make changes to an existing account in Settings > Account (SIP), turn
Enabled off for the account. Turn Enabled on when you have finished making changes.
Field Description
Out. Proxy Complete this field only if your SIP provider gave you an outbound proxy address, typically a domain name or an IP
address.
Auth
Name
Complete this field only if your SIP provider gave you an authorization name. Most providers do not use this field.
Account Additional
Field Description
Current Strategy Opens the setting for network traversal.
See Network Traversal.
Network Traversal
CounterPath Corporation 272
Bria Mobile User Guide Settings

Field Description
Wi-Fi IP
Version
Specifies the IP version for DNS lookup and SIP signaling. Applies to Wi-Fi networks. This does not apply to HTTP/S
connections such as login and provisioning. Bria Mobile leverages the iOS native HTTP/S framework for these connections.
l
IPv4: Bria Mobile uses IPv4 and does not look for IPv6 at all
l
IPv6: Bria Mobile uses IPv6 and does not look for IPv4
l
Prefer IPv4: Bria Mobile uses IPv4 first if it detects both IPv4 and IPv6
l
Prefer IPv6: Bria Mobile uses IPv6 first if it detects both IPv4 and IPv6
Mobile
IP
Version
This settings has the same function as Wi-Fi IP Version except it applies to mobile data networks.
IP Version
Field Description
Send DTMF
using
The method used to send DTMF. DTMF is sent when you press a number key when you are dealing with an auto
attendant, such as “press 1 for customer service”.
If DTMF tones are not being recognized, try the other methods to resolve the issue. If DTMF is still not working, contact
your VoIP service provider.
Choose a method specified by your VoIP service provider:
l
RFC 2833 (Default)
l
SIP INFO
l
Inband DTMF
If Bria Mobile recognizes that RFC 2833 or SIP INFO fails, it sends Inband DTMF instead.
DTMF Type
Field Description
Use Tel
URI
Change this value only if advised by your VoIP service provider. Some providers may require the tel:// format.
l
On: Prefix SIP URIs with tel://
l
Off (default): Prefix SIP URIs with sip://
Strip
Foreign
Domain
This setting controls how Bria Mobile stores a number (SIP URI) in History and Contacts.
l
On: Bria Mobile removes the domain portion of the SIP URI if incoming calls come from an IP address with a
domain that is different from yours, and the username portion of the SIP URI is digits only. Log entries and a
Call Dialing
CounterPath Corporation 273
Bria Mobile User Guide Settings
Field Description
contact created from the entry have no domain portion included. For example, an incoming call from
123@172.18.2.53 is logged as 123.
Try turning this setting on if you receive a “403 – Not relaying” response to an outbound call.
l
Off (default): Bria Mobile does not remove the domain portion; hence it stores both the username and domain
portion of the SIP URI in call history and contacts. For example, an incoming call from 123@172.18.2.53 is logged
as 123@172.18.2.53.
Field Description
SIP
Transport
Contact your VoIP service provider to identify the types of transport that are supported. Most VoIP service providers only
support UDP transport.
l
Automatic
l
UDP (default): Turn Settings > Preferences > Run In Background on to receive incoming calls when Bria
Mobile is in the background if you are not using the Bria Push Service. Most VoIP service providers only support
UDP transport
l
TCP: Allows you to take advantage of iOS multi-tasking support; i.e. receive incoming calls when Bria Mobile is
sleeping in the background. This preserves battery.
l
TLS: Supports signal encryption if it is supported by your VoIP service provider. If TLS is selected, a given call is
encrypted if the other person also uses TLS. You may need to install a certificate on your device; contact your
VoIP service provider. Also allows you to take advantage of iOS multi-tasking support; i.e. receive incoming calls
when Bria Mobile is sleeping in the background. This preserves battery.
Encrypt
Audio
Encrypt a phone call at the media (audio) level using SRTP. Encrypting audio is subject to VoIP service provider support.
l
Never (default): Audio is not encrypted.
l
Always: Audio is always encrypted. The call fails if the other person cannot accept encrypted calls. Call media
encrypted shows during a call.
SIP Port
Range
Set a SIP Port Start and SIP Port End for SIP signaling.
Controls the port range for the specific account.
The value 0 implies default/automatic. The appropriate setting depends on your device setup. If your device is behind a
restrictive firewall that only allows specific port ranges to be used, enter the SIP Port Start and SIP Port End to use for
your SIP account.
Note: Also open those ports on your firewall. Refer to the applicable firewall documentation.
RTP Port
Range
Audio
Set an RTP Port Audio Start and RTP Port Audio End for RTP audio.
Controls the port range for the specific account.
The value 0 implies default/automatic. The appropriate setting depends on your device setup. If your device is behind a
restrictive firewall that only allows specific port ranges to be used, enter the range of ports to use for your RTP account.
Transport and Security
CounterPath Corporation 274
Bria Mobile User Guide Settings

Field Description
Note: Also open those ports on your firewall. Refer to the applicable firewall documentation.
RTP Port
Range
Video
Set an RTP Port Video Start and RTP Port Video End for RTP video.
Controls the port range for the specific account.
The value 0 implies default/automatic. The appropriate setting depends on your device setup. If your device is behind a
restrictive firewall that only allows specific port ranges to be used, enter the range of ports to use for your RTP account.
Note: Also open those ports on your firewall. Refer to the applicable firewall documentation.
Field Description
Incoming
Calls
l
On: Receive calls on Bria Mobile.
l
Off: This account can only be used to make outgoing calls. Incoming SIP SIMPLE messages are not received.
This setting does not affect XMPP messaging.
Wi-Fi
Refresh
Interval
The timer interval for Bria Mobile’s attempts to register in order to refresh SIP account registration when on a Wi-Fi
network. This value is placed in the Expires header field of the SIP Register message.
Change this value only if advised to do so by your VoIP service provider.
l
Range: 30 to 900 seconds
l
Default: 900 seconds
Mobile
Refresh
Interval
This settings has the same function as Wi-Fi Refresh Interval except it applies to mobile data networks.
SIP Registration
Field Description
Wi-Fi
Interval
A keep alive message maintains a pinhole through your firewall so that the account registration is maintained over a Wi-Fi
network. The interval specifies how often the message is sent (in seconds).
If you are experiencing problems — accounts become unregistered when using a Wi-Fi connection — try setting this interval
to a lower number such as 20 seconds.
Specify 0 to disable.
Mobile
Interval
This settings has the same function as Wi-Fi Interval except it applies to mobile data networks.
Keep Alive
CounterPath Corporation 275
Bria Mobile User Guide Settings

Field Description
Verify
TLS
Cert
l
On: (default) Bria Mobile attempts to verify the certificate, sent by the SIP server to see if it is trusted.
l
Off: Bria Mobile accepts the certificate without attempting to verify it.
It depends on how your service provider handles TLS certificates whether you need to take an extra step to make this work.
l
If the certificate has been trusted by well-known certificate authorities (such as VeriSign), you do not need to take
further action.
l
If the certificate is a self-signed certificate, you need to install a corresponding CA certificate on the device in advance,
so Bria Mobile can verify a cert (received from the SIP server) against the CA certificate. Contact your VoIP service
provider to get the corresponding CA certificate and and use the iPhone or iPad Configuration Utility to install it to
your device.
The CA cert should appear under iOS Settings > General > Profiles. Downloading the CA cert via Safari does not install it
properly.
TLS Cert Management
Field Description
DNS
Servers
Add custom DNS servers.
Custom Name Server is a domain name server that is specific to a given domain (network or sub-network). It provides Bria
Mobile the ability to query inside the network for IP addresses associated to domain names rather than querying outside the
domain.Bria Mobile queries up to 4 DNS servers sequentially from the top of the list.
Custom DNS Servers
Field Description
Show
Miscellaneous
Displays miscellaneous settings.
Wi-Fi NAT64
Support
Appears when Settings > Account Advanced > Show Miscellaneous is on.
Leave on if there is a possibility that Bria Mobile is going onto an IPv6-only network, trying to reach IPv4-only SIP
services/infrastructure over a Wi-Fi network
l
Requires that the configured name servers support DNS64
l
Requires a Session Border Controller (SBC) with latching support, or a STUN server. ICE is not supported.
l
This feature is typically not necessary on platforms/networks where alternative IPv4-to-IPv6 transition
mechanisms are used, such as 464XLAT.
Has no effect when Bria Mobile uses IPv4 to communicate with the SIP server. (Settings > Accounts (SIP) >
Account Advanced > Wi-Fi IP Version is set to IPv4.)
SIPMiscellaneous
CounterPath Corporation 276
Bria Mobile User Guide Settings

Field Description
l
On: If Bria Mobile detects an IPv6-only network, it tries to use DNS64 to translate IPv4 addresses into IPv6
addresses.
Mobile
NAT64
Support
Appears when Settings > Account Advanced > Show Miscellaneous is on.
This settings has the same function as Wi-Fi NAT64 Support except it applies to mobile data networks.
Enable
PRACK
Appears when Settings > Accounts (SIP) > Account Advanced > Show Miscellaneous is on.
l
On: Bria Mobile advertises that it supports 100rel and allows PRACK, as defined in RFC 3262. The
outgoing INVITE message has 100rel in the Supported header and PRACK in the Allow header.
l Off (default)
Passive
Session
Timer
Appears when Settings > Accounts (SIP) > Account Advanced > Show Miscellaneous is on.
Controls the use of session timers on SIP accounts. The session timer is used to determine if the call is still active.
Only choose off if advised by your VoIP service provider.
l
On (default): Bria Mobile does not use session timers in any session, except if it is explicitly required by the
remote party.
l
Off: Bria Mobile uses session timers in allsessions whenever the remote party supports and uses it. Only
choose off if advised by your VoIP service provider.
Connection
Reuse
Appears when Settings > Accounts (SIP) > Account Advanced > Show Miscellaneous is on.
l
On: Bria Mobile uses existing connections by adding the alias parameter in the Via header, as specified in
RFC5923. Changing this setting might solve problems with dropping or holding calls.
Subscribe
MWI
Appears when Settings > Accounts (SIP) > Account Advanced > Show Miscellaneous is on.
Bria Mobile supports both solicited and unsolicited Message Waiting Indicator (MWI) notifications for voicemail.
l
On (default): Bria Mobile uses solicited MWI notifications when voicemailVM Number is configured.
l
Off:Bria Mobile uses unsolicited MWI notifications when voicemail VM Number is configured. Try turning this
setting off if you see an incorrect count MWI count.
Use SIP
Instance
Appears when Settings > Accounts (SIP) > Account Advanced > Show Miscellaneous is on.
l
On: Bria Mobile inserts a "+sip.instance" parameter in the SIPREGISTER request. Only turn this setting on
if your VoIP service provider requires it.
l
Off: Default
Enable IMS Appears when Settings > Accounts (SIP) > Account Advanced > Show Miscellaneous is on.
Only choose on if advised by your VoIP service provider.
l
On: Bria Mobile supports the IP Multimedia System. Bria Mobile populates the authorization header upon
every SIP request immediately, instead of after a challenge. Bria Mobile uses the SIP account domain for
authorization realm.
l
Off: Default
CounterPath Corporation 277
Bria Mobile User Guide Settings

Network Traversal
The Network Traversal Strategy can be found in Settings > Accounts (SIP) > Account
Advanced. You can configure separate NAT settings for each SIP account, such as
STUN, ICE, TURN, and RPort.
Before you make changes in Settings > Accounts (SIP) > Account Advanced > Current
Strategy, turn off Settings > Accounts (SIP) > Enabled. The Account Status displays
Not Registration. Turn on Enabled when you have finished making changes.
Field Description
Application
Managed
Bria Mobile uses the specified STUN server to discover the public address of your device, and presents your public
address when negotiating media routing. This setting has Use DNS SRV turned on.
Server
Managed
Bria Mobile presents the device's private address for SIP signaling and when negotiating media routing. A robust SIP
infrastructure, after detecting the private address, can step in and route the packets on the application’s benefit.
Choose this option if your VoIP service provider advises you that it has implemented a network-hosted NAT traversal
(or far-end NAT traversal) such as a session border control (SBC), media proxy, or RTP relay. This setting has Use
DNS SRV turned on.
Custom
Configuration
Allows you to configure the network traversal strategy for SIP signaling, STUN/TURN server, and media routing.
Network Traversal Strategy
Field Description
RPort
WiFi
l
On: When you are connected over a Wi-Fi network, the outgoing INVITE message has an RPort parameter
inside the Via header, which indicates that Bria Mobile supports RFC3581.
l
Off: The outgoing INVITE message does not have an RPort parameter. Choose off if you proxy is unable to
support RPort over Wi-Fi.
RPort
Mobile
This settings has the same function as Rport WiFi except it applies to mobile data networks.
Outbound
WiFi
l
On: Bria Mobile uses an existing connection by populating the SIP header as specified in RFC5626. The SIP
server should communicate with Bria Mobile using the same connection if the transport is set to TCP or TLS.
Turn this setting on if you have trouble connecting to the SIP server over Wi-Fi.
l
Off: Bria Mobile does not use an existing connection.
Outbound
Mobile
This settings has the same function as Outbound WiFi except it applies to mobile data networks.
SIP Network Traversal
CounterPath Corporation 278
Bria Mobile User Guide Settings

Field Description
Use DNS
SRV
When on, Server, Username and Password are disabled.
l
On: Bria Mobile uses DNS SRV to discover the network addresses for your VoIP service provider's VoIP-
related services (for example, STUN server).
l
Off: Bria Mobile does not use DNS SRV for discovery. Only turn this setting off if your system administrator
advises you to do so.
Server Appears when Settings > Accounts (SIP) > Account Advanced > Network Traversal > Use DNS SRV is off.
CounterPath recommends that you change the default (stun.counterpath.com) to an address provided by your VoIP
service provider. If the Server setting is left empty, Bria Mobile tries to query your VoIP service provider for STUN server
(STUN DNS SRV record on its network). The VoIP service provider may not have the server configured, which can
create a delay on start up (disabling STUN can mitigate this).
Username The username to connect to the STUN/TURN server. Usually provided by your system administrator or your VoIP
service provider.
Password The password to connect to the STUN/TURN server. Usually provided by your system administrator or your VoIP
service provider.
STUN / TURN
Field Description
Use
STUN
WiFi
This setting applies to media routing. STUN is disabled when IPv6 is used.
l
On: Bria Mobile uses a STUN server to discover your public IP address over a Wi-Fi network. This public IP is used
to inform the remote party where the audio packets should be sent. Otherwise the private IP is presented.
l
Off: Bria Mobile does not discover your public IP address; only the private IP address is used. This setting is ignored
and presumed off when VPN is enabled.
Use
STUN
Mobile
This settings has the same function as Use STUN WiFi except it applies to mobile data networks.
Use
ICE
WiFi
ICE is involved only in media routing; it is not involved in SIP signaling.
l
On: Bria Mobile uses ICE to discover addresses for media packets over a Wi-Fi network. ICE provides a good
guarantee of two-way audio. However, to use ICE successfully, both endpoints in a call must use ICE, and,
specifically, must use draft 19 of the ICE standard.
l
Off: Try turning ICE off if your device is not behind a firewallor NAT.
Use
ICE
Mobile
This settings has the same function as Use ICE WiFi except it applies to mobile data networks.
Use
TURN
Check with your VoIP service provider to make sure a TURN server is available.
l
On: Bria Mobile advertises the public IP address (discovered via STUN) for the contact address for signaling traffic
Media Network Traversal
CounterPath Corporation 279
Bria Mobile User Guide Settings

Field Description
WiFi over a Wi-Fi network. Bria Mobile advertises the address of a media relay server (discovered via TURN) for the
connection address for media traffic.
l
Off: TURN server is not available.
Use
TURN
Mobile
This settings has the same function as Use TURN WiFi except it applies to mobile data networks.
Accounts (XMPP)
Before you make changes to an existing account in Settings > Account (XMPP), turn off
Enabled for the account. Make sure to turn on Enabled when you have finished making
changes.
Field Description
Account Name Enter a name for each account to identify different accounts when you have multiple accounts.
Enabled
l
On: Set the account as active. Typically on.
l
Off: You are not using this account so you do not want the account register
automatically.
Account details
Field Description
Username The username for your XMPP account.
Password The password for your XMPP account.
Domain Domain of the XMPP service.
User details
Field Description
Account Specific Features Opens the settings screen for features that apply to individual XMPP accounts.
See Account Specific Features (XMPP).
Account Advanced Opens the settings screen for advanced settings that apply to individual XMPP accounts.
Other XMPP account settings
CounterPath Corporation 280
Bria Mobile User Guide Settings

Field Description
See Account Advanced (XMPP).
Account Specific Features (XMPP)
Appears on devices with mobile connectivity and when Settings > Preferences > Use
When Available is on.
Field Description
Disable
Mobile Data
l
On: This account does not use mobile data when a Wi-Fi network is not available. You will not receive any
messages or notifications when a Wi-Fi network is not available.
l
Off: Bria Mobile uses mobile data to receive messages and notifications when a Wi-Fi network is not
available. Data charges with your mobile carrier may apply.
Mobile Data Network
Account Advanced (XMPP)
Before you make changes to an existing account in Settings > Account (XMPP), turn off
Enabled for the account. Make sure to turn on Enabled when you have finished making
changes.
Field Description
Out.
Proxy
Complete this field only is your XMPP service provider has an outbound proxy and requires you to provide that address
toBria Mobile. Enter the domain name or the IP address obtained from your provider.
Resource Used to identify an XMPP session when you log in to multiple clients with this XMPP account (for example, /work or
/home). Can be used to allow one XMPP session at a time. The default is not set.
Priority Informs the XMPP server about the priority of your XMPP session.
l
Expected range: -128 to 127
l
Default: 0
Account Additional
CounterPath Corporation 281
Bria Mobile User Guide Settings

Field Description
IP Version
Wi-Fi
IP
Version
Specifies the IP version for DNS lookup and XMPP connections. Applies to Wi-Fi networks. This does not apply to HTTP/S
connections such as login and provisioning. Bria Mobile leverages the iOS native HTTP/S framework for these connections.
l
IPv4: Bria Mobile uses IPv4 and does not look for IPv6 at all
l
IPv6: Bria Mobile uses IPv6 and does not look for IPv4
l
Prefer IPv4: Bria Mobile uses IPv4 first if it detects both IPv4 and IPv6
l
Prefer IPv6: Bria Mobile uses IPv6 first if it detects both IPv4 and IPv6
Mobile
IP
Version
This settings has the same function as Wi-Fi IP Version except it applies to mobile data networks.
IP Version
Field Description
Use Ping
l
On (default): Send ping messages to the XMPP server to indicate that the connection is active.
Interval Interval for the ping messages to be sent to the XMPP server (in seconds), indication that the connection is still active.
l Default: 300 seconds
Keep Alive
Field Description
Verify
TLS
Cert
l
On: (default) Bria Mobile attempts to verify the certificate, sent by the XMPP server, to see if it is trusted.
l
Off: Bria Mobile accepts the certificate without attempting to verify it.
It depends on how your service provider handles TLS certificates whether you need to take an extra step to make this work.
l
If the certificate has been trusted by well-known certificate authorities (such as VeriSign), you do not need to take
further action.
l
If the certificate is a self-signed certificate, you need to install a corresponding CA certificate on the device in advance,
so Bria Mobile can verify a cert (received from the XMPP server) against the CA certificate. Contact your VoIP
service provider to get the corresponding CA certificate.
TLS Cert Management
CounterPath Corporation 282
Bria Mobile User Guide Settings

Preferences
Go to Settings > Preferences to make changes to the following fields.
Field Description
Mobile Data Network
Use
When
Available
Appears only on devices with mobile connectivity.
l
On: Bria Mobile attempts to connect to SIP/XMPP services using the mobile data network when a Wi-Fi
connection is not available. You receive messages and voice mailnotifications when Bria Mobile is in the mobile
data network.
l
Off: If a Wi-Fi connection is not available, SIP and XMPP services are unregistered; you willnot receive any
messages or notifications and willnot be able to place or receive calls.
You can allow or disallow VoIP calls using a separate setting Settings > Preferences > Allow VoIP Calls.
Data charges with your mobile carrier may apply.
Allow
VoIP
Calls
Appears when Use When Available is enabled in Preferences > Mobile Data Network.
l
On: Bria Mobile attempts to place calls using the mobile data channel when a Wi-Fi connection is not available.
Voice quality may be impacted as mobile data is not ideal for voice calls.
l
Off (default): If a Wi-Fi connection is not available, you cannot place or receive calls.
Data charges with your mobile carrier may apply.
Mobile Data Network
Field Description
Select Your
Colors
Change the color for various parts of the screen and tap Apply Colors. Tap Reset Colors to easily return to the
default settings.
Custom Colors
Field Description
Improve
Reachability
l
On: If you are not using the Bria Push Service on any of your SIP accounts and you are not receiving calls
in the background, try turning on this settings.
l
Off: Default
Reachability
l
Standard: Use this settings if you do not have the Bria Push Service enabled on all of your SIP accounts.
General
CounterPath Corporation 283
Bria Mobile User Guide Settings

Field Description
Strategy
l
Enhanced: Try using Enhanced if you are still not receiving calls when Bria Mobile is in the background.
Setting Reachability Strategy to Enhanced may consume more battery.
Private When in
Background
l
On: When Bria Mobile is in the background and you navigate to the App Switcher, you see the splash
screen for Bria Mobile rather than any details.
l
Off: When Bria Mobile is in the background and you navigate to the App Switcher, you see the last screen
that you used in Bria Mobile before you sent Bria Mobile to the background.
Field Description
Native
Integration —
iPhone
Appears on iPhone or iPads running iOS 10+. When on, Bria Mobile enables CallKit native call integration and users
see the following differences:
l
Easier to answer Bria Mobile calls when a device is locked. No need to rely on a small notification on the
unlock screen.
l
A native incoming call no longer takes over during a Bria Mobile call; it is presented as Call Waiting. You now
have a chance to tell the person that you have to pick up another call.
l
You can switch between a native call and a Bria Mobilecall.
l
All Bria Mobile calls are captured in the native dialer call history, with the option to click on an entry to call back
using Bria Mobile.
l
Improved Bluetooth headset support. You can answer and hang up Bria Mobile using the button on your
Bluetooth device.
l
CarPlay support.
Native
Integration —
iPad
Appears on iPads running iOS 10+.
l
On: Bria Mobile enables CallKit native call integration. Users find it easier to answer Bria Mobile calls when a
device is locked. No need to rely on a small notification on the unlock screen.
Display
Account
Name
Appears when Settings > Preferences > Native Integration is on.
l
On: the incoming call screen displays the SIPaccount name in front of the Caller ID. This setting helps the
user identify which SIPaccount is receiving the call when Bria Mobile has multiple SIP accounts configured.
l
Off: the incoming call screen does not display the SIP account that is receiving the call.
Call Handling
CounterPath Corporation 284
Bria Mobile User Guide Settings

Field Description
Play
Ringtone
Appears when Settings > Preferences > Native Integration is off.
l
On: Bria Mobile plays a ringtone for incoming calls.
l
Off: Bria Mobile does not play a ringtone for incoming calls.
Custom
Ringtone
Appears when Settings > Preferences > Native Integration is on.
l
On: Use a ringtone configured in Bria Mobile for incoming calls.
l
Off: Use a ringtone configured in iOS.
Vibrate —
iPhone
Appears when Settings > Preferences > Native Integration is off.
l
On: The device vibrates when you receive a call.
l
Off: The device does not vibrate when you receive a call.
Alert
Answer
Appears when Settings > Preferences > Native Integration is off.
Controls the behavior of the incoming Bria Mobile call prompt (when Bria Mobile is in the background):
l
On: You can immediately answer the call by tapping on the alert.
l
Off: After tapping the alert, you have a choice to answer or decline the call.
Alert
Missed
Controls the behavior of the missed call prompt (when you receive a callwhen Bria Mobile is in the background):
l
On: Bria Mobile shows a missed call notification when Bria Mobile is in the background.
l
Off: Bria Mobile does not send a missed call notification.
Ringtone The default ringtone for incoming calls. Played if no specific ringtone is assigned to the contact. Assign ringtones in native
iOS contacts.
Disable
Call
Waiting
Controls whether call waiting is enabled or disabled.
l
On: Call waiting is disabled and while on another call, incoming calls ring busy to the caller or go straight to voice
mail if you have voice mail configured.
Off: Call waiting is enabled and while on another call, you are alerted of the incoming call.
Match
Contacts
for Caller-
Id
Controls what name appears in caller ID for an incoming call.
l
On (default): Bria Mobile tries to match incoming calls with Contacts. If a match is found, Bria Mobile uses the
contact's Display name in the caller ID.
l
Off: Bria Mobile uses the information in the SIP header for the caller ID.
When Native Integration is enabled in Settings > Preferences – Call Handling, all numbers other than Softphone use
the contact's Display Name for the incoming caller ID if there is a matching contact. Once you answer the call, Bria
Mobile uses the information in the SIPheader for the caller ID.
Call
Blocking
Select what kind of phone numbers to block.
l
No number,
Incoming Call
CounterPath Corporation 285
Bria Mobile User Guide Settings

Field Description
l
Anonymous Caller ID, and/or
l
any number you added to the block list. You can add up to 20 phone numbers in Bria Mobile.
Field Description
Turn Letter to
Numbers
Controls whether letters entered in the dial pad are converted to numbers.
l
On: Letters entered in the dial pad are converted to numbers.
l
Off: Letters entered in the dial pad are not converted to numbers.
Hide My Number Controls whether anonymous calling is enabled.
l
On: Remote parties do not see your name or number on their phone.
l
Off: Remote parties see your caller ID information.
Default Account for
History
Changes Bria Mobile's dialing behavior on History when multiple SIP accounts are configured in Bria Mobile.
l
On: Bria Mobile dials using the default/primary account. A useful option when you want to use only
one account for all outgoing calls.
l
Off (default): Bria Mobile dials using the account that received the call.
Outgoing Call
Field Description
Background
Image
The background image that appears when you are on a call. Swipe the image to the left to delete it.
Contact
Image
Changes the way Bria Mobile displays the image of a contact during a call. Add an image to a contact in the Contact tab
of the resource panel. Make sure your images are smaller in size so they display faster.
l
Don’t Show: Bria Mobile does not show an image of the remote party during a call.
l
Full Screen: Bria Mobile shows an image of the remote party in the full screen a call.
l
Small Avatar: Bria Mobile shows a small photo of the remote party next to their name during a call.
Auto
Record
Calls
l
On: Bria Mobile automatically record all calls made with Bria Mobile.
l
Off(default): Bria Mobile records a call only if you tap manually start recording during a call.
Mobile Call
Interrupt —
iPhone
Appears when Settings > Preferences> Native Integration is off.
When you receive a native call while already in a Bria Mobile call, the Bria Mobile call is put on hold. You will not be able
to speak to the remote party in the Bria Mobile call until you answer or decline the incoming mobile call. Bria Mobile can
play feedback to the person who is put on hold without any notice.
Call in Progress
CounterPath Corporation 286
Bria Mobile User Guide Settings

Field Description
l
Silence: Bria Mobile plays nothing.
l
Tones: Bria Mobile plays beeps every 5 seconds to the person on hold.
l
Announcement: Bria Mobile plays an audio message to the remote party on hold in English, “Your call has
been interrupted by an incoming mobile call. Please wait for the other party to return.”
Play Music
On Hold
This setting controls music played locally by Bria Mobile; it does not control the server side if your service provider has
ability to play music on the server side.
l
On: Play classical music to the party on hold. Allthe participants hear music if it is a conference call.
l
Off: Default
Play Tone
On Network
Lost
l
On: Bria Mobile plays an audio tone to alert you if the network connection is lost while you are on a call.
l
Off (default): Bria Mobile only displays the visual indicator if the network connection is lost while you are on a
call.
Field Description
Single
Touch to
Call
When IM, SMS, and/or video are enabled, this setting is ignored. Bria Mobile displays a prompt to choose an option.
l
On: When making a callfrom Contacts or History, the call is placed when you tap a phone number.
l
Off: When you tap the phone number, a prompt appears. Tap the prompt to place the call.
Show URI
Domain
l
On: The phone number displayed for an incoming, outgoing, or established callincludes the domain name (for
example, 1234@myVoipProvider.com).
l
Off (default): The domain name is not displayed.
Digits To
Match
Controls a number of digits in phone numbers Bria Mobile uses to match contacts. This aims to solve an issue where
Bria Mobile matches a phone number with a different area code.
Phone Number
Field Description
Forward Calls
l
On: Send all incoming calls to a specific number if Bria Mobile is enabled and
registered.
This setting controls all the SIP accounts in the softphone client. If you have multiple
SIPaccounts and want to forward calls in only one of the SIP accounts, use the per-
account call forwarding settings. When both global and per-account call forwarding
settings are enabled, the global one takes precedence; all incoming calls on
all
the
SIP accounts will be forwarded to a specified number.
To Number Appears when Settings > Preferences > Forward Calls is on. Enter the number to which
calls are forwarded.
Client-side Call Forwarding
CounterPath Corporation 287
Bria Mobile User Guide Settings

Field Description
Enable IM &
Presence
l
On: Bria Mobile can be used for sending instant messages and sharing online status.
To use IM & Presence on a SIP account, Settings > Accounts (SIP) > Account
Specific Features > Enable IM & Presence must also be on.
l
Off: You will not be able to use SIP or XMPP accounts for presence and messaging.
Enable SMS
l
On: Bria Mobile can be used for sending SMS messages to PSTN numbers. To use
SMS on a SIP account, Settings > Accounts (SIP) > Account Specific Features >
Enable SMS must also be on.
l
Off (default): You will not be able to use a SIP account for sending SMS.
Alert Sound
l
On: Bria Mobile plays a ring tone when you receive a new message.
Alert Vibration —
iPhone
l
On: Your device vibrates when you receive a new message.
Hyperlink
Preview
l
On: You see a small preview of hyperlinks in Bria Mobile messages
l
Off: Hyperlink previews do not appear in Bria Mobile messages
Private When
Locked
l
On: Bria Mobile does not display the incoming call information on the lock screen and
the notification drawer.
l
Off: Default
[Enter] As
Newline
l
On: Tap the Enter key to add a new line in IM/SMS conversations. Tap the Send icon
to send IM.
l
Off: Tap the Enter key to send an IM. You might want to turn it off when using physical
keyboard with the device.
Alert Text Tone The default text tone for incoming messages. Played if no specific text tone is assigned to the
contact. Assign text tones in the native iOS contacts.
Messages
Field Description
Enable Video
l
On: Bria Mobile can be used for video calls. To place Video Calls, Settings >
Accounts (SIP) > Account Specific Features > Enable Video must be on.
l
Off: You will not be able to make video calls on Bria Mobile.
Send Landscape Appears when Settings > Preferences > Enable Video is on.
l
On: Your video is sent in the landscape orientation. This is a compatibility mode for
older devices that cannot render video in the portrait orientation. Use as an
exception.
l
Off (default):
Video Calls
CounterPath Corporation 288
Bria Mobile User Guide Settings
Field Description
Video Quality Wi-
Fi
Appears when Settings > Preferences > Enable Video is on.
The video quality for calls started on a Wi-Fi network. If you move to a mobile network during a
call, the video quality retains this setting.
l
Low (CIF): Uses 352 horizontal pixels and 288 vertical lines.
l
Medium (VGA)*
l
HD (720p)* : Default on iPhone 6s and higher and iPad Air 2 and higher
*Medium (VGA) and HD video are not supported on iPhone 4S, iPad 2 and iPad Mini 1G.
Video Quality
Mobile
Appears when Settings > Preferences > Enable Video is on.
The video quality for calls started on a mobile network. If you move to a Wi-Fi network during a
call, the video quality retains this setting.
l
Low (CIF): Uses 352 horizontal pixels and 288 vertical lines.
l
Medium (VGA)*
l
HD (720p)* : Default on iPhone 6s and higher and iPad Air 2 and higher
*Medium (VGA) and HD (720p) video are not supported on iPhone 4S, iPad 2 and iPad Mini
1G.
Advanced settings
Note: If you make changes to the fields identified by a ▼ , you must tap the Apply Changes
button at the bottom of the screen or restart Bria Mobile.
Field Description
Use
VPN If
Active
l
On: Force Bria Mobile to select the VPN network interface. Choose this option only if you are using Bria Mobile
with a VPN connection to your network; otherwise, the wrong network interface my be selected, resulting in
registration problems.
l
Off: (default) You are not using a VPN network interface.
VPN Support
Field Description
Voice
l
On: Audio is not transmitted when no one talking. Turning this feature on may reduce bandwidth usage.
Media Options ▼
CounterPath Corporation 289
Bria Mobile User Guide Settings
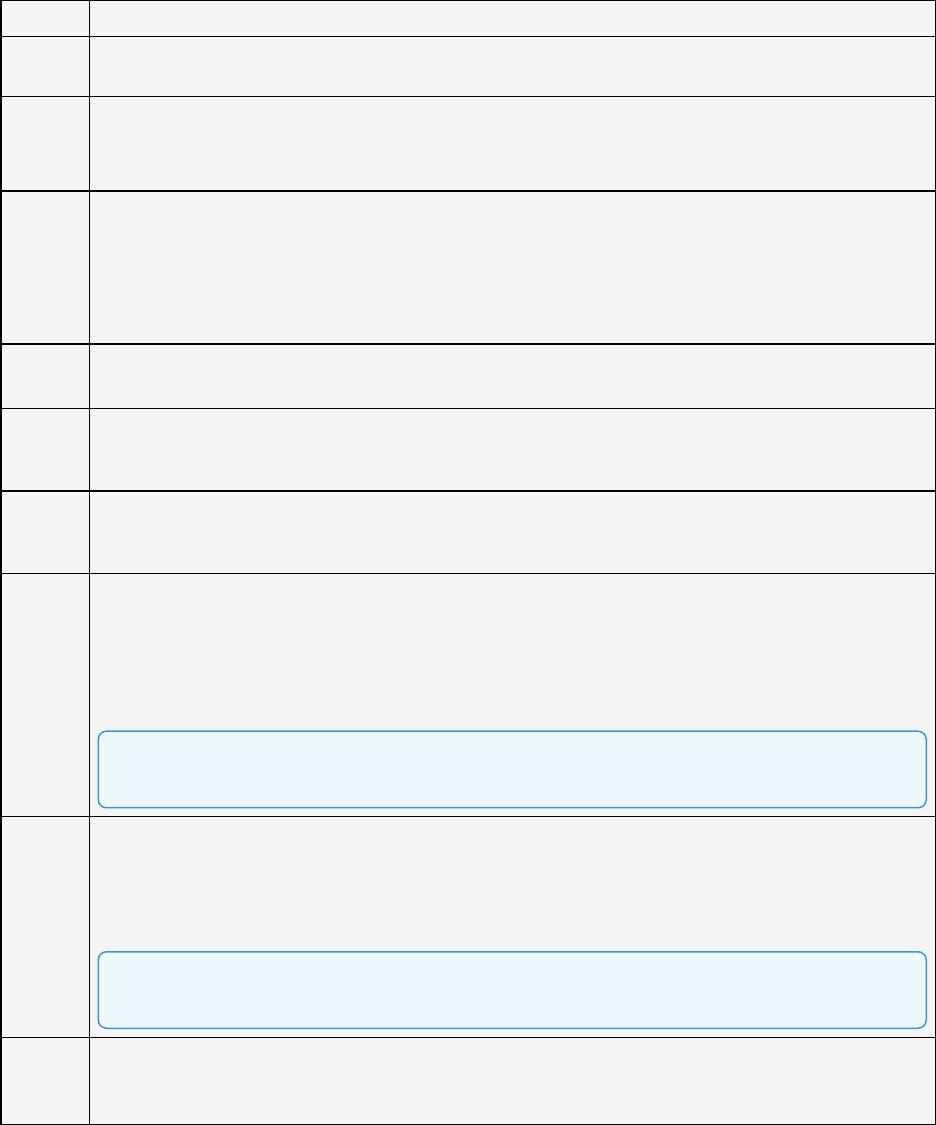
Field Description
Activity
Detection
l
Off (default): Audio is transmitted when there is no one talking.
Noise
Reduction
l
On: Bria Mobile attempts to reduce background noise from your microphone. Typically on when you are not
using a headset.
l
Off: Typically off when you are using a headset.
Quality Of
Service
Ask your VoIP service provider if quality of service (QoS) is supported. QoS can allow your calls to be given a higher
priority on the network. Turing QoS on has no effect if your VoIP service provider does not support it.
l
On: Each voice data packet is marked, allowing a VoIP aware router to prioritize them to help increase audio
quality.
l
Off: Default
QoS SIP
Value
Appears when Settings > Advanced Settings > Quality of Service is on.
Quality of Service for SIP includes TCP, TLS, and RTP.
QoS
Audio
Value
Appears when Settings > Advanced Settings > Quality of Service is on.
Quality of Service is for RTP only.
QoS
Video
Value
Appears when Settings > Advanced Settings > Quality of Service is on.
Quality of Service is for RTP only.
SIP Port
Range
Set a SIP Port Start and SIP Port End for SIP signaling.
Controls the port range for allaccounts. Use the settings under Account Advanced instead if you want to set a different
port range for each account. If both global and per-account settings have a value, Bria Mobile uses per-account settings.
The value 0 implies default/automatic. The appropriate setting depends on your device setup. If your device is behind a
restrictive firewall that only allows specific port ranges to be used, enter the SIP Port Start and SIP Port End to use for
your SIP account.
Note: Also open those ports on your firewall. Refer to the applicable firewall documentation.
RTP Port
Range
Audio
Set an RTP Port Audio Start and RTP Port Audio End for RTP audio.
Controls the port range for allaccounts. Use the settings under Account Advanced instead if you want to set a different
port range for each account. If both global and per-account settings have a value, Bria Mobile uses per-account settings.
The value 0 implies default/automatic. The appropriate setting depends on your device setup. If your device is behind a
restrictive firewall that only allows specific port ranges to be used, enter the range of ports to use for your RTP account.
Note: Also open those ports on your firewall. Refer to the applicable firewall documentation.
RTP Port
Range
Video
Set an RTP Port Video Start and RTP Port Video End for RTP video.
Controls the port range for allaccounts. Use the settings under Account Advanced instead if you want to set a different
port range for each account. If both global and per-account settings have a value, Bria Mobile uses per-account settings.
CounterPath Corporation 290
Bria Mobile User Guide Settings
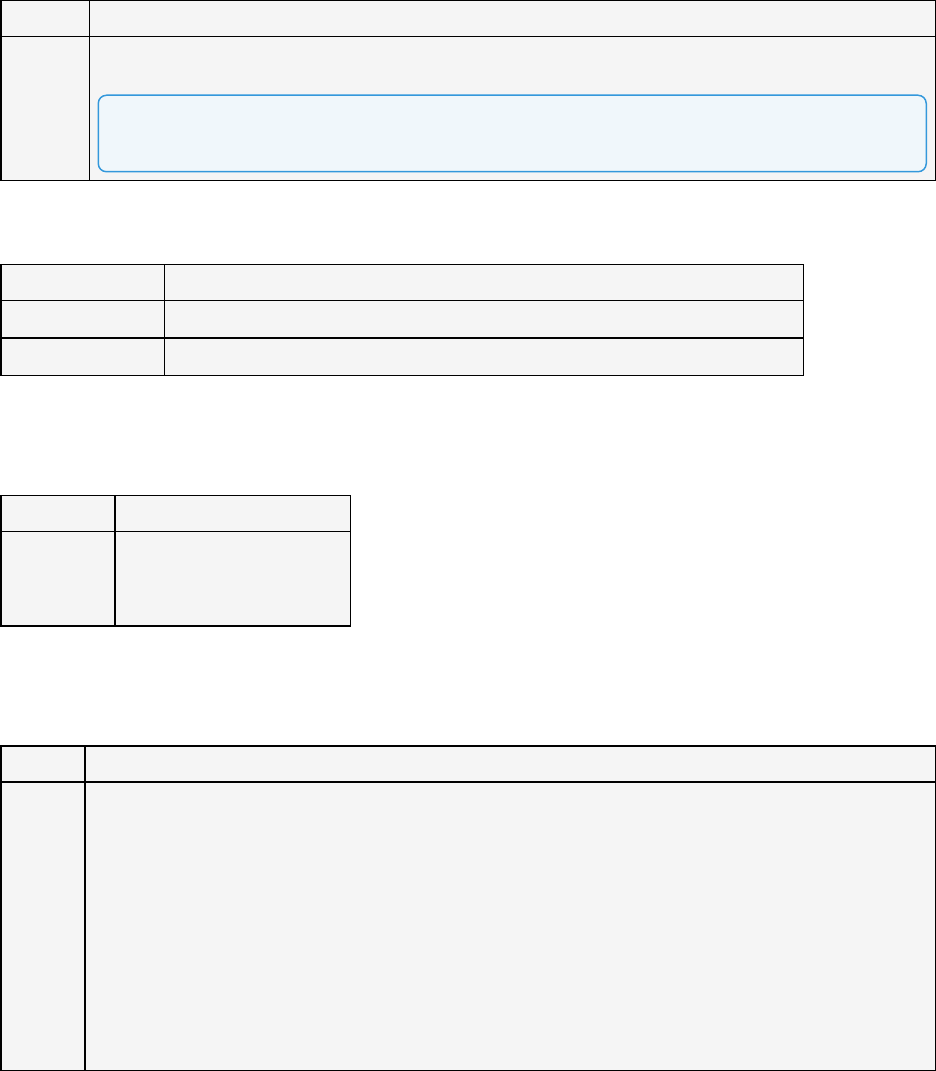
Field Description
The value 0 implies default/automatic. The appropriate setting depends on your device setup. If your device is behind a
restrictive firewall that only allows specific port ranges to be used, enter the range of ports to use for your RTP account.
Note: Also open those ports on your firewall. Refer to the applicable firewall documentation.
Field Description
Mobile Audio Codecs CounterPath recommends using the default settings. See Wi-Fi and Mobile Audio Codecs.
Wi-Fi Audio Codecs CounterPath recommends using the default settings. See Wi-Fi and Mobile Audio Codecs.
Audio Codecs Selection
Field Description
Video Codecs
l
H264 - offers 720p HD
support.
l
VP8
Video Codecs Selection
Field Description
Verify
HTTPS
TLS Cert
Applies to HTTPS connections except for provisioning.
l
On(default): Bria Mobile attempts to verify the certificates, sent by the corresponding HTTPS server, to see if it is
trusted
l
Off: Bria Mobile accepts the certificate without attempting to verify it.
If the certificate is trusted by a well-known certificate authority such as VeriSign, you do not need further action.
If the certificate is a self-signed certificate, you need to install a corresponding CA certificate on your device in advance.
Contact your VoIP service provider to get a corresponding CA certificate, and use the iPhone or iPad Configuration Utility
to install it to your device .
The CA cert should appear under iOS Settings > General > Profiles. Downloading the CA cert via Safari does not install
it properly.
TLS Cert Management
CounterPath Corporation 291
Bria Mobile User Guide Settings

Field Description
Alert Push
Notification
Issue
This setting applies to registrations issues in which the Bria Push Server continues attempting to re-register. Even with
the setting turn Off, Bria Mobile sends an alert for registration errors that can not be recovered from or if the Bria Push
Server stops trying to re-register.
l
On (default): Bria Mobile sends notifications when the Bria Push Server is not able to register with the SIP
server on behalf of Client. Bria Mobile also sends notifications when the Bria Push Server is able to re-
registered with the SIPserver. Bria Mobile sends alerts for the following errors:
l 403: Forbidden
l 408: Request Timeout
l 480: Temporarily Unavailable
l 500: Server Internal Error
l 503: Service Unavailable
l 504: Server Time-out
See Request Failure 4xx or Server Failure 5xx for more information on these errors.
Make sure that Bria Mobile notifications are enabled under iOS Settings > Notifications.
l
Off: Bria Mobile does not send notifications regarding push notification registration errors.
Account Registration Issues
Field Description
Show
Miscellaneous
l
On: Displays miscellaneous settings.
Encode # in URI Appears when Settings > Preferences > Show Miscellaneous in on
l
On (default): Bria Mobile escapes a hash character (#) used in the user part of SIP URI, as required
by RFC 3261.
l
Off:Bria Mobile does not escape a hash character (#) and sends it as is.
Turn this setting off if you are having trouble making outgoing calls to a number with a hash character.
SIP Miscellaneous ▼
Field Description
Verbose
Logging
Leave this off unless Technical Support instructs you to turn it on to troubleshoot a problem you are having on your
device. Troubleshooting.
Share
Anonymous
l
On (default): Bria Mobile sends anonymous usage data to CounterPath. This information contains no
personally identifiable information and is used to improve the quality and performance of Bria Mobile.
Application Logging ▼
CounterPath Corporation 292
Bria Mobile User Guide Settings

Field Description
Usage Data Off: Bria Mobile does not send anonymous usage data to CounterPath.
Call Statistics Shows detailed information about the current/last call, such as the number of packets lost.
For an ongoing call, the statistics information refreshes every second.
l
Tap the Refresh button to stop auto refresh and present a snapshot of the most current statistics.
l
To enable auto refresh again, either long-press the Refresh button, or leave the statistics page and come
back again.
Send Log Tap to upload the current log to Technical Support. Troubleshooting.
Codecs
Codecs are programs in Bria Mobile that are involved in transmitting audio and video.
Each codec has different characteristics and each works better in some situations than
others.
Novice and Non-technical Users
CounterPath recommends you use the default settings and priority and let Bria Mobile
select the best codec to use in a given situation.
Technically Savvy Users
You may choose to enable one, some, or all codecs. With only one codec enabled, all
calls will use that codec. With more than one codec enabled, Bria Mobile offers the
enabled codecs and negotiates a common codec with the other party. In general, it is
desirable to have several codecs enabled.
Make sure that there are common codecs between you and the remote party. If you do
not have a common codec, the audio call will fail with a 488 error or video will not be
available on the call.
Prioritize codecs by dragging them up or down in the list. Codecs higher in the list are
given a higher priority in the offer when negotiating codecs with the other party. Moving a
codec higher should improve its chances of being chosen.
Wi-Fi and Mobile Audio Codecs
Bria Mobile offers Opus, SILK - NB, SILK - WB, SILK - SWB, G.729, G.722, G.711µLaw,
G.711aLaw, GSM, Speex - NB and Speex - WB codecs.
CounterPath Corporation 293
Bria Mobile User Guide Settings

SILK-Super-Wideband (24k) and OPUS-Full(48k) are only available in iPhone 4s and
newer, iPod 5th generation and newer, and iPad 2 and newer devices.
Narrow and Wideband
G.722-WB, SILK-WB(16k), SILK-SWB(24k), Opus-Full HD (48kHz), and Speex-
Wideband are wideband codecs. All other codecs are narrowband. When a wideband
codec is used, data usage is higher and audio quality is generally better. When a
narrowband codec is used, data usage may be lower but audio quality may be affected.
Data Usage
Data usage for the codecs with a fixed bit rate, from high to low usage, is: G.722, G.711,
GSM, and G.729a.
Speex, SILK, and Opus have a variable bit rate; the data usage will fluctuate depending
on the network conditions.
l G.729: Provides the best performance (audio quality and bandwidth usage/cost)
when using mobile data for phone calls.
l G.711: The most commonly used codec, but requires substantial bandwidth.
l G.722: A wideband (HD) codec providing excellent audio quality. However, your
VoIP service provider may not support G722 for PSTN calls (standard phone
numbers). Enable G722 only if it can actually be used. If enabled, the clock rate is
switched from 8kHz to 16 kHz. This can impact the audio quality when other
codecs are used.
Note: The G.722 codec is available on iPhone 3GS and newer and 3rd generation iPod touch
and newer.
Video Codecs
H.264 and VP8 (with 720p HD video support) can be used during a video call over a Wi-
Fi or a mobile network.
VGA and HD video are not supported on older devices such as the iPhone 4S, iPad 2,
and iPad Mini 1G.
CounterPath Corporation 294
Bria Mobile User Guide Settings
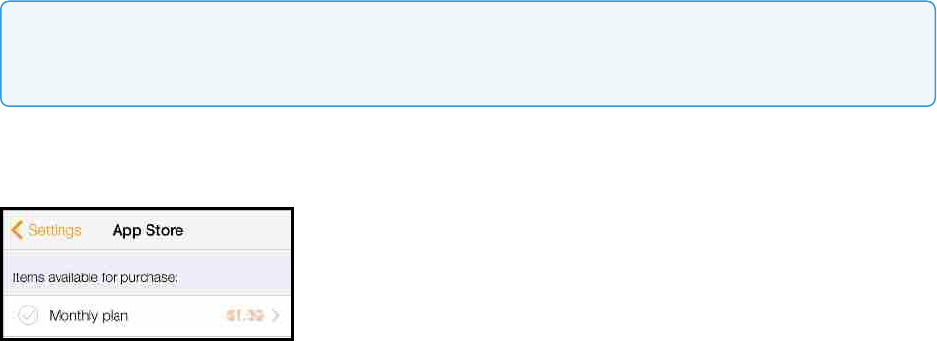
Subscription
When you install Bria Mobile for the first time, you can try it free for 14 days. Select the
Monthly plan to use the app for the trial period. If you cancel your subscription within the
14-day trial period, you will not be charged.
Note: Subscriptions will automatically renew unless you turn off auto-renew or cancel the
subscription at least 24-hours before the end of the subscription period.
All payments are charged to your iTunes account. Go to Settings > Subscription to view
your current plan. Your current plan is indicated by a green check mark.
Subscription Renewals
Subscriptions to Bria Mobile renew automatically. The renewal takes place within 24-
hours of the end of the current subscription period. You must turn off auto-renew or
cancel your subscription at least 24-hours before the end of the subscription period. You
can change or cancel your subscription at any time and you will continue to be able to
use Bria Mobile until the end of the current subscription period. You will not receive a
refund if you cancel your subscription during the subscription period.
When you cancel your subscription and the subscription period ends, you can no longer
register your accounts in Bria Mobile. You can still access the Messaging and the
History tabs. Renew your subscription if it has expired and you want to start using Bria
Mobile again.
When the Subscription message appears, tap Cancel to access the Messaging and the
History tabs.
CounterPath Corporation 295
Bria Mobile User Guide Settings
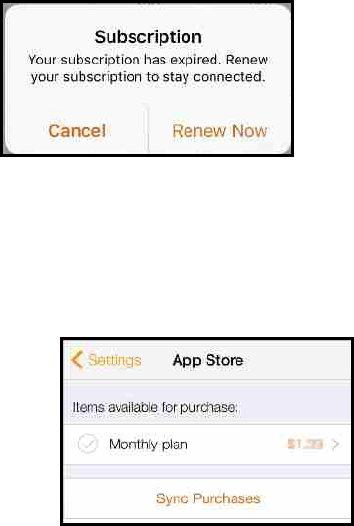
To renew your subscription
1. Tap Renew Now or go to Settings > Subscription.
2. Tap Monthly plan.
3. Tap on the price of the subscription and confirm your purchase.
The subscription is renewed. The monthly subscription plan that you chose has a check
mark beside it. Your subscription will auto-renew unless you turn off auto renew in your
iTunes account .
Managing your subscription
You can manage your subscription by accessing your iTunes account settings after you
have made the initial purchase.
To cancel or change your subscription
1. On your device, go to Settings > Apple ID, iCloud, iTunes & Apps > iTunes & App
Stores.
2. Tap your Apple ID at the top of the screen.
3. Sign in with your Apple ID and password if required.
4. Tap Manage.
5. Cancel or change the subscription period or turn off automatic renewal.
CounterPath Corporation 296
Bria Mobile User Guide Settings
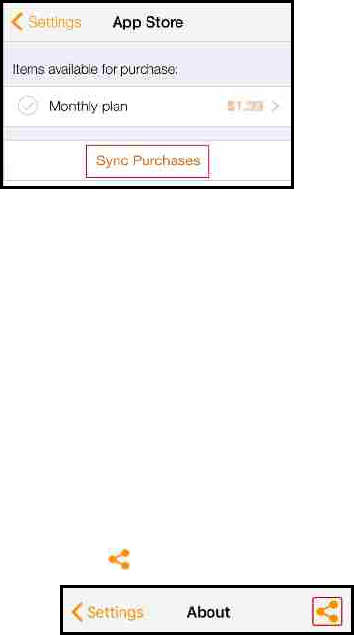
Changes to the subscription will take place at the end of the current subscription period.
Sync or restore purchase
When you change to a new iPhone or iPad, your purchase may not appear on the
device. The first time you log in on the new device, tap Restore your purchase.
If you have already purchased a subscription but the subscription is not showing on your
device, go to Settings > Subscription and tap Sync Purchases.
Share
You can easily share Bria Mobile with your friends. Select from apps available on your
share sheet.
To share from your share sheet
1. Go to the Settings tab on the resource panel.
2. Tap About Bria Mobile.
3.
Tap Share.
The share sheet opens.
4. Select an app from the share sheet. You may be asked to log in to the selected
app.
CounterPath Corporation 297
Bria Mobile User Guide Settings
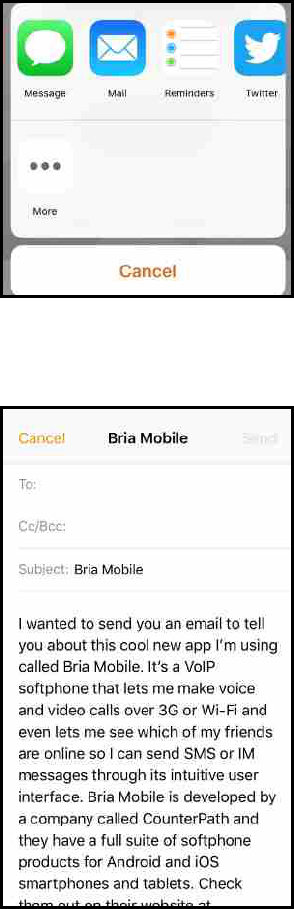
5. A message appears in the app. Use the apps features to share the message. The
example shown here is email.
The message is shared.
CounterPath Corporation 298
Bria Mobile User Guide Settings
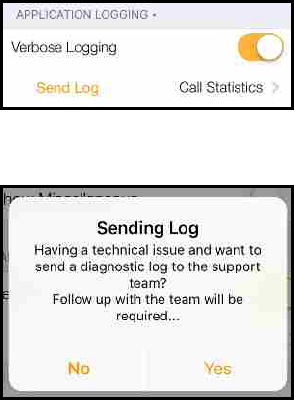
Troubleshooting
Using Bria Mobile diagnostics
If you have a problem with Bria Mobile, technical support may ask you to turn
diagnostics on to capture information.
To send a log to support
1. Go to Settings > Advanced Settings > Verbose Logging. If Verbose Logging is off,
turn it to on and tap Apply Changes.
2. Reproduce the problem you were having.
3. Go back to Settings > Advanced Settings.
4. Tap Send Log (not Call Statistics).
5. Tap Yes on Sending Log.
6. Add a description of the issue, and tap Continue.
7. Tap Copy on Sending Log Success. The log reference number is on your
CounterPath Corporation 299
Bria Mobile User Guide Troubleshooting

clipboard.
8. Report the Ref # to the support team member who was assisting you. If you are
opening a new topic, include a description of the problem and the Ref # as it
always helps with diagnosing an issue when support has logfile to look at. If you
add the Ref # to your topic description, it will speed up the support process.
The description of the problem could include the following:
l What you were doing when the problem occurred.
l Your Apple device and model.
l Any recent changes you have made to your setup of Bria Mobile.
l Whether you are in your normal Wi-Fi zone or a different Wi-Fi zone.
l Whether you normally have mobile data (3G/4G/LTE) enabled on your
device and in Bria Mobile.
9. Turn off Verbose Logging when you are done. Tap Apply Changes.
More information and technical support
Please visit the CounterPath Support Center to:
l Search the knowledge base or FAQ.
l Read forum topics.
l Ask a question.
l Submit a ticket.
CounterPath Corporation 300
Bria Mobile User Guide Troubleshooting

Bria Push Service
The Bria Push Service uses push notifications to support inbound calls when Bria
Mobile is in the background, Bria Mobile is not active, or your device is locked. Push
notifications are messages reliably delivered from a cloud-based messaging service to
your device.
Some iOS operating systems stop Bria Mobile from running in the background in order to
conserve battery. To continue to receive calls, the Bria Push Service maintains your SIP
registration even when Bria Mobile is not running.
Note: When you use the Bria Push Service, your account configuration is stored on
CounterPath’s push notification server. The data is securely transmitted in accordance to our
Privacy Policy. In order to use the Bria Push Service, you must accept the Bria Push Service
agreement.
How does the Bria Push Service work?
When Bria Mobile is in the foreground, Bria Mobile registers directly with your VoIP
service provider. If the Bria Push Service is enabled and you place Bria Mobile in the
background, the Bria Push Service will register with your VoIP service provider on Bria
Mobile’s behalf. Inbound calls are directed through the Bria Push server. When there is
an incoming call, the push server sends a notification to Bria Mobile and Bria Mobile is
brought to the foreground and creates a secure connection with the push server. The call
is routed from the VoIP service provider to the Push Server and then to Bria Mobile.
After the call ends, the push server may unregister depending on your Registration
Method. Bria Mobile re-registers with your VoIP service provider. Any new calls that are
made will route directly to your VoIP service provider until you place Bria Mobile in the
background again.
CounterPath Corporation 301
Bria Mobile User Guide Bria Push Service
Bria Push Service Settings
When you turn on Use Push Notification, the following settings are revealed:
l Registration Mode
l Nat Emulation
l Advanced Settings
l SIP Proxy
l Insert RInstance
l Disable Hash Token
l Auto Send 180
l Disable Override Domain
l Server Refresh Interval
Registration Mode
There are four registration modes. Continuous and Standard are used if your VoIP
service provider supports multiple registrations. Single Device Takeover and Single
Device Emulation are used if your VoIP service provider does not support multiple
registrations. Most VoIP service providers do support multiple registrations. The default
value for new accounts is Single Device Takeover.
l
Continuous
The Continuous registration mode ensures that the Bria Push server is always
registered on behalf of the Bria Mobile client. The Bria Mobile client still registers
directly to the SIP server when in the foreground, but the Bria Push server does not
de-register from the SIP server. In this mode, all inbound calls and all outbound
calls from the Bria Mobile client are handled by the Bria Push server.
The Continuous mode, in particular, is used when a SIP server supports multiple
registrations at the same time. This mode avoids any gap in SIP registration
because the Bria Push server is always registered on behalf of the Bria Mobile
client.
CounterPath Corporation 302
Bria Mobile User Guide Bria Push Service
In the event of a call to the SIP account while the Bria Mobile client is in the
foreground, the Bria Mobile client will receive an INVITE directly from the SIP
server and via the Bria Push server. The Bria Mobile client will filter out these
duplicate events and only allow one of the call attempts to progress.
l
Single Device Takeover
The Single Device Takeover mode is an enhanced option of the Single Device
Emulation mode. The Bria Mobile client and the Bria Push server take over
registrations from each other without unregistering first. Neither the Push server or
the Bria Mobile client sends SIP de-registration messages when transitioning from
one element to the other. It aims to eliminate gaps that are present in the other
registration mode. This mode is in some cases beneficial for SIP servers that only
support single registration.
l
Standard
The Standard registration mode allows both the Bria Push servers and the Bria
Mobile clients to register to a customer’s SIP account in an alternating manner. In
this mode, there may be short overlaps of registration where both the Bria Push
server and the Bria Mobile client are registered to the SIP server. Some PBXs, SIP
servers or SIP services may have issues with this registration overlap. If you
encounter an issue with registering to the SIP server or receiving push
notifications, select a different registration mode.
l
Single Device Emulation
The Single Device Emulation registration mode ensures that both the Bria Mobile
client and the Bria Push server unregister before the other one registers. In other
words, the Bria Mobile client and the Bria Push server never register to a PBX, SIP
server, or SIP service at the same time. The Bria Mobile client controls the
registrations by requesting the Bria Push server to register only after the Bria
Mobile client has de-registered and alternately, by receiving confirmation that the
Bria Push server has de-registered before the Bria Mobile client registers directly
to the SIP server. The Bria Mobile clients will also not register while they are in a
call delivered through the Bria Push server so that they do not cause potential
issues with the call in progress being terminated by the SIP Server.
Note that when in the Single Device Emulation registration mode, there are
periods of time (typically fractions of a second) when neither the Bria Mobile client
CounterPath Corporation 303
Bria Mobile User Guide Bria Push Service
or the Bria Push server will be registered to the PBX, SIP server or SIP service.
This gap could lead to a missed call if the call is presented to the SIP server at the
same time that neither element is actively registered. This is a downside of the
requirement of the SIP server that only one element be registered at any one time.
Nat Emulation
This option instructs the Bria Push server to simulate that the Bria Push server is
registering from behind a Network Address Translation (NAT) router or another network
element. Enable NAT Emulation if your VoIP service provider uses a session border
controller. If enabling NAT Emulation results in no push notifications or no audio, disable
NAT Emulation.
More details
The Bria Push server simulates this NAT situation by inserting a SIP VIA header into the
SIP REGISTER method that the Bria Push server sends to the SIP server. This VIA
header often assists with ensuring that various NAT traversal techniques are enabled on
a customer’s Session Border Controller and/or SIP server. Enabling the various
techniques supported by these platforms may assist with ensuring that registrations are
maintained or may help with issues related to call delivery or RTP stream establishment.
Advanced Settings
The advanced settings only need to be changed if your VoIP service provider has some
limitations or does not follow SIP RFC specifications. In most cases, Bria Push Service
will work without changing the advanced settings.
l
SIP Proxy
The option allows the customer to specify a SIP Proxy specifically for use by the
Bria Push Server. It is important to note that this is an alternative to the SIP proxy
configured as part of the regular SIP account configuration. In some very specific
customer deployments, the customer would like the Bria Push server to register
and receive calls from the SIP Server using a particular proxy while the Bria Mobile
clients would use a different SIP Proxy either internally to a customer’s local
network or external to the customer’s network.
l
Insert RInstance
The Insert RInstance option instructs the Bria Push server to use a hash token as
CounterPath Corporation 304
Bria Mobile User Guide Bria Push Service
the rinstance in the contact header of SIP register. RInstance assists some SIP
servers with identifying different clients contact addresses when servers support
multiple registrations for a single SIP account. Refer to the Disable Hash Token
option for an example of when to use RInstance.
l
Disable Hash Token
The Bria Push server generates a globally-unique hash token for each customer to
avoid possible SIPusername collisions. The Bria Push server uses this token
when registering to the SIPservice on behalf of the Bria Mobile client's SIP
account. In most cases, using the hash token is beneficial and does not cause any
problems for registration and call processing. However, some SIPservers, mainly
PBXs that are not compliant to the SIP RFC specifications, cannot handle this
token. If this is the case, disable hash token and try using RInstance instead in
order to help the Bria Push server identify the clients. Note that some PBXs do not
support RInstance either.
More details
When the Disable Hash Token option is off (therefore using the token), the Bria
Push server inserts a hash token in the uri.user portion in the contact header of SIP
register. However, some SIP servers do not include the hash token in an
INVITEmessage when sending it to the Bria Push server, which does not benefit
the Bria Push server.
l
Auto Send 180
The Auto Send 180 Ringing option instructs the Bria Push server to issue a SIP
180 RINGING message to the SIP server without waiting for the Bria Mobile client
to be waken up for an incoming call. This option may help situations where your
SIP service may timeout before the push notification is delivered to your device.
More details
With Bria Push enabled, the Bria Mobile client establishes a secure WebSocket
tunnel with the Bria Push server after the Bria Push server receives an INVITE
from the SIP service. Once the tunnel is established, the Bria Push server relays
the INVITE to the Bria Mobile client. The Bria Mobile client then sends 180 Ringing
back to the Bria Push server and the Bria Push server relays it to the SIP service.
CounterPath Corporation 305
Bria Mobile User Guide Bria Push Service
This process takes longer than what occurs during a normal (non-push) foreground
call.
When the Auto Send 180 option is enabled, the Bria Push server generates its
own 180 ringing response and does not wait for the Bria Mobile client to create the
secure WebSocket tunnel. This aims to shorten the delay and allows the Bria Push
server to respond to the SIP service right away to the incoming INVITE. Note that
this option aims to address only a part of the delay; the Bria Push Service involves
processing through various elements that result in this time lag.
l
Disable Override Domain
The Disable Domain Override option stops the Push server from replacing the To
Header Domain Part of the INVITE with the domain included in the SIP account
information.
l
Server Refresh Interval
The Server Refresh Interval option instructs the Bria Push server to register with
the SIP server for a particular requested re-registration interval. Value in seconds.
Some SIP servers do not specify minimal refresh time in the registration response
and ignore the REGISTER expires value. Note that according to the SIP
standards, a SIP server can return a lower value in the 200OK which the Bria Push
server will respect by re-registering at or before the lower interval requested.
The default is 3600 seconds.
Current limitations
Only IPv4 SIP servers are currently supported for calls involving the Bria Push server.
Bria Mobile only supports IPv6 only networks using DNS64/NAT64 when
communicating with IPv4 SIP servers for these calls.
Requirements for push notifications
To see if you can use the Bria Push Service, check the following on your device and
your server.
CounterPath Corporation 306
Bria Mobile User Guide Bria Push Service
Network requirements
l Your mobile device must have public Internet access to Apple’s APNS push
notification system.
If you are using your device inside a restricted network, make sure to open ports
specified by Apple. Visit Apple APNS for instructions.
l Your mobile device must have public Internet access to Bria Push servers. For a
list of servers, visit the Bria Mobile Push Checklist.
SIP server requirements
If you are unsure of any of these requirements, contact your server administrator or your
VoIP service provider.
l The SIP server must allow registration from the Bria Push server. If the SIP server
is running inside of the restricted network of an organization, the organization must
provide access to the Bria Push server and set the SIP Proxy parameter. For a
complete list of servers, visit the Bria Mobile Push Checklist.
l The SIP server should map the SIP Address-of-Record (AOR) to the Contact URI
when sending the INVITE. The Bria Push server generates a unique Contact URI
for each SIP account on each device the account is registered on. The Bria Push
server uses this unique Contact URI to determine where to send the push
notification for the incoming call. If the SIP server does not pass the unique Contact
URI to the Bria Push server in the INVITE, it is likely that the device will not get a
push notification for the incoming call because the Bria Push server cannot identify
a unique SIP account to route the incoming call.
More details
The Bria Push server sets this unique Contact URI in the REGISTER message
when registering with the SIP server. For the best interoperability, when the SIP
server notifies the Bria Push server of an incoming call, the SIP server should set
the Request-URI of the INVITE message to be the same value as the Contact
header as specified by the Bria Push server in the REGISTER message. If you
think this might be the cause of your issue, try changing the settings for Disable
Hash Token and Insert RInstance.
CounterPath Corporation 307
Bria Mobile User Guide Bria Push Service
l For the best user experience, the SIP server should support multiple SIP
registrations for each SIP account. If the SIP server can support multiple
registrations, the Bria Push server and Bria Mobile can be registered with the SIP
server at the same time. If your SIP server does not support multiple registrations,
set Settings > Accounts (SIP) - Bria Push Service > Registration Mode to Single
Device Emulation. You may notice a momentary pause in service when Bria
Mobile transitions from the background to the foreground.
l If the SIP service uses server managed NAT traversal or follows industry best
practices where the SIP server sends responses to the originating IP address and
port, leave Settings > Accounts (SIP) – Bria Push Service > NAT Emulation
disabled. If the SIP service does not use server managed NAT traversal or send
the responses to the originating IP address and port, enable Settings > Accounts
(SIP) – Bria Push Service > NAT Emulation. If you do not receive push
notifications or there is no audio on push registered calls, turn Settings > Accounts
(SIP) – Bria Push Service > NAT Emulation off.
Troubleshooting the Bria Push Service
Troubleshooting tips
l Is it Push-related?
Determine whether or not the issue is related to push notifications. To verify this,
test the same scenarios while the Bria Mobile client is in the foreground. If you
encounter the same issue while in the foreground as well as in the background,
your issue is likely unrelated to the Bria Push Service.
l SIP server reachability from CounterPath Push servers
The SIP server (a PBX or a SIP service) must be reachable from the Internet. This
is required in order to allow the Bria Push servers to register to your SIP server and
receive calls from your SIP server.
If your SIP server is running inside a restricted network of an organization
You must do both:
CounterPath Corporation 308
Bria Mobile User Guide Bria Push Service
a. set the which is a separate item from the one configured as part of regular
SIP settings.
b. provide access to the Bria Push servers CounterPath has deployed. See the
Bria Mobile Push Checklist for a list of IP address and DNS names used by
the Bria Push Service. Note that this information may change over time;
customers should monitor the content.
If you are not sure about the network you are using
Verify the SIP server reachability by testing if the Bria Mobile client can register to
the SIPserver, with the Bria Push Service disabled, in the following networks:
l from a Wi-Fi network that is not associated with your own corporate/home
network, such as a coffee shop or public library, and
l from an LTE / 4G mobile network. Make sure to disable the Wi-Fi network on
the mobile device.
This test is effective when verifying the SIPserver reachability because the Bria
Mobile client registering from an unknown IP address simulates the interaction of
CounterPath Push servers with the customer's SIP server.
l CounterPath Push server reachability from the Bria Mobile clients
Ensure that their mobile devices are on a network that allows them to communicate
with the Bria Push Service. Try the Test Push Service button in Settings >
Accounts - Bria Push Service with the SIP account enabled and registered. If the
test is successful, your device is able to communicate with the Bria Push server
and your device is able to receive push notifications
l Apple APNs reachability from the Bria Mobile clients
Apple requires a set of ports to be open in your firewall. If you have a restricted
network, see Apple APNs to make sure the traffic is allowed. The Test Push
Service button can verify this.
l SIP server capabilities: single registration vs multiple registrations
One critical item to understand about a SIP server is if it supports a single
registered client per configured SIP account or line. Different manufacturers,
software providers, and Unified Communications Services use different
terminology for this capability.
CounterPath Corporation 309
Bria Mobile User Guide Bria Push Service
a. If you can only use one SIPdevice at a time, then CounterPath classifies this
as supporting a single registration. In Bria Push configuration, the registration
mode should be either Single Device Emulation or Single Device Takeover.
Try Single Device Takeover unless Single Device Emulation is already
working for you. It might require some testing to figure out which is better for
your deployment.
b. If you can use multiple SIP devices at the same time and specifically receive
calls on all devices for a single inbound call (meaning that all devices are
able to maintain a registration and the SIPserver supports call forking), then
CounterPath classifies this as supporting multiple registrations. The
registration mode should be either Standard or Continuous. Try Continuous
unless Standard is already working for you. It might require some testing to
figure out which is better for your deployment.
l SIP server capabilities: setting Contact URI
The SIP server should map the SIP Address-of-Record (AOR) to the Contact URI
when sending the INVITE. The Bria Push server generates a unique Contact URI
for each SIP account on each device the account is registered on. The Bria Push
server uses this unique Contact URI to determine where to send the push
notification for the incoming call. If the SIP server does not pass the unique Contact
URI to the Bria Push server in the INVITE, it is likely that the device will not get a
push notification for the incoming call because the Bria Push server cannot identify
a unique SIP account to route the incoming call.
More details
The Bria Push server sets this unique Contact URI in the REGISTER message
when registering with the SIP server. For the best interoperability, when the SIP
server notifies the Bria Push server of an incoming call, the SIP server should set
the Request-URI of the INVITE message to be the same value as the Contact
header as specified by the Bria Push server in the REGISTER message. If you
think this might be the cause of your issue, try changing the settings for Disable
Hash Token and Insert RInstance.
l Permissions for push notifications on user's device
CounterPath Corporation 310
Bria Mobile User Guide Bria Push Service
Make sure the user has given a permission to receive push notifications on their
device. This can be controlled in the same way as you give a permission for the
mobile device to access the microphone, camera, contacts etc.
Common issues
Missed Incoming calls
This is one of the most common issues when testing the Bria Mobile client on mobile
devices with or without using push notifications. Make sure:
l Push notifications are enabled in the SIP account on the Bria Mobile client.
l The user has given a permission to receive push notifications on the device.
l Your SIP servers can be reached from the Internet, such as a coffee shop or public
library. Try registering to the SIP server with push notifications disabled in such a
location using Wi-Fi and/or a mobile data network.
l The Bria Mobile client can reach the CounterPath push servers from behind any
firewalls. Try the Test Push Service button on the Bria Mobile client.
l Check if your SIPserver cancels the incoming call because it does not receive a
180 RINGING message back from the Push server within an expected period of
time. If this is the case, turn on the Auto Send 180 Ringing setting (one of the Bria
Push advanced settings), or review configurations on your SIPserver to increase
the interval in which a 180 RINGINGis expected.
l Review the Bria Mobile Push Checklist.
No audio or one-way audio
In the CounterPath's experience, no audio or one-way audio has not been related to the
Bria Push Service.
Try calling to and from the Bria Mobile client while it is in the foreground, which does not
leverage the Bria Push Service. If you still experience no audio or one-way audio while
the client is in the foreground, it means that the issue is outside the scope of the Bria
Push Service and that it is likely related to a configuration in the SIPnetwork or
interaction between Bria Mobile and the SIP server. Try solving the issue with push
notifications disabled. After addressing the issue, try testing push notifications again.
CounterPath Corporation 311
Bria Mobile User Guide Bria Push Service
Logs and traces
l
SIP trace from the SIPserver
Not required, but having a SIP trace from your SIP server is beneficial. A SIP trace
provides information needed to understand the interaction between the Bria Mobile
client, the push servers, and the SIPserver.
Some SIP platforms and providers provide a view of the SIP registration status.
This capability can be helpful to determine if the Bria Push Service is able to
register on behalf of the Bria Mobile client.
l
Client trace from the Bria Mobile client
CounterPath provides the capability for the user to send the device log from the
Bria Mobile client to CounterPath Support.
CounterPath Corporation 312
Bria Mobile User Guide Bria Push Service

Native integration
Native integration determines the way Bria Mobile interacts with the native phone. When
Settings > Preferences > Native Integration is on, Bria Mobile works with the native
dialer and native contacts. When Settings > Preferences > Native Integration is off,
native calls take priority over Bria Mobile calls.
Native Integration is on
When Native Integration is on, you can have up to two calls: one native call and one
Bria Mobile call; or two Bria Mobile calls. Native calls have the same priority as Bria
Mobile calls.
Outgoing call type Existing call type Result
Bria Mobile None You can place a Bria Mobile call.
Bria Mobile One Bria Mobile call You can place the native call. The Bria Mobile call is put on hold.
Bria Mobile Two Bria Mobile calls You cannot place a Bria Mobile call. You can only have two call at one time.
Native None You can place the native call.
Native One Bria Mobile call. You can place the native call. The Bria Mobile call is put on hold.
Native You cannot place a native call. You can only have two calls at one time.
Outgoing calls with Native Integration on
You can have two Bria Mobile calls; or one Bria Mobile call and one native call
established at the same time. You can swap between native calls and Bria Mobile calls.
CounterPath Corporation 313
Bria Mobile User Guide Native integration

Incoming
call type
Existing
call type
Result
Bria Mobile None The incoming Bria Mobile call rings.
Bria Mobile One Bria
Mobile call
The incoming Bria Mobile call rings.
Bria Mobile Two Bria
Mobile calls
The incoming Bria Mobile call goes to your Bria Mobile voice mail if it is configured. If is not configured,
the call fails. You can only have two active calls at one time.
Native None The incoming native call rings on your phone.
Native One Bria
Mobile call
The incoming native call rings on your phone.
Native Two Bria
Mobile calls
The incoming call goes to your native voice mail if you have it configured. You can only have two active
calls at one time.
Incoming calls with Native Integration on
Native integration is off
When Settings > Preferences > Native Integration is off, you can have up to three calls:
one native call and up to two Bria Mobile calls. Native calls take priority over Bria Mobile
calls.
Outgoing call
type
Existing call
type
Result
Bria Mobile None You can place a Bria Mobile call.
Bria Mobile One Bria Mobile
call
You can place a Bria Mobile call.
Bria Mobile Two Bria Mobile
calls
You cannot place a Bria Mobile call. You can only have two Bria Mobile calls at one time.
Native None You can place the native call
Native One Bria Mobile
call
You can place your native call. The Bria Mobile call is put on hold.
Native Two Bria Mobile
calls
You can place your native call. The Bria Mobile calls are put on hold. This is the maximum
number of calls you can have.
Outgoing calls with Native Integration off
CounterPath Corporation 314
Bria Mobile User Guide Native integration

Incoming
call type
Outgoing
call type
Result
Bria
Mobile
None The incoming Bria Mobile call rings.
Bria
Mobile
One Bria
Mobile
call
The incoming Bria Mobile call rings.
Bria
Mobile
Two Bria
Mobile
calls
The incoming Bria Mobile goes to voice mail if it is configured. Otherwise, the call fails.
Native None The incoming native call rings on your phone.
Native One or
two Bria
Mobile
calls
The incoming native call rings on your phone. The native call interrupts the Bria Mobile calls and you cannot
speak to the remote parties until you end or decline the native call. The Bria Mobile remote parties hear
silence, tones, or an announcement depending on how Settings > Preferences > Mobile Call Interrupt is
set up.
Incoming calls with Native Integration off
Handling calls with Native Integration off
To learn how to handle calls with Settings > Preferences > Native Integration on, see
Handling an incoming call.
To handle incoming calls with Bria Mobile in the foreground
iPhone
1. Tap Decline, or Accept.
CounterPath Corporation 315
Bria Mobile User Guide Native integration

Bria Mobile declines or starts the call.
iPad
1. Tap Decline or Answer.
CounterPath Corporation 316
Bria Mobile User Guide Native integration
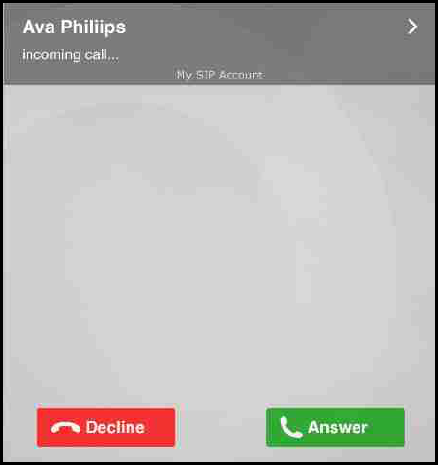
Bria Mobile declines or starts the call.
Incoming calls with Bria Mobile in the background
When Bria Mobile is in the background, Bria Mobile displays a notification for the
incoming call. To change the notification style you receive, go to iOS Settings >
Notifications > Bria Mobile.
l If you choose Banner Style as Temporary, Bria Mobile displays the notification at
the top of the screen and it goes away automatically.
l If you choose Banner Style as Persistent, Bria Mobile displays the notification at
the top of the screen and it does not go away until you tap on the notification and
handle the call.
You can set a preference on what happens when you tap the alert for an incoming call.
l Tapping the alert lets you choose to decline or answer the incoming call (turn off
Alert Answer ), or
l Tapping the alert immediately answers the incoming call (turn on Alert Answer).
Alert Answer can be found under Settings > Preferences.
CounterPath Corporation 317
Bria Mobile User Guide Native integration

To handle incoming calls with Bria Mobile in the background
iPhone
1. Tap the notification.
2. Tap Decline, or Accept if asked.
Bria Mobile declines or starts the call.
iPad
1. Tap the notification.
CounterPath Corporation 318
Bria Mobile User Guide Native integration
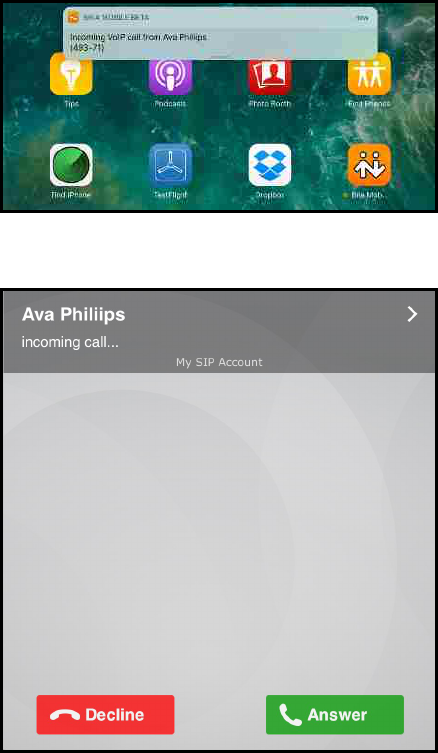
2. Tap Decline or Answer if asked.
Bria Mobile declines or starts the call.
On the lockscreen
When Bria Mobile is running and the iPhone or iPad is locked, you receive a notification
of the call on the lockscreen.
You can take three actions with incoming calls: answer, decline, or clear the notification.
Decline is available when Alert Answer is off.
CounterPath Corporation 319
Bria Mobile User Guide Native integration

To answer or decline an incoming call by swiping right
iPhone
1. Swipe the call notification to the right.
2. Unlock your device.
3. Tap Decline, or Accept if asked.
Bria Mobiledeclines or starts the call.
CounterPath Corporation 320
Bria Mobile User Guide Native integration
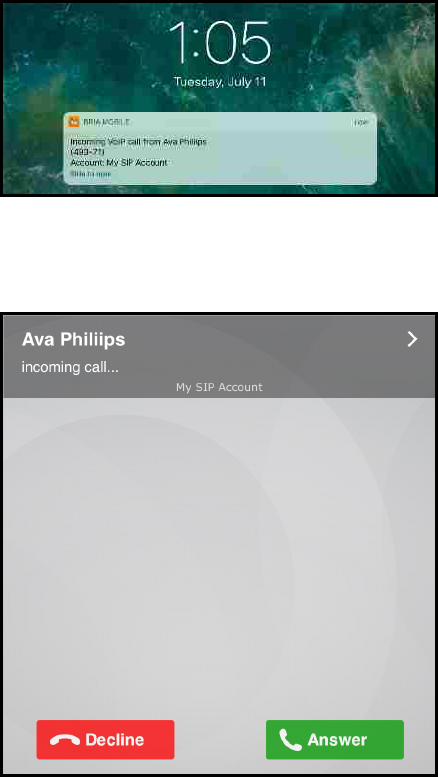
iPad
1. Swipe the call notification to the right.
2. Unlock your device.
3. Tap Decline or Answer if asked.
Bria Mobiledeclines or starts the call.
To clear a notification by swiping left
iPhone
1. Swipe the call notification to the left.
2. Tap Clear. The call continues to ring for the remote party and goes to voice mail if
CounterPath Corporation 321
Bria Mobile User Guide Native integration

you have it configured.
Bria Mobile clears the notification of the call.
iPad
1. Swipe the call notification to the left.
2. Tap Clear. The call continues to ring for the remote party and goes to voice mail if
you have it configured.
Bria Mobile clears the notification of the call.
CounterPath Corporation 322
Bria Mobile User Guide Native integration
CarPlay and Bluetooth
Using CarPlay
When Settings > Preferences > Native Integration is on, Bria Mobile can be used with
CarPlay-compatible vehicles.
l If Settings > Preferences > Improve Reachability is turned on, you may
experience audio interruptions with audio sources other than your iOS device
when Bria Mobile is running in both the foreground and the background.
l If Settings > Preferences > Improve Reachability is off, CarPlay works with any
audio source.
Requirements
l A car that supports Apple CarPlay.
l Settings > Preferences > Native Integration turned on in Bria Mobile.
l A device connected to the car via a Lightning cable.
What you can do
With CarPlay, you can:
l Answer or decline incoming Bria Mobile calls via the CarPlay interface.
l Make outgoing calls through History on the CarPlay interface for calls that were
made with Bria Mobile.
l Make outgoing calls using Siri
Ask Siri to “Call Ava Phillips with Bria Mobile” or “Call 6045551234 with Bria
Mobile".
If you make calls through Contacts on the CarPlay interface, the calls are placed
using the native dialer.
l Hear the remote party over the vehicle's sound system.
CounterPath Corporation 323
Bria Mobile User Guide CarPlay and Bluetooth

l Switch between vehicle's sound system (displayed as CarPlay on Bria Mobile),
iPhone or iPad, and other Bluetooth headsets if connected.
l Control an established Bria Mobile call, such as mute, hold, add call, swap, merge
and end.
Note: Video calls are not supported when CarPlay is used.
When native integration is disabled
When Settings > Preferences > Native Integration is off in Bria Mobile, connecting an
iPhone or iPad to your car via a Lightning cable allows you to:
l Answer Bria Mobile incoming calls on the screen on your iPhone or iPad (instead
of built-in screen in your car).
l Hear the remote party over the vehicle's sound system.
l Use Bria Mobile on your iPhone or iPad to mute, end the call, etc.
Using Bluetooth to connect to a car — iPhone
If you connect your device to your car using Bluetooth (instead of CarPlay), we
recommend that you turn on Settings > Preferences > Native Integration so you can
answer and hang up a call using car controls, such as buttons on the steering wheel,
instead of tapping on Bria Mobile’s screen.
Using Bluetooth headsets
When Settings > Preferences > Native Integration is on, you can answer and end a call
by pressing a button on your Bluetooth device. However, if you are already on a call, be
aware:
l Pressing once (or a short press) on the Bluetooth button performs End & Accept.
This means that the original call ends and the new call begins.
l Pressing twice (or a long press) performs Hold & Accept. This means that the
original call is put on hold and the new call begins.
CounterPath Corporation 324
Bria Mobile User Guide CarPlay and Bluetooth
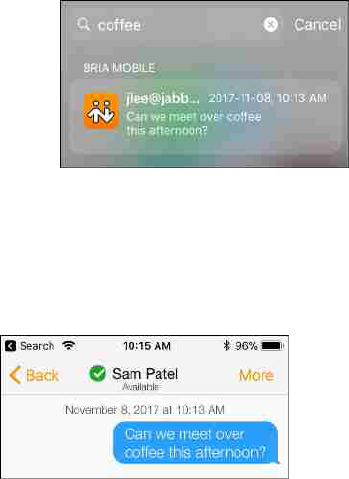
Using Spotlight search
Use the Siri Spotlight search from the Home screen to search Buddies or IMs using
name, contact number, e-mail, IM address, or phrases in IMs.
To use Spotlight search, your device must be running iOS 10 or higher and your XMPP
account must be registered.
If Spotlight search still does not work for you, check to make sure that iOS Settings > Siri
& Search > Bria Mobile > Search & Siri Suggestions is enabled. To narrow the search
results, disable iOS Settings > Siri & Search > Suggestions in Search.
To use Spotlight search
1. Make sure your XMPP account is registered.
2. From the iOSHome screen, swipe down on the middle of the your screen or swipe
right until the Spotlight search appears.
3. Type your search words in Search.
4. Scroll through the results until you find the suggestion you are looking for. Tap the
suggestion.
Bria Mobile opens to the corresponding page.
CounterPath Corporation 325
Bria Mobile User Guide Using Spotlight search
iPad Multitasking
Bria Mobile has multitasking support for iPads – you can view both Bria Mobile and
another app at the same time. iOS 11 has two ways you can view multiple apps – Slide
Over and Split View.
When you use two apps in Slide Over, one app sits on top of the other and blocks part of
the content. You can move the app in Slide Over to either side of the screen but it always
covers a portion of the app underneath.
When you use two apps in Split View, both apps adjust in size and run side-by-side. You
can adjust the size of the apps – Split View supports both apps being equal in size, or a
25/75 split.
To use Slide Over or Split View, make sure iOS Settings > General > Multitasking &
Dock > Allow Multiple Apps is turned on.
Slide Over requirements
l iOS 11 or higher
l iPad Pro, iPad (5th generation and later), iPad Air and later, or iPad mini 2 and
later
Split View requirements
l iOS 11 or higher.
l Pad Pro, iPad (5th generation and later), iPad Air 2, or iPad mini 4
Using Slide Over and Split View
Open an app directly in Slide Over or Split View or change from Slide Over to Split View.
CounterPath Corporation 326
Bria Mobile User Guide iPad Multitasking
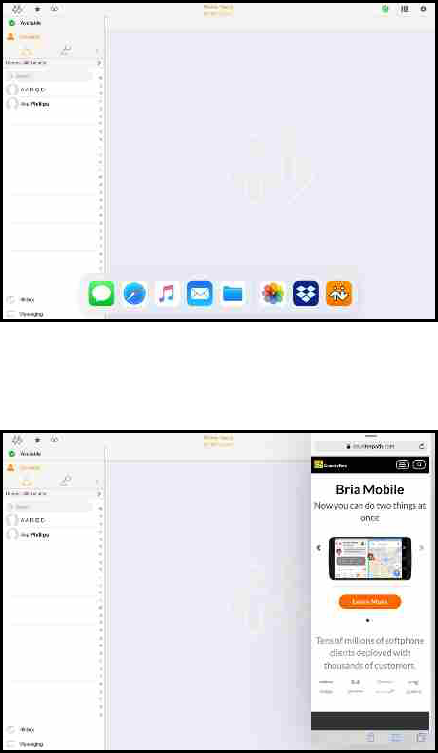
To use Slide Over
1. With Bria Mobile in the foreground, swipe up from the bottom of the screen to open
the Dock.
2. Long-press the second app you want to open and drag it off the dock. The app
opens in Slide Over on top of Bria Mobile.
The app opens in Slide Over on top of Bria Mobile.
To open Split View
From Slide Over
1. With Bria Mobile in the foreground, swipe up from the bottom of the screen to open
the Dock.
CounterPath Corporation 327
Bria Mobile User Guide iPad Multitasking
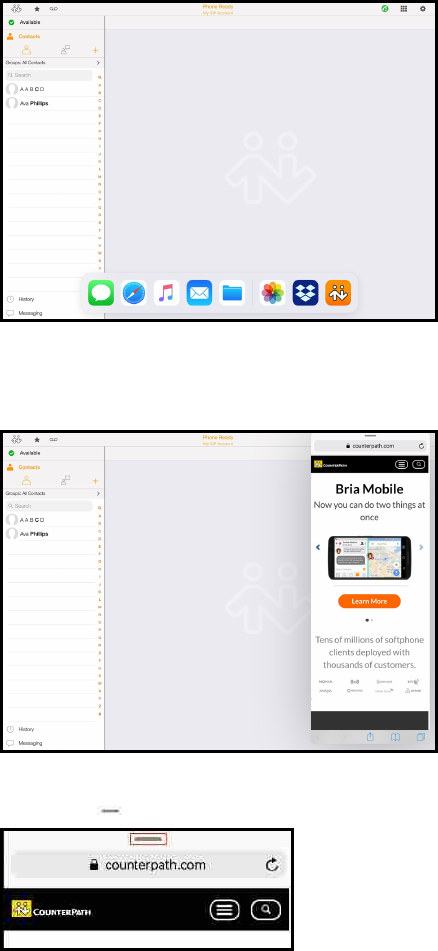
2. Long-press the second app you want to open and drag it off the dock. The app
opens in Slide Over on top of Bria Mobile.
3. Drag the Edit Handle down.
Both apps are open in Split View with the second app displayed on a quarter of the
screen.
CounterPath Corporation 328
Bria Mobile User Guide iPad Multitasking
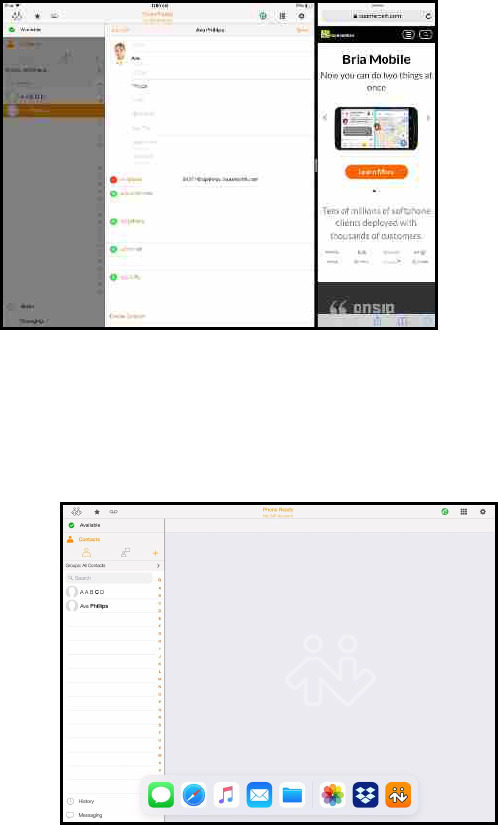
From the Dock
1. With Bria Mobile in the foreground, swipe up from the bottom of the screen to open
the Dock.
2. Long-press the second app you want to open and drag it to the far right or far left of
the screen until Bria Mobile shrinks, leaving a space beside it.
CounterPath Corporation 329
Bria Mobile User Guide iPad Multitasking
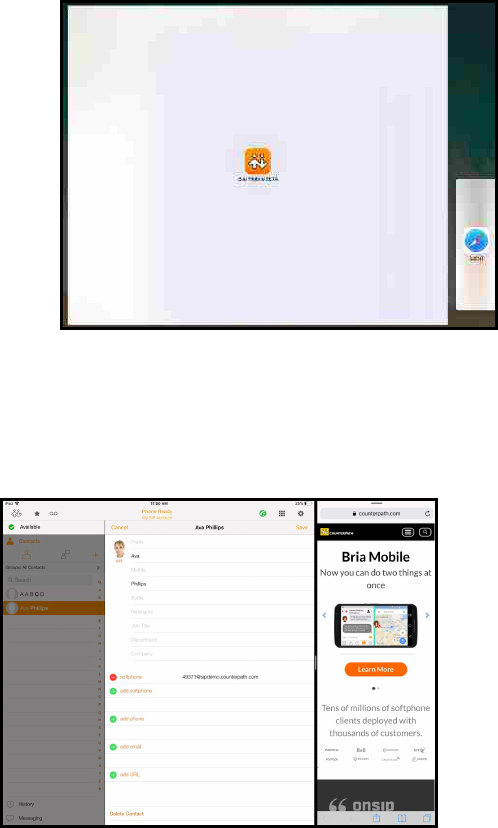
3. Release the second app.
Both apps are open in Split View with the second app displayed on a quarter of the
screen.
To adjust Split View
1. Drag the app divider to change the amount of screen each app uses.
The apps appear equal in size or one app uses a quarter of the screen.
CounterPath Corporation 330
Bria Mobile User Guide iPad Multitasking
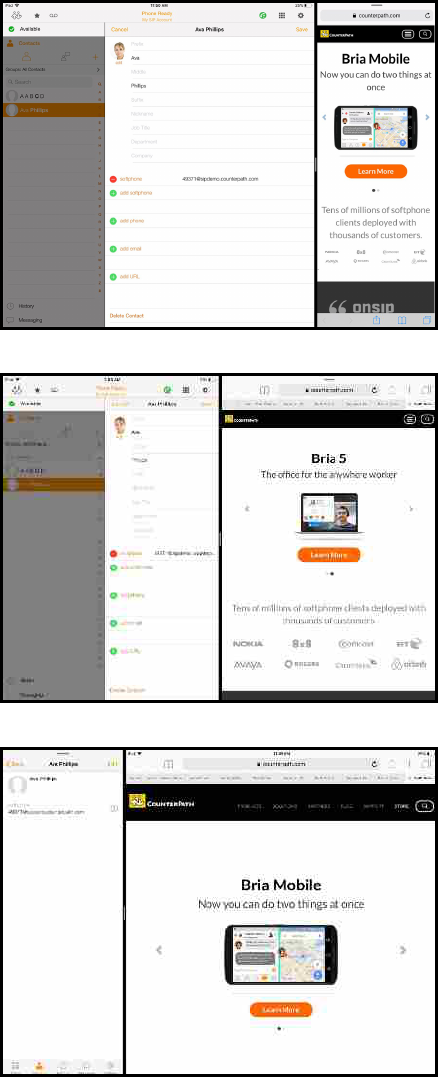
CounterPath Corporation 331
Bria Mobile User Guide iPad Multitasking

Closing Slide Over and Split View
Close Slide Over and Split View by dragging them off the screen or change Split View to
Slide Over.
To close Slide Over
1. Swipe the app in slide over off the edge of the screen.
Bria Mobile is left open in the full screen.
To close Split View
To close Split View by turning one app into Slide Over
1. Drag the Edit Handle down.
Both apps display on the screen. One app appears in Slide Over.
To close Split View by closing one app
1. Drag the app divider to the right or left side of the screen.
CounterPath Corporation 332
Bria Mobile User Guide iPad Multitasking

One app closes and the second app remains open on the full screen.
Note: The camera is not available when you are running Bria Mobile on an iPad in split view
mode. Video is not sent and you see Video Not Available on your video preview.
CounterPath Corporation 333
Bria Mobile User Guide iPad Multitasking

Glossary
3
3G/4G call
A Bria call that uses the mobile data network rather than a Wi-Fi network. If you start or receive a call when
you are not in a Wi-Fi zone, the call will be a 3G or 4G call. Not all devices supported by Bria support
mobile data.
A
account
In Bria, your account refers to your credentials used to connect with servers. These servers (SIP or XMPP
servers) are used to place calls, send messages, or indicate your presence online.
authentication
Authentication is the process of confirming a user or administrator's identity by way of a username and
password combination (their "credentials").
auto-attendant
An automated voice menu system that answers calls in place of an operator or receptionist. Callers can
navigate options using phone buttons.
B
bandwidth
In data transmission, the wider the band, the more data it is possible to transmit in a given time span. A
cable, DSL, and ADSL connection to the network provide broadband for data transmission. A dialup or
ISDN connection typically provide a narrow bandwidth for data transmission.
Bria Desktop
Bria Desktop refers to Bria softphone clients for desktop or laptop computers that run Windows or macOS.
CounterPath Corporation 334
Bria Mobile User Guide Glossary

Bria Mobile
Bria Mobile is a softphone client by CounterPath Corporation. It is available in versions for Windows,
macOS, Android, and iOS.
Bria Mobile call
A call made using Bria Mobile as compared to a native call
C
call display
A service that transmits the caller's information to the recipient. Also known as caller ID.
chat room
A chat room is a persistent session in which two or more people can have a text conversation.
client
In the context of softphones, the client is the end-user device that connects to a server when making a
voice or video call. Bria mobile is an example of a softphone client.
codec
A codec is software that encodes/decodes data, such as audio and video, for transmission and storage.
Each codec has different characteristics, and each works better in some situations than in others.
collaboration conference
A online conference that includes audio, video, screen share, and messaging.
conference
In the context of softphones, a conference is a multi-party voice or video call.
conference host
The individual who initiates a multi-person voice or video call.
credentials
Authentication credentials refer to the username and password combination used to log in.
CounterPath Corporation 335
Bria Mobile User Guide Glossary

CSV
Files in Comma-separated Values (CSV) format contain data that's organized by columns and rows, in
which the columns represent data fields and each row represents a record. Values on each row are
separated by a comma.
CTI
Computer-telephony integration. Used in Bria for Salesforce to display the Bria Sidebar
D
device
A device is a computing device that runs the softphone client, such as Bria Mobile, and includes
computers and mobile devices alike.
DNS
DNS (Domain Name System) is a system for converting named addresses into numeric IP addresses.
When given a domain name, a DNS server will return the IP address needed to connect to the domain's
particular server or device on the Internet.
DropBox token
The cloud storage service, DropBox, allows some applications to post files to individual DropBoxes. To do
this, DropBox requires a "token" — a generated string of characters — to authenticate the upload. DropBox
tokens are generated on the DropBox website.
DTMF
Dual-tone multi-frequency. The tones you hear when you press numbers on a phone. Each number
corresponds to a different tone.
E
End User Portal
End User Portal is a web-based service that allows end users to interact with Stretto to manage some of
their own services. Stretto administrators control which functions appear in the End User Portal.
H
Home button
The button at the bottom of an iPhone, iPad, or iPod touch.
CounterPath Corporation 336
Bria Mobile User Guide Glossary

HTTPS
HTTPS is a protocol for communications over a secure network connection.
hyperlink
A clickable item (words or an image) that links a reader to another document or location.
I
ICE
Interactive Connectivity Establishment. A method for traversing a firewall.
IM
Instant message. A brief text message sent from one person to another with near instantaneous delivery.
IP address
A unique number that identifies a device. Devices on a network use IP addresses to communicate with
each other.
ITSP
An Internet Telephony Service Provider (ITSP) is an entity that provides voice-over-IP services.
IVR
Interactive Voice Response. An automated voice menu system that answers calls in place of an operator
or receptionist. Callers can navigate options using phone buttons.
L
LDAP
LDAP (Lightweight Directory Access Protocol) is a software protocol for interacting with an Active
Directory services database, which can be used for user authentication.
M
media
The audio and video portions of a call. Compare with signalling.
CounterPath Corporation 337
Bria Mobile User Guide Glossary

MWI
Message Waiting Indicator. An indicator, such as an icon or a light, that shows when a voicemail message
has arrived.
N
NAT Emulation
A setting in your SIP account that can be used when you are using the Bria Push Service. If your VoIP
service provider uses a session border controller, turn this setting on. The Bria Push Service will act as if it
is behind a NAT by using a private IP address.
native call
A call made using the phone service that comes with a iPhone or smartphone.
native phone service
The phone service that comes with an iPhone or smartphone.
notification
A popup, banner, or other message that tells you of an event, such as an incoming call or message. Some
notifications may allow you to respond by clicking an icon or button.
P
pan
A gestured used to move an image around your screen. Move your finger across the screen to pan the
image.
pinch
A gesture used to decrease the size of images on touch screen devices. Place two fingers on the screen
an move them together.
presence
An instant messaging feature that allows uses to share information about their online status.
provisioning
Provisioning involves the process of remotely setting up devices, such as softphones, to use particular
services and resources.
CounterPath Corporation 338
Bria Mobile User Guide Glossary

PSTN
Public Switch Telephone Network. The traditional landline telephone network.
R
remote update
Remote update is a process in which a Bria client connects to Stretto to retrieve the latest provisioning
settings. This is not the same as a remote upgrade.
remote upgrade
Remote upgrade is a procedure in which Bria desktop requests a the newer software version, if it's
available. This is not the same as a remote update.
S
signaling
The information in a call that deals with establishing and controlling the connection, and managing the
network. Compare with media.
Single Device Emulation
A registration mode for the Bria Push Service Registration Mode setting that is used when your VoIP
service provider does not support multiple registrations. If your VoIP service provider does not support
multiple registrations, this setting is used so the registration is handed off between Bria Mobile and the
Bria Push Service as required.
SIP
SIP (Session Initiation Protocol) is a software protocol for controlling voice and video communication
sessions. A SIP server manages Bria Mobile calls on a network.
SIP account
An account that provides the user with the ability to make VoIP calls. The account encapsulates the rules
and functions the user can access.
SIP Proxy
A setting in your SIP account that can be used when you have turned on the Bria Push Service. Complete
this setting with your outbound proxy if your VoIP service provider requires you to use different SIP proxies
for Bria Mobile and the Bria Push Service to communicate with the PBX.
CounterPath Corporation 339
Bria Mobile User Guide Glossary

SIP SIMPLE
A SIP protocol for presence and instant messaging.
softphone
A softphone is a software application for making phone calls over the Internet instead of through
dedicated hardware.
softphone address
The address used to connect to a SIP endpoint. The "phone number" used in a VoIP phone call. For
example, sip:joseph@domainA.com.
stretch
A gesture used to enlarge images on touch screen devices. Place two fingers on the screen a separate
them.
STUN
Simple Traversal of UDP through a firewall or NAT.
T
TURN
Traversal Using Relays around NAT. Like STUN, it is a network protocol/packet format (IETF RFC 5766)
used to assist in the discovery of paths between peers on the Internet. It differs from STUN in that it uses a
public intermediary relay to relay packets between peers.
V
vCard
An electronic business card that is often attached to an email. If often appears as a signature block that
identifies the person, their title, and their business.
VoIP service provider
A business that provides a Voice over Internet Protocol (VoIP) service, allowing a user to connect to the
internet in order to make VoIP calls using Bria. The VoIP service provider sets up a SIP account for the
user.
CounterPath Corporation 340
Bria Mobile User Guide Glossary

W
Wi-Fi call
A Bria call made over the Wi-Fi Internet. To make a Wi-Fi call, you must be in a Wi-Fi zone.
X
XML
XML (eXtensible Markup Language) is a file format that uses tags to structure data for storage or retrieval.
XMPP
XMPP (or Extensible Messaging and Presence Protocol) is a collection of technologies that support
mesages, chat rooms, voice/video calls, and presence information.
XMPP account
An account that provides the user with the ability to send IMs and view other people's presence.
XMPP Buddy
"Buddy" is the XMPP-specific term for an XMPP chat contact.
Z
zip file
A .zip file is a type of archive file that can contain compressed files and folders.
CounterPath Corporation 341
Bria Mobile User Guide Glossary
